Create an Azure MySQL Database service
You now have the compute service that will host your applications and the config server that will be used by your migrated application. Before you start deploying individual microservices as Azure Container Apps, you need to first create an Azure Database for MySQL Flexible Server-hosted database for them. To accomplish this, you can use the following guidance:
You will also need to update the config for your applications to use the newly provisioned MySQL Server. This will involve updating the application.yml config file in your private git config repo with the values provided in the MySQL Server connection string.
Your MySQL database will also have a firewall enabled. This firewall will by default block all incoming calls. You will need to open this firewall in case you want to connect to it from your microservices running in the ACA environment.
Step by step guidance
- Run the following commands to create an instance of MySQL Flexible server. Note that the name of the server must be globally unique, so adjust it accordingly in case the randomly generated name is already in use. Keep in mind that the name can contain only lowercase letters, numbers and hyphens. In addition, replace the
<sqladmin-password>placeholder with a complex password and record its value.Here we use mysql admin password for apps to connect to sql server, this is for demo/test/learn purpose, not recommand in production environment. Please refer to Lab 04: Connect to Database securely using identity for the secured managed identity solution.
MYSQL_SERVER_NAME=mysql-$APPNAME-$UNIQUEID
MYSQL_ADMIN_USERNAME=sqladmin
MYSQL_ADMIN_PASSWORD="<sqladmin-password>"
DATABASE_NAME=petclinic

az mysql flexible-server create \
    --admin-user myadmin \
    --admin-password "$MYSQL_ADMIN_PASSWORD" \
    --name "$MYSQL_SERVER_NAME" \
    --resource-group "$RESOURCE_GROUP"
During the creation you will be asked whether access for your IP address should be added and whether access for all IP’s should be added. Answer
nfor no on both questions.In case this statement fails with the message
ERROR: Unable to prompt for confirmation as no tty available, add the--yesflag to the above statement. This will auto-install any missing resource providers.Wait for the provisioning to complete. This might take about 3 minutes.
-
Once the Azure Database for MySQL Flexible Server instance gets created, it will output details about its settings. In the output, you will find the server connection string. Record its value since you will need it later in this exercise.
-
Run the following commands to create a database in the Azure Database for MySQL Flexible Server instance.
az mysql flexible-server db create \ --server-name $MYSQL_SERVER_NAME \ --resource-group $RESOURCE_GROUP \ -d $DATABASE_NAME -
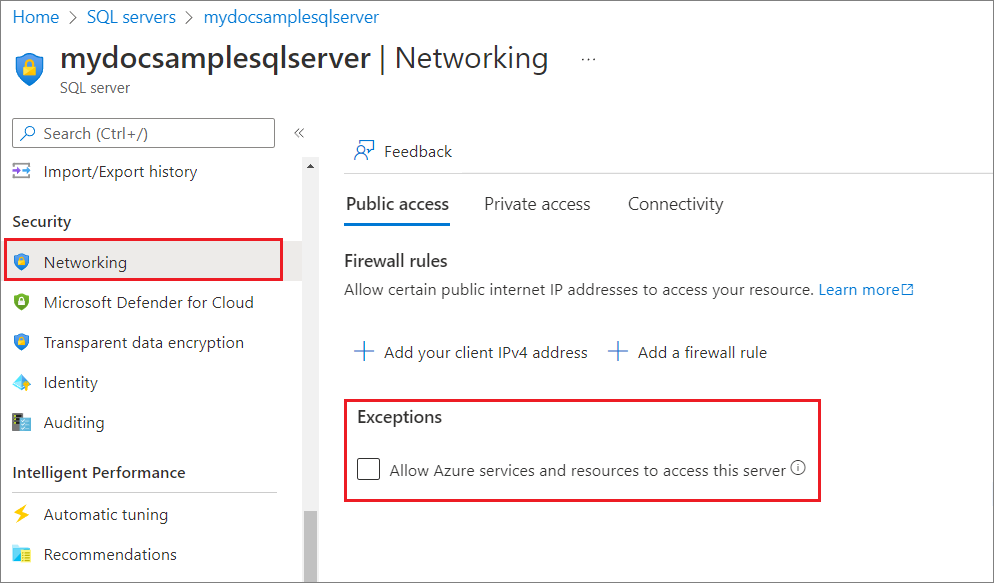
You will also need to allow connections to the server from your ACA environment. For now, to accomplish this, you will create a server firewall rule to allow inbound traffic from all Azure Services.
Check the status of your sql server
Checking
Allow Azure services and resources to access this serveradds an IP based firewall rule with start and end IP address of0.0.0.0, See Connections from inside Azure.This way your apps running in Azure Container Apps will be able to reach the MySQL database. In one of the upcoming exercises, you will restrict this connectivity to limit it exclusively to the apps hosted by your ACA.
 az mysql flexible-server firewall-rule create \
     --rule-name allAzureIPs \
     --name $MYSQL_SERVER_NAME \
     --resource-group $RESOURCE_GROUP \
     --start-ip-address 0.0.0.0 --end-ip-address 0.0.0.0
Check the sql server firewall rules with command
az mysql flexible-server firewall-rule list \ --name $MYSQL_SERVER_NAME \ --resource-group $RESOURCE_GROUP \ -
From the Git Bash window, in the config repository you cloned locally, use your favorite text editor to open the application.yml file. Replace the full contents of the application.yml file with the contents of this application.yml file. The updated application.yml file includes the following changes:
- It removes the default
0value for theserver.porton line 5. - It changes the default
spring.sql.initvalues to usemysqlconfiguration on lines 15 to 19. - It adds a
spring.datasourceproperty for your mysql database on lines 10 to 14. - It adds extra
eurekaconfig on lines 61 to 66. - It removes the
chaos-monkeyandmysqlprofiles.
- It removes the default
-
In the part you pasted, update the values of the target datasource endpoint on line 6, the corresponding admin user account on line 7, and its password on line 8 to match your configuration. Set these values by using the information in the Azure Database for MySQL Flexible Server connection string you recorded earlier in this task.
-
Save the changes and push the updates you made to the application.yml file to your private GitHub repo by running the following commands from the Git Bash prompt:
git add .
git commit -m 'azure mysql info'
git push
At this point, the admin account user name and password are stored in clear text in the application.yml config file. In one of upcoming exercises, you will remediate this potential vulnerability by removing clear text credentials from your configuration.