Integrate AI into your existing project
In this chapter, we will learn how to create AI Java applications using Azure OpenAI and Spring AI.
Start from a simple spring boot application, we will add AI components to the project and leverage AI to integrate with existing the petclinic solution we deployed in this lab.
Step by step guide
-
We have simple sample saved in the tools directory, copy it under the folder
spring-petclinic-microservices:cp -r ../tools/spring-petclinic-chat-service . -
Open the chat-service project in VSCode
code spring-petclinic-chat-serviceNote we already have spring-ai dependencies in
pom.xml:<spring-ai.version>1.0.0-M4</spring-ai.version>and
<dependency> <groupId>org.springframework.ai</groupId> <artifactId>spring-ai-azure-openai-spring-boot-starter</artifactId> </dependency> -
In the VSCode IDE, make sure you have extension
Github Copilot Chatinstalled, and login to Copilot with your github account.Open the Github Copilot Chat Window, you can ask copliot in the “Ask Copilot” input box.
-
Create a file for your system prompt.
Create file
src/main/resources/prompts/system-message.stwith contentYou are a chatbot good at telling jokes. -
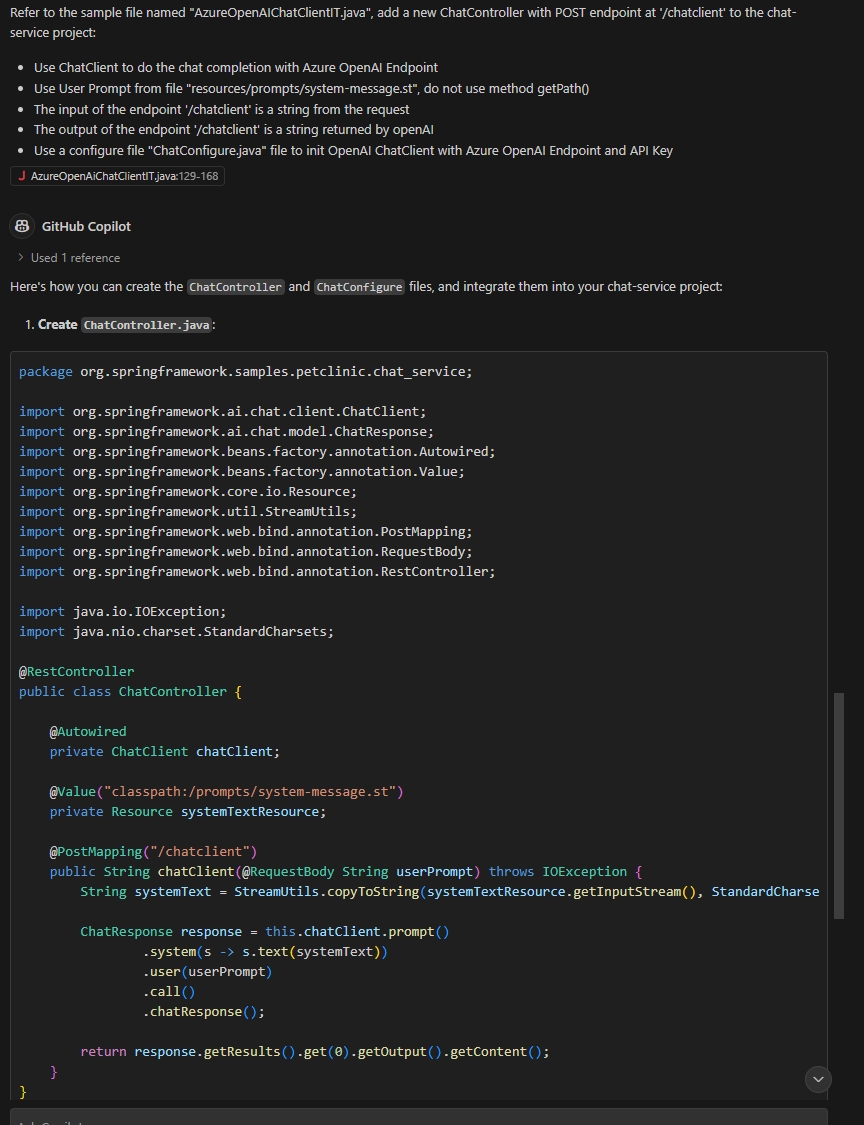
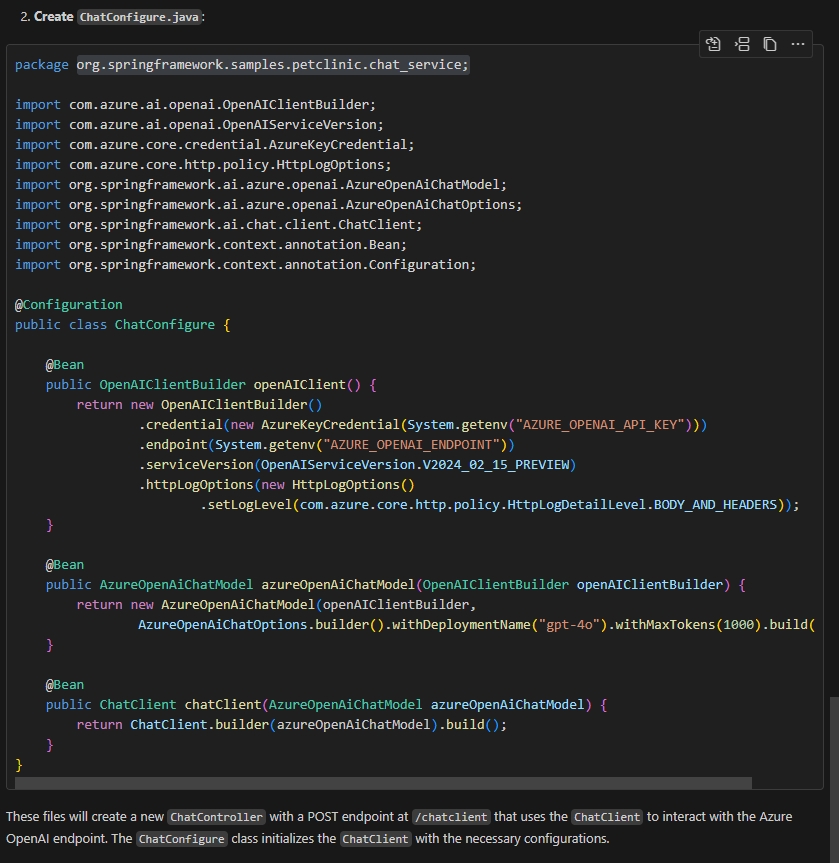
Ask Copilot to create code for open AI integration.
Click the file
src/main/resources/AzureOpenAiChatClientIT.java, note the file name will show in the “Ask Copilot” input box as “Current file context”.Input the following prompt to “Ask Copilot”:
Refer to the sample file named "AzureOpenAIChatClientIT.java", add a new ChatController with POST endpoint at '/chatclient' to the chat-service project:
* Use ChatClient to do the chat completion with Azure OpenAI Endpoint
* Use User Prompt from file "resources/prompts/system-message.st", do not use method getPath()
* The input of the endpoint '/chatclient' is a string from the request
* The output of the endpoint '/chatclient' is a string returned by openAI
* Use a configure file "ChatConfigure.java" file to init OpenAI ChatClient with Azure OpenAI Endpoint and API Key
You will see output like:
-
Follow the steps to make changes to the project.
In the VSCode terminal (current directory
spring-petclinic-chat-service), run maven command to build the project:mvn clean packageFix the erorrs if there are any.
-
Verify the chat endpoint.
- In the VSCode terminal, set the endpoint and api-key of your open ai instance, and run the app:
export AZURE_OPENAI_API_KEY="<OPENAI-API-KEY>"
export AZURE_OPENAI_ENDPOINT="<OPENAI-ENDPOINT>"

mvn spring-boot:run
Ignore the warnings on
c.n.discovery.InstanceInfoReplicator.- In your commandline environment, verify the ‘/chatclient’ endpoint with simple command:
curl -XPOST http://localhost:8080/chatclient -d 'Hi, tell a joke'You will get a joke generated by OpenAI. Congratulations!
-
Deploy the
chat-serviceto your Container Apps Environment.In your commandline environment (current directory
spring-petclinic-microservices), run:APP_NAME=chat-service AZURE_OPENAI_API_KEY="<AZURE-OPENAI-API-KEY>" AZURE_OPENAI_ENDPOINT="<AZURE-OPENAI-ENDPOINT>" cp -f ../tools/Dockerfile ./spring-petclinic-$APP_NAME/Dockerfile az containerapp create \ --name $APP_NAME \ --resource-group $RESOURCE_GROUP \ --environment $ACA_ENVIRONMENT \ --source ./spring-petclinic-$APP_NAME \ --registry-server $MYACR.azurecr.io \ --registry-identity $APPS_IDENTITY_ID \ --ingress external \ --target-port 8080 \ --min-replicas 1 \ --max-replicas 1 \ --env-vars AZURE_OPENAI_API_KEY="$AZURE_OPENAI_API_KEY" AZURE_OPENAI_ENDPOINT="$AZURE_OPENAI_ENDPOINT" \ --bind $JAVA_EUREKA_COMP_NAME \ --runtime javaIn your browser navigate to the Azure portal and find the container app
chat-service. Check the details.Verify chat-service in Azure Container Apps.
CHAT_URL=$(az containerapp show \ --resource-group $RESOURCE_GROUP \ --name $APP_NAME \ --query properties.configuration.ingress.fqdn \ -o tsv) curl -XPOST https://$CHAT_URL/chatclient -d 'Hi, tell a joke' -
Function Calling with SpringAI
In this section, we will implement a basic RAG (Retrieval-Augmented Generation) pattern using Spring AI. The Retrieval-Augmented Generation (RAG) pattern is an industry standard approach to building applications that use large language models to reason over specific or proprietary data that is not already known to the large language model. This is critical because Azure Open AI model that we integrated in the previous step don’t know anything about the PetClinic application. Refer to Spring AI FunctionCallback API for more information.
The Spring AI API is under development and the interface may change time to time. At this moment, we are using the API version
1.0.0-M4in this sample.In this sample, we will implement a FunctionCallback interface for AI to get the owners information from existing petclinic solution.
- Create a new
Owner.javafor owner details.
package org.springframework.samples.petclinic.chat_service; import lombok.Data; import java.io.Serializable; @Data public class Owner implements Serializable { private Integer id; private String firstName; private String lastName; private String address; private String city; private String telephone; }- Create a new file
OwnerService.javato retrieve owner info fromapi-gateway.
package org.springframework.samples.petclinic.chat_service; import java.util.List; import org.springframework.core.ParameterizedTypeReference; import org.springframework.http.HttpMethod; import org.springframework.stereotype.Service; import org.springframework.web.client.RestTemplate; @Service public class OwnerService { public List<Owner> getOwners() { RestTemplate restTemplate = new RestTemplate(); var responseEntity = restTemplate.exchange( "http://api-gateway/api/customer/owners", HttpMethod.GET, null, new ParameterizedTypeReference<List<Owner>>() { }); List<Owner> owners = responseEntity.getBody(); return owners; } }-
Add FunctionCallbacks to chat client.
First Add an attribute to ChatController”
@Autowired
private OwnerService ownerService;
Add Functions to chat client. The new code segment would like, see the
functionspart.ChatResponse response = this.chatClient.prompt() .system(s -> s.text(systemText)) .user(userPrompt) .functions(FunctionCallback.builder() .description("list all owners") .method("getOwners") .targetObject(ownerService) .build()) .call() .chatResponse();Fix the
importissues with the help of VSCode. -
Update the content in file
prompts/system-message.stto
You are a friendly AI assistant designed to help with the management of a veterinarian pet clinic called Spring Petclinic. Your job is to answer questions about and to perform actions on the user's behalf, mainly around veterinarians, owners, owners' pets and owners' visits. You are required to answer an a professional manner. If you don't know the answer, politely tell the user you don't know the answer, then ask the user a followup question to try and clarify the question they are asking. If you do know the answer, provide the answer but do not provide any additional followup questions. When dealing with vets, if the user is unsure about the returned results, explain that there may be additional data that was not returned. Only if the user is asking about the total number of all vets, answer that there are a lot and ask for some additional criteria. For owners, pets or visits - provide the correct data.- Rebuild the project in the VSCode termimal window (current directory spring-petclinic-chat-service):
mvn clean package -DskipTests- Update the chat-service in your commandline window (current directory spring-petclinic-microservices):
az containerapp update --name $APP_NAME --resource-group $RESOURCE_GROUP \
    --source ./spring-petclinic-$APP_NAME
Verify the AI integrated with spring petclinic output:
curl -XPOST https://$CHAT_URL/chatclient -d 'list the names of the owners'

curl -XPOST https://$CHAT_URL/chatclient -d 'list the owners from Madison'
You may create more owners in the api-gateway page and ask more questions on the owners. Note, here we only implemented the owner function.
- Create a new
-
Here we have finished the first function for AI component to communicate with the existing system. Future more:
- You may add more functions to empower the AI strenght. Just like the getOwners sample.
- You may integration a chatbox in the api-gateway page. see Chatbox in api-gateway.
(Optional) Integrate the chat client into api-gateway
-
Update service
api-gatewayto add a new chat window.- Add new route entry for
chat-service. Note this name will be used later. Open filespring-petclinic-api-gateway/src/main/resources/application.ymland append new entry like below:
- id: chat-service uri: lb://chat-service predicates: - Path=/api/chat/** filters: - StripPrefix=2- Add chatbox for api gateway
git apply -f ../tools/api-gateway-chatbox.patch- Rebuild the api-gateway project and update the container app.
APP_NAME=api-gateway mvn clean package -DskipTests -pl spring-petclinic-$APP_NAME az containerapp update --name $APP_NAME --resource-group $RESOURCE_GROUP \ --source ./spring-petclinic-$APP_NAME- Check the new chatbox in the petclinic page.
api_gateway_FQDN=$(az containerapp show \
  --resource-group $RESOURCE_GROUP \
  --name $APP_NAME \
  --query properties.configuration.ingress.fqdn \
   -o tsv)

echo https://$api_gateway_FQDN
Open the api-gateway url and there is a chatbox at the right bottom corner.

- Add new route entry for
-
Verify the new RAG empowered AI bot about owners.

(Optional) Prepare the simple project
-
Create a project from spring initializr:
curl https://start.spring.io/starter.tgz \ -d dependencies=web,cloud-eureka,actuator,lombok,spring-ai-azure-openai \ -d name=chat-service -d type=maven-project \ -d jvmVersion=17 -d language=java -d packaging=jar \ -d groupId=org.springframework.samples.petclinic -d artifactId=chat-service \ -d description="Spring Petclinic Chat Service" \ | tar -xzvf - -C spring-petclinic-chat-service -
Update
application.propertiestoapplication.ymlspring: application: name: chat-service -
Version
Verify the version of spring-ai is
1.0.0-M4Download the template file from branch
1.0.0-M4IT_FILE="https://raw.githubusercontent.com/spring-projects/spring-ai/refs/heads/1.0.0-M4/models/spring-ai-azure-openai/src/test/java/org/springframework/ai/azure/openai/AzureOpenAiChatClientIT.java" wget $IT_FILE -P spring-petclinic-chat-service/src/main/resources/ -
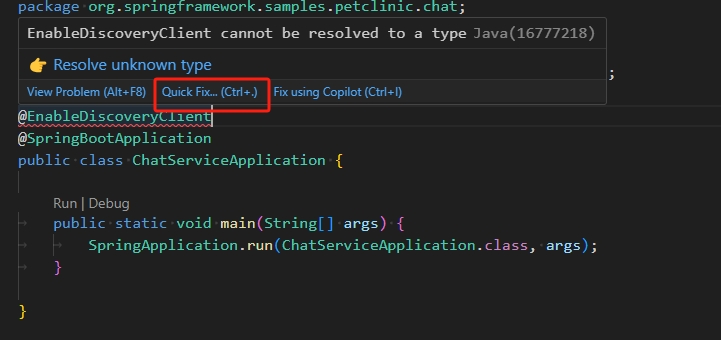
Enable Eureka Client in class
ChatServiceApplication: