Create an AI application from scratch for the Petclinic workload
In this section, you’ll learn how to create an AI-enabled Java application using Azure OpenAI and Spring AI. You’ll then configure this application to answer questions about the sample Spring Petclinic application that you’ve deployed and configured in previous labs.
You’ll start by creating a new Spring Boot service application that connects with your Azure OpenAI instance. Then you’ll use this application to implement a simple chatbot that takes advantage of the Azure OpenAI GPT-4o model, learning how to seamlessly integrate AI into your existing Spring Petclinic application as you go.
Prerequisites:
- A GitHub Copilot subscription. (If you don’t already have a subscription, try GitHub Copilot Free.)
- The GitHub Copilot Chat extension installed in your copy of Visual Studio Code.
- A prepared Azure OpenAI instance with the
gpt-4omodel deployed. For more details, refer to the instructions in previous section of this lab. - The
endpointandapi-keyvalues for your Azure OpenAI instance. You can find these by going to your Azure OpenAI instance in the Azure portal and looking in theResource Management>Keys and Endpointsection.
Step by step guidance
Create a new Spring Boot application
Your first step in this process is to create a new Spring Boot application:
-
Use the spring initializr tool to create a new Spring Boot application. When you create the new application, you’ll need to specify the following dependencies:
- Spring Web (
web). Supports the base Spring Boot app functionality. - Eureka Discovery Client (
cloud-eureka). Supports locating other component applications within overall workload. - Spring Boot Actuator (
actuator). Supports endpoints that help monitor and manage your application. - Lombok (
lombok). A Java annotation library, which helps to reduce boilerplate code. - Azure OpenAI (
spring-ai-azure-openai). Spring AI support for Azure OpenAI.
You’ll also need to provide additional settings, such as project type, Java code details, and naming to match the structure of the existing Spring Petclinic application.
To create the new Spring Boot application using these settings, in your command-line window, go to the
spring-petclinic-microservicesfolder of your local code repo and run the following command:mkdir spring-petclinic-chat-service curl https://start.spring.io/starter.tgz \ -d dependencies=web,cloud-eureka,actuator,lombok,spring-ai-azure-openai \ -d name=chat-service -d type=maven-project \ -d jvmVersion=17 -d language=java -d packaging=jar \ -d groupId=org.springframework.samples.petclinic -d artifactId=chat \ -d description="Spring Petclinic Chat Service" \ | tar -xzvf - -C spring-petclinic-chat-service - Spring Web (
-
Open the newly created application folder in Visual Studio Code.
code spring-petclinic-chat-service -
In Visual Studio Code, open the
pom.xmlfile and find thespring-ai.versionvalue for the project.<spring-ai.version>1.0.0-M6</spring-ai.version> -
In your command-line window, save this version number as an environment variable for later use (modifying the version number to match the value you see in your actual
pom.xmlfile).SPRING_AI_VERSION=<spring-ai.version>
Generate AI code using Github Copilot
GitHub Copilot is a specially trained language model that you can use to generate code snippets. However, since the Spring AI project that you’ll be using to interact with Azure OpenAI is relatively new, Copilot may not have the context and data required to create Spring AI code. To overcome this potential limitation, you can use prompt engineering to provide the contextual information that Copilot needs.
To do this, you’ll download a version-appropriate example code file from the Spring AI project and then submit it as a part of your Copilot code generation prompt.
-
Download the version-appropriate Spring AI chat client sample code to your local environment.
In your command-line window, go to the directory
spring-petclinic-microservicesand run the following commands:TEST_FILE="https://raw.githubusercontent.com/spring-projects/spring-ai/refs/heads/${SPRING_AI_VERSION}/models/spring-ai-azure-openai/src/test/java/org/springframework/ai/azure/openai/AzureOpenAiChatClientIT.java" curl $TEST_FILE -o spring-petclinic-chat-service/src/main/resources/AzureOpenAiChatClientIT.java -
In Visual Studio Code, open the
Github Copilot Chatwindow and select theChatServiceApplication.javafile. The file name appears in the “Ask Copilot” input box as “Current file context”. -
Drag the file
src/main/resources/AzureOpenAiChatClientIT.javato the “Ask Copilot” window. Note that the file name appears in the “Ask Copilot” input box.
-
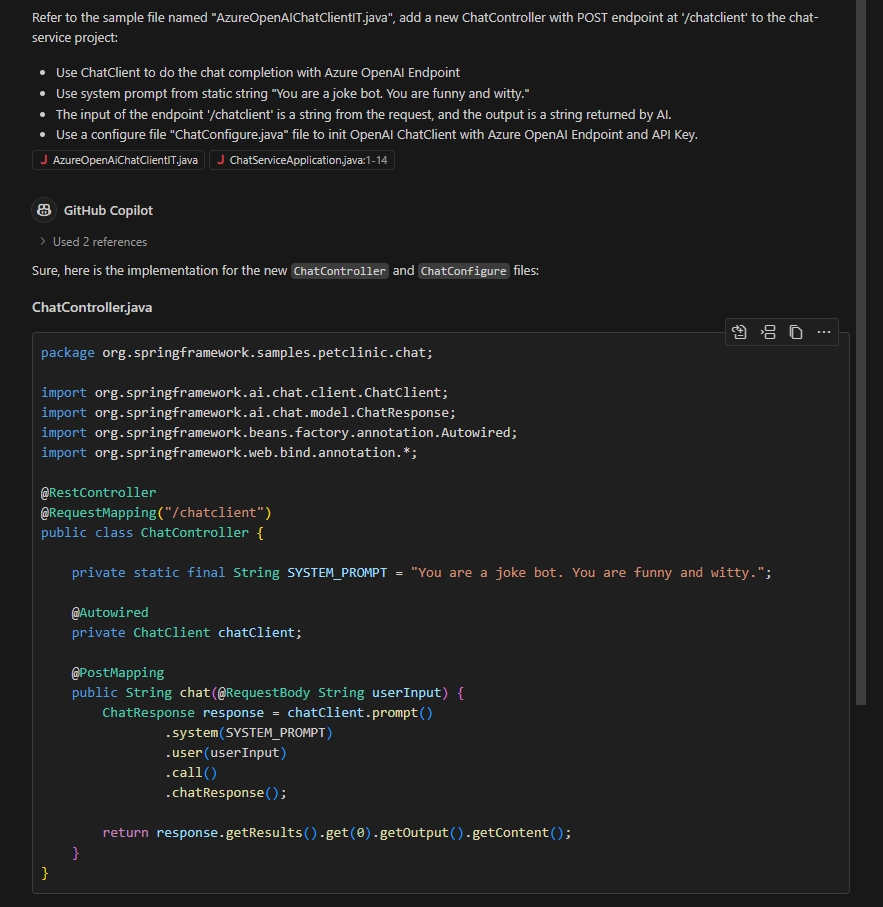
Enter the following text in the “Ask Copilot” input box:
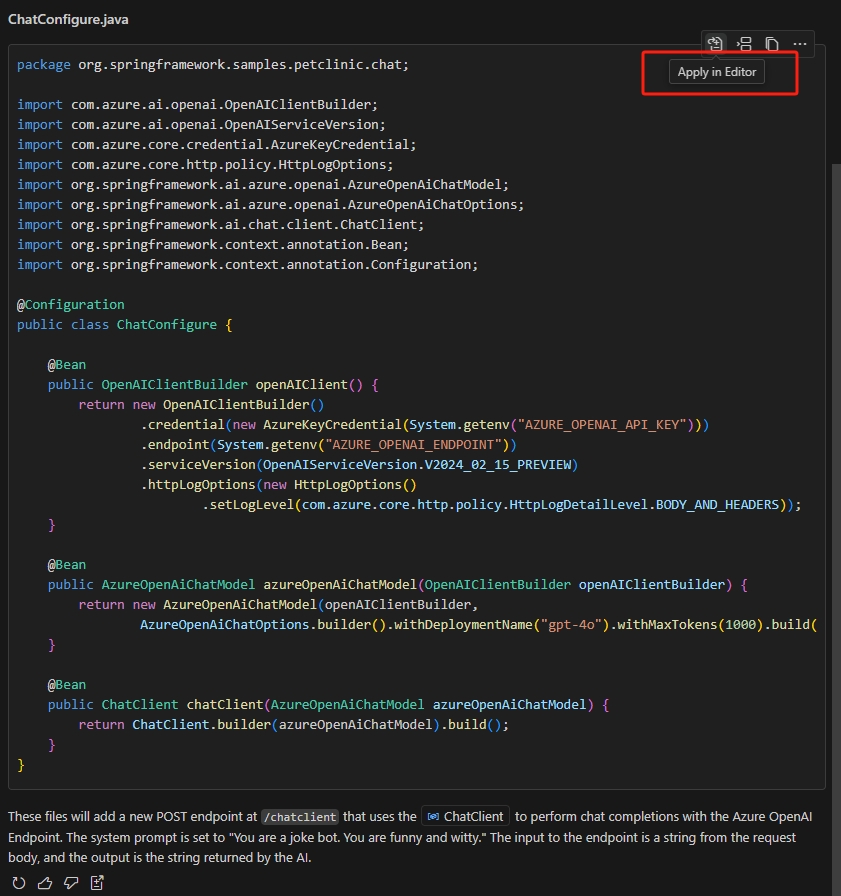
You are a Java engineer who wants to write your first AI empowered service and you’re going to start a new project from some samples.
Refer to the sample file named "AzureOpenAIChatClientIT.java", add a new ChatController class with POST endpoint at '/chatclient' to the chat-service project:
* Use ChatClient to do the chat completion with Azure OpenAI Endpoint
* Use the system prompt from this static string: "You are a joke bot. You are funny and witty."
* The input of the endpoint '/chatclient' is a string from the request, and the output is a string returned by AI.
* Use a configure file "ChatConfigure.java" file to init OpenAI ChatClient with Azure OpenAI Endpoint and API Key.
You’ll notice a screen that looks like this:
Follow the recommended steps to make changes to your project. To apply any AI-generated code snippets, select the Apply button at the top right of the sample code box, and complete any subsequent prompts to create or modify files as Copilot recommends:
The AI-generated code may not always be the same and is sometimes incorrect. If you run into errors, try repeating these steps to regenerate it.
Build and run your new AI application
Now that your project is updated with the Copilot-generated code, you’re ready to build the new application and test it in your local development environment.
-
In your Visual Studio Code terminal, build the new AI project.
mvn clean package -DskipTestsReview the code generated by GitHub Copilot. For more information on configuration properties, refer to Azure OpenAI chat properties.
You might need to implement some minor fixes in the AI-generated code. The most common fix involves modifying the following line in the ChatController.java file:
response.getResults().get(0).getOutput().getText()–>response.getResults().get(0).getOutput().getContent() -
Now you’ll run the new project locally.
After a successful build, use your Visual Studio Code terminal to run the project.
export AZURE_OPENAI_API_KEY="<AZURE-OPENAI-API-KEY>" export AZURE_OPENAI_ENDPOINT="<AZURE-OPENAI-ENDPOINT>" mvn spring-boot:run -
In another command-line window, verify that the application is running by making the following call:
curl -XPOST http://localhost:8080/chatclient -d 'tell a joke'
You now have a functioning AI-powered joke bot!
Deploy your new chat-service to your Container Apps environment
With your chat-service app built and working, you’re ready to deploy it to your Container Apps environment alongside the other components of the Spring Petclinic application.
-
In your command-line environment, run the following command to deploy the app:
APP_NAME=chat-service AZURE_OPENAI_API_KEY="<AZURE-OPENAI-API-KEY>" AZURE_OPENAI_ENDPOINT="<AZURE-OPENAI-ENDPOINT>" cp -f ../tools/Dockerfile ./spring-petclinic-$APP_NAME/Dockerfile az containerapp create \ --name $APP_NAME \ --resource-group $RESOURCE_GROUP \ --environment $ACA_ENVIRONMENT \ --source ./spring-petclinic-$APP_NAME \ --registry-server $MYACR.azurecr.io \ --registry-identity $APPS_IDENTITY_ID \ --ingress external \ --target-port 8080 \ --min-replicas 1 \ --env-vars AZURE_OPENAI_API_KEY="$AZURE_OPENAI_API_KEY" AZURE_OPENAI_ENDPOINT="$AZURE_OPENAI_ENDPOINT" \ --bind $JAVA_EUREKA_COMP_NAME \ --runtime java -
Get the endpoint of the newly deployed chat service application.
CHAT_URL=$(az containerapp show \ --resource-group $RESOURCE_GROUP \ --name $APP_NAME \ --query properties.configuration.ingress.fqdn \ -o tsv) -
Verify that the endpoint is working by using curl.
curl -XPOST https://$CHAT_URL/chatclient -d 'Hi, tell a joke'
Congratulations, your joke bot is running on Azure Container Apps!
Empower your AI service to support the Petclinic project
Getting this initial joke bot deployed is a good first step in understanding how to use Azure OpenAI within Spring applications. However, to make it useful for the Petclinic application, you’ll have to make some changes to how the bot works.
-
First you’ll enable the discovery client so that the chat service can find other application components of the Spring Petclinic workload.
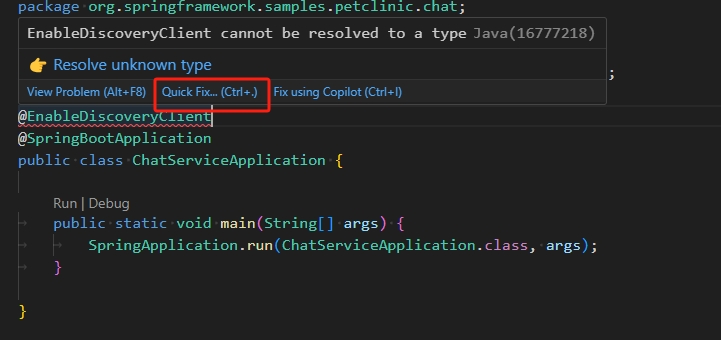
Open the
ChatServiceApplication.javafile in the AI chat project, and add the@EnableDiscoveryClientannotation to theChatServiceApplicationclass. This enables the new chat service to find other registered services.To update the code and fix any alerts, use the Visual Studio Code hint feature, as shown in the following screenshot.
-
Next, update the system prompt to tell the AI service application to help Petclinic app users.
In the
ChatController.javafile, replace the system prompt with the following statement:private static final String SYSTEM_PROMPT = """ You are a friendly AI assistant designed to help with the management of a veterinarian pet clinic called Spring Petclinic. Your job is to answer questions about and to perform actions on the user's behalf, mainly around veterinarians, owners, owners' pets and owners' visits. You are required to answer in a professional manner. If you don't know the answer, politely tell the user you don't know the answer, then ask the user a follow-up question to try and clarify the question they are asking. If you do know the answer, provide the answer but do not provide any additional follow-up questions. When dealing with vets, if the user is unsure about the returned results, explain that there may be additional data that was not returned. Only if the user is asking about the total number of all vets, answer that there are a lot and ask for some additional criteria. For owners, pets or visits - provide the correct data. """; -
Now, you’ll extend the functionality of the bot by implementing Spring AI function calling.
To do this, you’ll implement a basic Retrieval-Augmented Generation (RAG) pattern using Spring AI. This pattern is an industry-standard approach to building language model–based applications which use specific or proprietary data that is not already known to an AI model. You’ll need to use this method to help Azure OpenAI interact with the Petclinic application and provide relevant responses using Petclinic data.
For more information about how Spring AI supports these capabilities, refer to the Spring AI FunctionCallback API documentation.
The Spring AI API is under development and the interface may change over time. In this sample, we’re using the
$SPRING_AI_VERSIONAPI version.In the following steps, you’ll implement a FunctionCallback interface which allows the AI to get pet owner information that’s stored in your existing Spring Petclinic application.
-
Create a new folder named
modeland add a classOwnerin that folder for owner details.package org.springframework.samples.petclinic.chat.model; import lombok.Data; import java.io.Serializable; @Data public class Owner implements Serializable { private Integer id; private String firstName; private String lastName; private String address; private String city; private String telephone; } -
Create a new folder named
services, and create the classOwnerServicein that folder to retrieve owner info fromapi-gateway.package org.springframework.samples.petclinic.chat.services; import java.util.List; import org.springframework.core.ParameterizedTypeReference; import org.springframework.http.HttpMethod; import org.springframework.samples.petclinic.chat.model.Owner; import org.springframework.stereotype.Service; import org.springframework.web.client.RestTemplate; @Service public class OwnerService { public List<Owner> getOwners() { RestTemplate restTemplate = new RestTemplate(); var responseEntity = restTemplate.exchange( "http://api-gateway/api/customer/owners", HttpMethod.GET, null, new ParameterizedTypeReference<List<Owner>>() { }); List<Owner> owners = responseEntity.getBody(); return owners; } }
-
-
Add the necessary FunctionCallback code to the chat client.
First, add the following attribute to the
ChatControllerclass:@Autowired private OwnerService ownerService;Add the new FunctionCallback to the chat client. The new code segment would like, see the
functionspart.ChatResponse response = this.chatClient.prompt() .system(systemPrompt) .user(userPrompt) .functions(FunctionCallback.builder() .description("list all owners") .method("getOwners") .targetObject(ownerService) .build()) .call() .chatResponse();Fix any remaining
importissues with the help of the Visual Studio Code hint feature. -
Rebuild the project in your Visual Studio Code terminal window.
mvn clean package -DskipTests -
Update the chat service application by using the following command:
az containerapp update --name $APP_NAME --resource-group $RESOURCE_GROUP \ --source ./spring-petclinic-$APP_NAME -
Verify the new RAG-empowered AI bot by asking it a question about owner information.
curl -XPOST https://$CHAT_URL/chatclient -d 'which owners live in Monona?'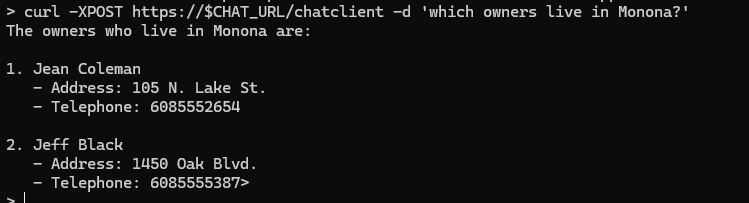
Congratulations! You now have a chatbot that can answer questions specifically about the Spring Petclinic application. This is a good example of how easy it is to integrate the capabilities of Azure OpenAI with your existing services and applications.