End-to-End Deployment using Azure Developer CLI
Table of Contents
- Prerequisites
- Deployment Steps
- Run the App Locally
- Customizing or Configuring AZD Deployments
- CI/CD with Azure Developer CLI (azd)
- Required Secrets for Federated Workload Identities
- Verify Deployment
- Troubleshooting
This guide covers how to deploy the project end-to-end with Azure Developer CLI (azd).
Prerequisites
- Azure Role Permissions (Subscription Scope)
- You need
Contributorto provision resources. - You need
User Access Administratorto assign roles to managed identities.
- You need
- Enable EasyAuth Permissions
- To use EasyAuth, ensure you have the following permissions:
- Create Service Principals: Required to generate the necessary identities for EasyAuth.
- Authorize API Permissions on Entra: Required to grant API permissions for the service principal to access resources securely.
- If you lack these permissions, contact your Azure administrator to grant them or perform these actions on your behalf.
- To use EasyAuth, ensure you have the following permissions:
- Install Docker
- Docker is required to build and publish container images to Azure Container Registry (ACR). Follow the steps below to install Docker:
- Windows/Mac: Download and install Docker Desktop.
- Linux: Follow the official Docker installation guide.
- After installation, verify Docker is running by executing:
docker --version - Ensure you have sufficient permissions to run Docker commands. On Linux, you may need to add your user to the
dockergroup:sudo usermod -aG docker $USERLog out and back in for the changes to take effect.
- Docker is required to build and publish container images to Azure Container Registry (ACR). Follow the steps below to install Docker:
- Install Azure Developer CLI
- Follow the installation guide.
- Check Model Availability by Region
- Check Azure OpenAI Model Availability: This solution uses the following models by default:
- Reasoning model:
o1 - Chat completions model:
gpt-4o - Embeddings model:
text-embedding-3-large
Before deployment, verify these models are available in your target region using the Azure OpenAI models documentation. If any model isn’t available in your region, update the corresponding parameter in
infra/main.parameters.jsonwith an alternative model. - Reasoning model:
- Check Azure OpenAI Model Availability: This solution uses the following models by default:
- Initialize Environment
- Run
azd initto prepare your environment.- Be sure to select “Use code in the current directory”
- Run
Deployment Steps
- Adjust Infra Config [Optional]
- You can use the variables provided in the defaults in infra/main.parameters.json, or you can choose to provide your own desired values.
Main Deployment Parameters (main.bicep)
Parameter name Required Description Example enableEasyAuth No Flag to indicate if EasyAuth should be enabled for the Container Apps (Defaults to true) truedisableIngress No Flag to indicate if the Container App should be deployed with ingress disabled falseenvironmentName Yes Name of the environment that can be used as part of naming resource convention devlocation Yes Primary location for all resources. Not all regions are supported due to OpenAI limitations eastusfrontendExists No Flag to indicate if Frontend app image exists. This is managed by AZD falsebackendExists No Flag to indicate if Backend app image exists. This is managed by AZD falsepriorAuthName No Name for the PriorAuth resource and used to derive the name of dependent resources priorAuthtags No Tags to be applied to all resources { environment: 'dev', location: 'eastus' }openAiApiVersion No API Version of the OpenAI API 2025-01-01-previewreasoningModel No Reasoning model object to be deployed to the OpenAI account (i.e o1, o1-preview, o3-mini) { name: 'o1', version: '2025-01-01-preview', skuName: 'GlobalStandard', capacity: 100 }chatModel No Chat model object to be deployed to the OpenAI account (i.e gpt-4o, gpt-4o-turbo, gpt-4o-turbo-16k, gpt-4o-turbo-32k) { name: 'gpt-4o', version: '2024-08-06', skuName: 'GlobalStandard', capacity: 100 }embeddingModel No Embedding model to be deployed to the OpenAI account { name: 'text-embedding-3-large', version: '1', skuName: 'Standard', capacity: 50 }GIT_HASH No Unique hash of the git commit that is being deployed. This is used to tag resources and support llm evaluation automation azd-deploy-1741105197embeddingModelDimension No Embedding model size for the OpenAI Embedding deployment 3072storageBlobContainerName No Storage Blob Container name to land the files for Prior Auth defaultNote: If you don’t have access to the
o1model yet, try using thegpt-4oconfiguration for thereasoningModel"reasoningModel": { "value": [ { "name": "gpt-4o", "version": "2024-08-06", "skuName": "Standard", "capacity": 100 } ] } - Guided End-to-End Deployment to Azure To get up and running right away:
azd upUnderstand
azdcommand structure:azd provision: Only provisions infrastructure resources defined in the/infradirectoryazd deploy: Only deploys applications to already-provisioned infrastructure as defined inazure.yamlazd up: Combines both steps (provision + deploy) in a single command- If you want to deploy only a specific service, use
azd deploy <service>(e.g.,azd deploy frontend). - This provisions defined resources in infra/main.bicep and deploys services defined in azure.yaml, generating a
.envfile for local development.
- If you want to deploy only a specific service, use
- During Deployment
-
AZD will guide you through certain deployment flag parameters:
Parameter Name Description ENABLE_EASY_AUTHGiven your deployment identity has the permissions to create service principals, enabling this flag will enable Entra sign-ons on your deployed applications so only users in your tenant may access. DISABLE_INGRESSThis flag will disable the network ingress into your container app. Enabling this flag will make your container application unrouteable. RUN_EVALSThis flag will run the pytest large language model evaluations after the
-
- Post Deployment Model Evaluation The solution includes functionality to evaluate AI model performance (see postdeploy.sh for more details and customization):
# Enable model evaluations export RUN_EVALS=true azd deploy # Alternatively, you can run the script directly once you had a successful deployment. # From your autoauth project root directory.. export RUN_EVALS=true ./utils/azd/hooks/postdeploy.sh - Verify Deployment
- Run
azd showto confirm resources and endpoints. - Run
azd monitor showto open the application dashboard
- Run
Run the App Locally
To run and debug this project locally, you need to set up a Python environment with the required dependencies. You can choose either Conda or virtualenv for environment management.
Option 1: Using Conda
- [Optional] Install Conda
- Create and activate the environment
 # Create Python environment from the YAML file
 conda env create -f environment.yaml

 # Activate the environment
 conda activate pa-ai-env
Option 2: Using Python virtualenv
- Create a virtual environment
# Create a new virtual environment (ensure you're using Python 3.10+) python -m venv .venv # Activate the environment source .venv/bin/activate - Install requirements
pip install -r requirements.txt
Running the Application
Method 1: Using VS Code Debugger
- Configure environment in VS Code
- Ensure VS Code is using your conda environment or virtualenv
- In VS Code, press
Ctrl+Shift+P(orCmd+Shift+Pon macOS) - Type “Python: Select Interpreter” and select your environment
- Run with debugger
- Open the Streamlit frontend file in the editor
- Go to the “Run and Debug” view in the sidebar (or press
Ctrl+Shift+D) - Select “Python: Streamlit” from the dropdown menu (or create this configuration if it doesn’t exist)
- Click the green play button or press
F5to start debugging
Method 2: Running Directly with Python
You can also run the Streamlit frontend directly using Python:
# Make sure your environment is activated, then run:
python app/frontend/streamlit/Home.py
Accessing the Application
- Once running, the Streamlit app should automatically open in your default web browser
- If not, you can access it at http://localhost:8501
Customizing or Configuring AZD Deployments
- Workflow Definition
- azure.yaml: Controls azd behavior, hooks, infrastructure definition, and app deployment.
- Pre/Post Scripts
- utils/azd/hooks: Holds scripts (e.g.,
postprovision) that update.env.
- utils/azd/hooks: Holds scripts (e.g.,
- Infrastructure
- infra/main.bicep: Main entry point for infrastructure provisioning.
- infra/resources.bicep: Core deployment resources.
- infra/main.parameters.json: Default deployment values, overrideable by ENV vars.
- Use
azd provisionto only provision infrastructure.
- Application Definitions
- Apps map to provisioned resources via tags, referencing service names in azure.yaml.
- For testing only the application layer, use
azd deploy <service>.
CI/CD with Azure Developer CLI (azd)
You can automate deployment with azd-generated pipelines.
- Create a Pipeline
- Run
azd pipeline configto generate pipeline files for GitHub Actions.
- Run
- Use Existing Pipelines
- Reference .github/workflows/azd_deploy.yml for GitHub Actions.
Required Secrets for Federated Workload Identities
Refer to Azure GitHub OIDC docs for creating these values.
Add these secrets and variables to your GitHub repository under “Secrets and variables” → “Actions”:
Secrets
AZURE_CLIENT_ID: Client ID of your Service Principal/Managed Identity (e.g.,00000000-0000-0000-0000-000000000000)AZURE_TENANT_ID: Your Azure Tenant ID (e.g.,00000000-0000-0000-0000-000000000000)AZURE_SUBSCRIPTION_ID: Your Azure Subscription ID (e.g.,00000000-0000-0000-0000-000000000000)
Variables
AZURE_ENV_NAME: Specifies the Azure Developer CLI environment name (e.gdev)AZURE_LOCATION: Specifies the Azure region to deploy to (e.geastus2)
name: Azure Developer CLI Deploy

on:
  push:
     branches:
        - main

jobs:
  build:
     runs-on: ubuntu-latest
     env:
        AZURE_CLIENT_ID: "$"
        AZURE_TENANT_ID: "$"
        AZURE_SUBSCRIPTION_ID: "$"
        AZURE_ENV_NAME: "$"
        AZURE_LOCATION: "$"
     steps:
        - name: Checkout
          uses: actions/checkout@v4
        - name: Install azd
          uses: Azure/setup-azd@v1.0.0
        - name: Log in with Azure (Federated Credentials)
          run: |
             azd auth login `
                --client-id "$Env:AZURE_CLIENT_ID" `
                --federated-credential-provider "github" `
                --tenant-id "$Env:AZURE_TENANT_ID"
          shell: pwsh
        - name: Provision Infrastructure
          id: provision
          run: azd up --no-prompt
          env:
             AZD_INITIAL_ENVIRONMENT_CONFIG: "$"
Verify Deployment
After deployment, visit the service endpoints returned by azd show.
Troubleshooting
- Authentication Errors
- Ensure that your Azure CLI is logged in with the correct account.
- run
az account showto check your local azure credentials - run
az loginorazd auth loginto refresh your credentials
- run
- Verify that the service principal or managed identity has the necessary permissions.
- Ensure that your Azure CLI is logged in with the correct account.
- OpenAI Model Unavailable in your Region
- Reference Azure OpenAI models documentation to ensure your current region has support for your desired Azure OpenAI models.
- Resource Provisioning Failures
- Check the Azure portal for any resource-specific error messages under the deployments tab.
-
Ensure that your subscription has sufficient quota and that the region supports the requested resources.
- Configuration Errors
- Check the AI Search Service
- Verify if the index has been properly created by checking the
Indexes,Indexer, andData Sourcetabs. - Ensure the managed identity used by the AI Search service has
Storage Blob Data Readeror higher level of access to the storage account. - If no documents are populated, and there aren’t any
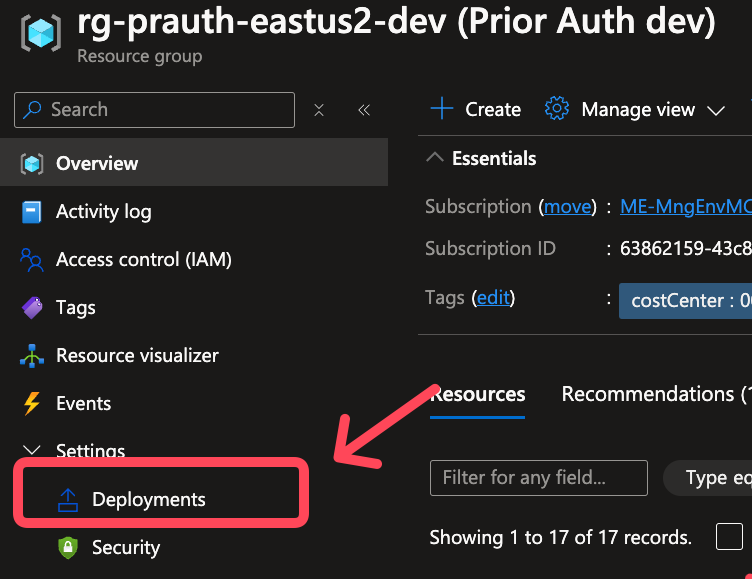
Indexes,Indexers, orData Sourcespopulated, then theContainer App Jobmay have failed.- To retry or debug the
Container App Job: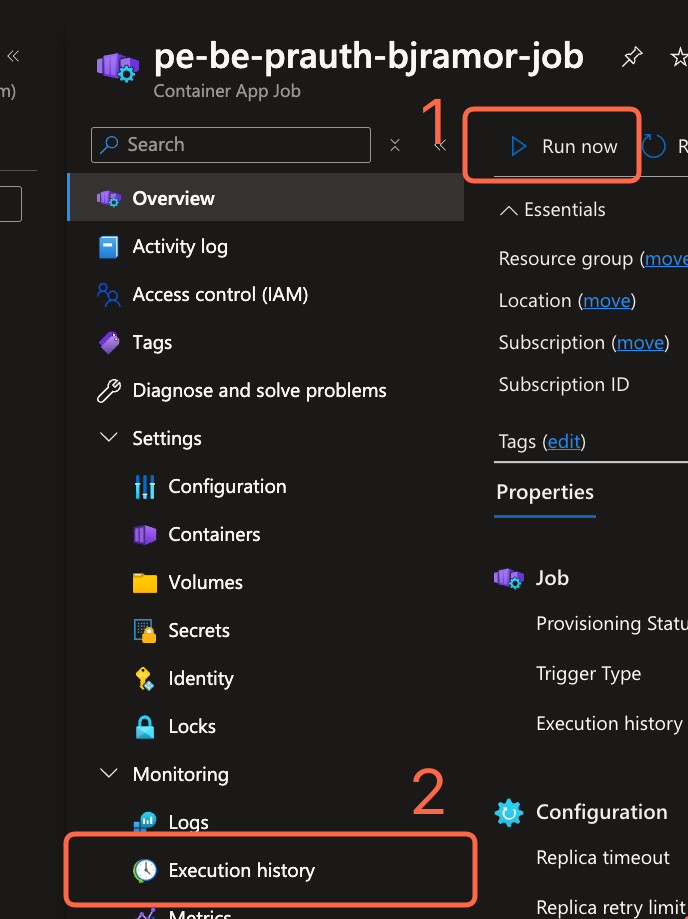
- To retry or debug the
- Verify if the index has been properly created by checking the
- Check the AI Search Service
- Pipeline Failures
- Check the pipeline logs for detailed error messages.
- Ensure that all required secrets and variables are correctly configured in your GitHub repository.
- Application Errors
- View the detailed logs of the Container App:
-
First, navigate to either the
LogsorLog Stream
-
Log Streamwill stream the live data from your container, however when there are issues with the container itself, you may not be able to see theconsolelog due to the container being in a failed state. -
Logswill display all of yoursystemandconsolelogs, but there is a minor delay in the data.
-
-
- View the detailed logs of the Container App:
For more detailed troubleshooting steps, refer to the specific service documentation linked in the Troubleshooting section.
If you encounter issues:
For more on azd projects, see Azure Developer CLI docs.