Host an MCP server on Azure App Service, secured with OAuth
The Model Context Protocol (MCP) is how AI agents such as GitHub Copilot, Cursor, and Claude discover and call your tools. A remote MCP server exposes those tools over HTTP so any agent can reach them, from anywhere. That reach is exactly why security matters: an unauthenticated MCP server is an open door to whatever your tools can do.
Most remote MCP servers in the wild ship that door wide open. The Apps on Azure post Only 8.5% of MCP Servers Use OAuth - Here's How to Host One Securely on App Service makes the point plainly: the overwhelming majority of public MCP servers have no real authorization at all. This lab shows you the secure path instead.
In this lab you will:
- Build a minimal, stateless MCP server (Node.js/TypeScript and Python variants).
- Deploy it to Azure App Service three ways: Azure Developer CLI (azd), Azure CLI (az), and the Azure portal.
- Verify the MCP endpoint responds over HTTP.
- Secure it with OAuth 2.0 / Microsoft Entra ID using App Service Authentication ("Easy Auth"), and connect from Visual Studio Code.
App Service is a strong home for MCP servers: managed HTTPS, built-in OAuth through Easy Auth, autoscale, and the same deployment tooling you already use for web apps. This lab complements the reference docs - see App Service as Model Context Protocol (MCP) servers for the conceptual overview.
Estimated time: 30 to 45 minutes.
Objectives
By the end of this lab you will be able to:
- Explain why an MCP server should be stateless to scale out on App Service.
- Deploy an MCP server to App Service with azd, az, or the portal.
- Confirm the server responds to an MCP
initializerequest. - Configure Easy Auth with Microsoft Entra ID and protected resource metadata (PRM) so MCP clients can complete the OAuth flow.
Prerequisites
- An Azure subscription. Configuring the OAuth portion requires permission to create a Microsoft Entra ID app registration (Application Administrator or equivalent). If you don't have that permission, ask an administrator to complete the OAuth section.
- Azure CLI 2.60 or later.
- Azure Developer CLI (azd) 1.9 or later (for the azd path).
- One runtime for the sample:
- Visual Studio Code with GitHub Copilot to test the secured server (optional but recommended).
Sign in first:
az login
azd auth login
How it works, and why stateless matters
An MCP server built on the current spec speaks Streamable HTTP: the client sends JSON-RPC messages to a single endpoint (here, /mcp) with POST, and the server can stream responses back as Server-Sent Events (SSE) on the same connection.
Early MCP servers kept a session in memory and pinned each client to one process. That works on a single instance but breaks the moment you scale out - a request can land on any instance. The Apps on Azure post MCP Just Went Stateless - What the 2026 Spec Changes About Scaling on App Service describes the shift: the protocol now supports fully stateless operation, where the server holds no per-client session state between requests. Any instance can serve any request, so App Service scale out just works.
The sample below follows this pattern: it creates a fresh MCP server per request and keeps nothing in memory between calls.
The MCP server sample
The sample exposes one trivial tool (roll_dice) plus a /health endpoint for App Service health checks. Pick your language.
- Node.js / TypeScript
- Python
Create a project with these files.
package.json
{
  "name": "mcp-server-appservice",
  "version": "1.0.0",
  "type": "module",
  "main": "dist/server.js",
  "scripts": {
    "build": "tsc",
    "start": "node dist/server.js"
  },
  "engines": {
    "node": ">=20"
  },
  "dependencies": {
    "@modelcontextprotocol/sdk": "^1.12.0",
    "express": "^4.21.2",
    "zod": "^3.24.1"
  },
  "devDependencies": {
    "@types/express": "^4.17.21",
    "@types/node": "^22.10.0",
    "typescript": "^5.7.2"
  }
}
tsconfig.json
{
  "compilerOptions": {
    "target": "ES2022",
    "module": "NodeNext",
    "moduleResolution": "NodeNext",
    "outDir": "./dist",
    "rootDir": "./src",
    "strict": true,
    "esModuleInterop": true,
    "skipLibCheck": true,
    "forceConsistentCasingInFileNames": true
  },
  "include": ["src/**/*.ts"]
}
src/server.ts
import express, { Request, Response } from "express";
import { randomUUID } from "node:crypto";
import { McpServer } from "@modelcontextprotocol/sdk/server/mcp.js";
import { StreamableHTTPServerTransport } from "@modelcontextprotocol/sdk/server/streamableHttp.js";
import { z } from "zod";

// Build a fresh MCP server instance for every request. Keeping no state in
// the process is what lets App Service scale out: any instance can serve any
// request.
function createServer(): McpServer {
  const server = new McpServer({ name: "appservice-mcp-demo", version: "1.0.0" });

  server.tool(
    "roll_dice",
    "Roll an n-sided dice and return the result.",
    { sides: z.number().int().min(2).max(100).default(6) },
    async ({ sides }) => {
      const value = 1 + Math.floor(Math.random() * sides);
      return { content: [{ type: "text", text: `You rolled a ${value} (d${sides}).` }] };
    }
  );

  return server;
}

const app = express();
app.use(express.json());

// Health probe for App Service health check and quick smoke tests.
app.get("/health", (_req: Request, res: Response) => {
  res.status(200).json({ status: "ok" });
});

// Stateless Streamable HTTP endpoint: a new server + transport are created per
// request and disposed when the response closes.
app.post("/mcp", async (req: Request, res: Response) => {
  try {
    const server = createServer();
    const transport = new StreamableHTTPServerTransport({
      sessionIdGenerator: undefined, // stateless: no session persistence
    });
    res.on("close", () => {
      transport.close();
      server.close();
    });
    await server.connect(transport);
    await transport.handleRequest(req, res, req.body);
  } catch (err) {
    console.error("MCP request error:", err);
    if (!res.headersSent) {
      res.status(500).json({
        jsonrpc: "2.0",
        error: { code: -32603, message: "Internal server error" },
        id: null,
      });
    }
  }
});

// In stateless mode the server does not support GET streaming or DELETE.
const rejectStateless = (_req: Request, res: Response) => {
  res.status(405).json({
    jsonrpc: "2.0",
    error: { code: -32000, message: "Method not allowed in stateless mode." },
    id: randomUUID(),
  });
};
app.get("/mcp", rejectStateless);
app.delete("/mcp", rejectStateless);

const port = Number(process.env.PORT) || 3000;
app.listen(port, () => console.log(`MCP server listening on port ${port}`));
Install and build:
npm install
npm run build
Run it locally to confirm it works:
node dist/server.js
# In another terminal:
curl http://localhost:3000/health
The Node.js sample runs on both Windows and Linux App Service plans. The Python variant below is Linux only - Python is not a built-in Windows App Service stack.
Create a project with these files.
requirements.txt
mcp>=1.12.0
app.py
import os
import random

from mcp.server.fastmcp import FastMCP
from mcp.server.transport_security import TransportSecuritySettings
from starlette.requests import Request
from starlette.responses import JSONResponse

# FastMCP enables DNS-rebinding protection and, by default, only trusts
# localhost. On App Service the request Host header is <app>.azurewebsites.net,
# which would otherwise be rejected with HTTP 421 "Invalid Host header".
# App Service exposes that hostname as WEBSITE_HOSTNAME, so add it (plus
# localhost for local runs) to the allowed hosts.
allowed_hosts = ["localhost", "localhost:*", "127.0.0.1", "127.0.0.1:*"]
website_hostname = os.environ.get("WEBSITE_HOSTNAME")
if website_hostname:
    allowed_hosts += [website_hostname, f"{website_hostname}:*"]

security = TransportSecuritySettings(allowed_hosts=allowed_hosts)

# stateless_http=True keeps no session state in memory, so any App Service
# instance can serve any request when you scale out.
mcp = FastMCP("appservice-mcp-demo", stateless_http=True, transport_security=security)


@mcp.tool()
def roll_dice(sides: int = 6) -> str:
    """Roll an n-sided dice and return the result."""
    value = random.randint(1, sides)
    return f"You rolled a {value} (d{sides})."


# Health probe for App Service health check and quick smoke tests.
@mcp.custom_route("/health", methods=["GET"])
async def health(_request: Request) -> JSONResponse:
    return JSONResponse({"status": "ok"})


if __name__ == "__main__":
    # FastMCP serves the Streamable HTTP endpoint at /mcp.
    mcp.settings.host = "0.0.0.0"
    mcp.settings.port = int(os.environ.get("PORT", 8000))
    mcp.run(transport="streamable-http")
Install and run locally:
python -m venv .venv
source .venv/bin/activate   # Windows: .venv\Scripts\activate
pip install -r requirements.txt
python app.py
# In another terminal:
curl http://localhost:8000/health
The App Service startup command for this app is python app.py.
Python App Service apps run on Linux plans only. If you need Windows, use the Node.js variant.
Deploy to App Service
Choose one deployment mechanism. All three create a Linux App Service on a low-cost B1 plan with Always On enabled (streaming responses need a tier that supports Always On; avoid the Free F1 tier for MCP).
- Azure Developer CLI (azd)
- Azure CLI (az)
- Azure portal
The Azure Developer CLI provisions infrastructure and deploys code in one step. Add these files to your project.
azure.yaml
# yaml-language-server: $schema=https://raw.githubusercontent.com/Azure/azure-dev/main/schemas/v1.0/azure.yaml.json
name: mcp-server-appservice
services:
  web:
    project: .
    language: js   # use "py" for the Python variant
    host: appservice
infra/main.bicep
targetScope = 'subscription'

param resourceGroupName string
param location string
param webAppName string
param appServicePlanName string

resource rg 'Microsoft.Resources/resourceGroups@2024-03-01' = {
  name: resourceGroupName
  location: location
}

module app 'app.bicep' = {
  name: 'mcp-app'
  scope: rg
  params: {
    location: location
    webAppName: webAppName
    appServicePlanName: appServicePlanName
  }
}

output webAppHostName string = app.outputs.webAppHostName
infra/app.bicep
param location string
param webAppName string
param appServicePlanName string

resource plan 'Microsoft.Web/serverfarms@2023-12-01' = {
  name: appServicePlanName
  location: location
  sku: { name: 'B1', tier: 'Basic' }
  kind: 'linux'
  properties: { reserved: true }
}

resource webApp 'Microsoft.Web/sites@2023-12-01' = {
  name: webAppName
  location: location
  tags: { 'azd-service-name': 'web' }
  properties: {
    serverFarmId: plan.id
    httpsOnly: true
    siteConfig: {
      linuxFxVersion: 'NODE|22-lts'      // use 'PYTHON|3.12' for Python
      alwaysOn: true
      minTlsVersion: '1.2'
      healthCheckPath: '/health'
      appCommandLine: 'node dist/server.js' // use 'python app.py' for Python
      appSettings: [
        { name: 'SCM_DO_BUILD_DURING_DEPLOYMENT', value: 'true' }
      ]
    }
  }
}

output webAppHostName string = webApp.properties.defaultHostName
infra/main.parameters.json
{
  "$schema": "https://schema.management.azure.com/schemas/2019-04-01/deploymentParameters.json#",
  "contentVersion": "1.0.0.0",
  "parameters": {
    "resourceGroupName": { "value": "${AZURE_RESOURCE_GROUP}" },
    "location": { "value": "${AZURE_LOCATION}" },
    "webAppName": { "value": "${WEB_APP_NAME}" },
    "appServicePlanName": { "value": "${APP_SERVICE_PLAN_NAME}" }
  }
}
Create an environment and set names. Use a unique suffix so the app's hostname is globally unique:
SUFFIX=$(openssl rand -hex 3)   # 6 lowercase hex chars
azd env new asl-mcp --location eastus --subscription <your-subscription-id>
azd env set AZURE_RESOURCE_GROUP "rg-asl-mcp-${SUFFIX}"
azd env set WEB_APP_NAME "app-asl-mcp-${SUFFIX}"
azd env set APP_SERVICE_PLAN_NAME "plan-asl-mcp-${SUFFIX}"
Provision and deploy:
azd up
When it finishes, azd prints the endpoint, for example:
Endpoint: https://app-asl-mcp-xxxxxx.azurewebsites.net/
SUCCESS: Your application was deployed to Azure in 5 minutes 48 seconds.
On the very first azd up, azd occasionally reports it can't find the tagged resource because provisioning outputs aren't cached yet. If that happens, simply run azd deploy once more - the resources already exist and the code deploy completes.
Create the resources, configure the app, then deploy the code as a zip. App Service builds the code remotely because SCM_DO_BUILD_DURING_DEPLOYMENT=true is set.
SUFFIX=$(openssl rand -hex 3)
export RG="rg-asl-mcp-${SUFFIX}"
export PLAN="plan-asl-mcp-${SUFFIX}"
export APP="app-asl-mcp-${SUFFIX}"
export LOCATION=eastus

az group create --name "$RG" --location "$LOCATION"
az appservice plan create --resource-group "$RG" --name "$PLAN" --is-linux --sku B1
az webapp create --resource-group "$RG" --plan "$PLAN" --name "$APP" --runtime "NODE|22-lts"
Configure build, startup, Always On, and the health check path:
az webapp config appsettings set --resource-group "$RG" --name "$APP" \
  --settings SCM_DO_BUILD_DURING_DEPLOYMENT=true

az webapp config set --resource-group "$RG" --name "$APP" \
  --startup-file "node dist/server.js" --always-on true

az webapp config set --resource-group "$RG" --name "$APP" \
  --generic-configurations '{"healthCheckPath":"/health"}'
Package the source (App Service compiles it) and deploy:
zip -r app.zip package.json package-lock.json tsconfig.json src
az webapp deploy --resource-group "$RG" --name "$APP" --src-path app.zip --type zip
The remote build can take a few minutes. If az webapp deploy returns a 504 GatewayTimeout, the build is usually still finishing - wait a minute and check the endpoint. It succeeds even when the client-side poll times out.
For the Python variant, use --runtime "PYTHON|3.12", set --startup-file "python app.py", and zip app.py requirements.txt.
Get the hostname:
az webapp show --resource-group "$RG" --name "$APP" --query defaultHostName --output tsv
-
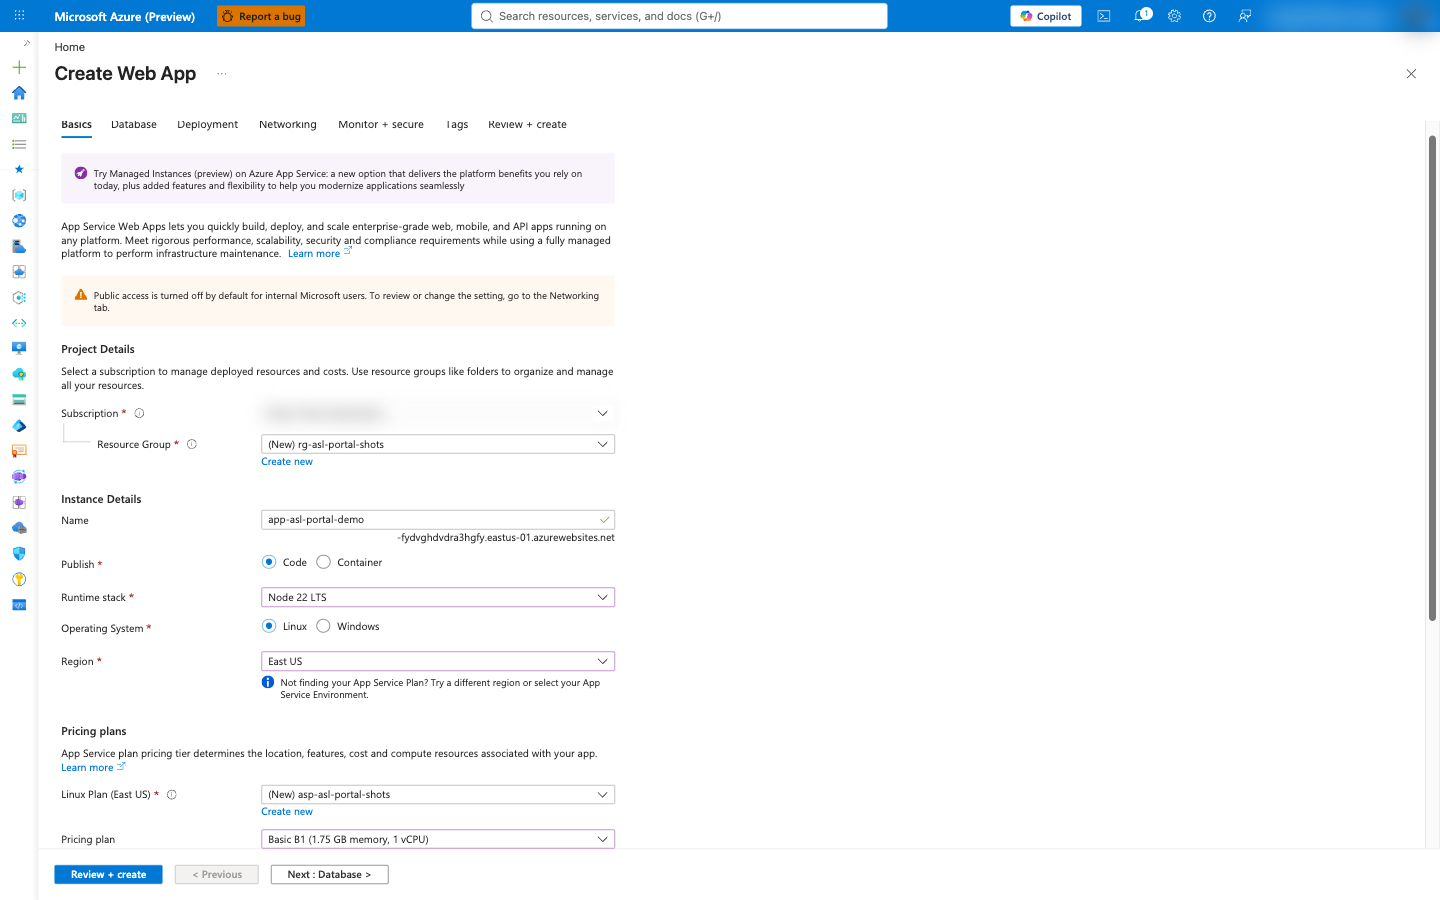
In the Azure portal, select Create a resource > Web App.
-
On the Basics tab, set:
- Publish: Code
- Runtime stack: Node 22 LTS (or Python 3.12)
- Operating System: Linux
- Pricing plan: create or select a Basic B1 plan.
-
Select Review + create, then Create. Wait for deployment to finish.
-
Go to the new app > Settings > Configuration (or Environment variables) and add the app setting SCM_DO_BUILD_DURING_DEPLOYMENT = true.
-
Under Settings > Configuration > General settings, set the Startup Command to
node dist/server.js(orpython app.py), turn Always On to On, and set the Health check path to/health. -
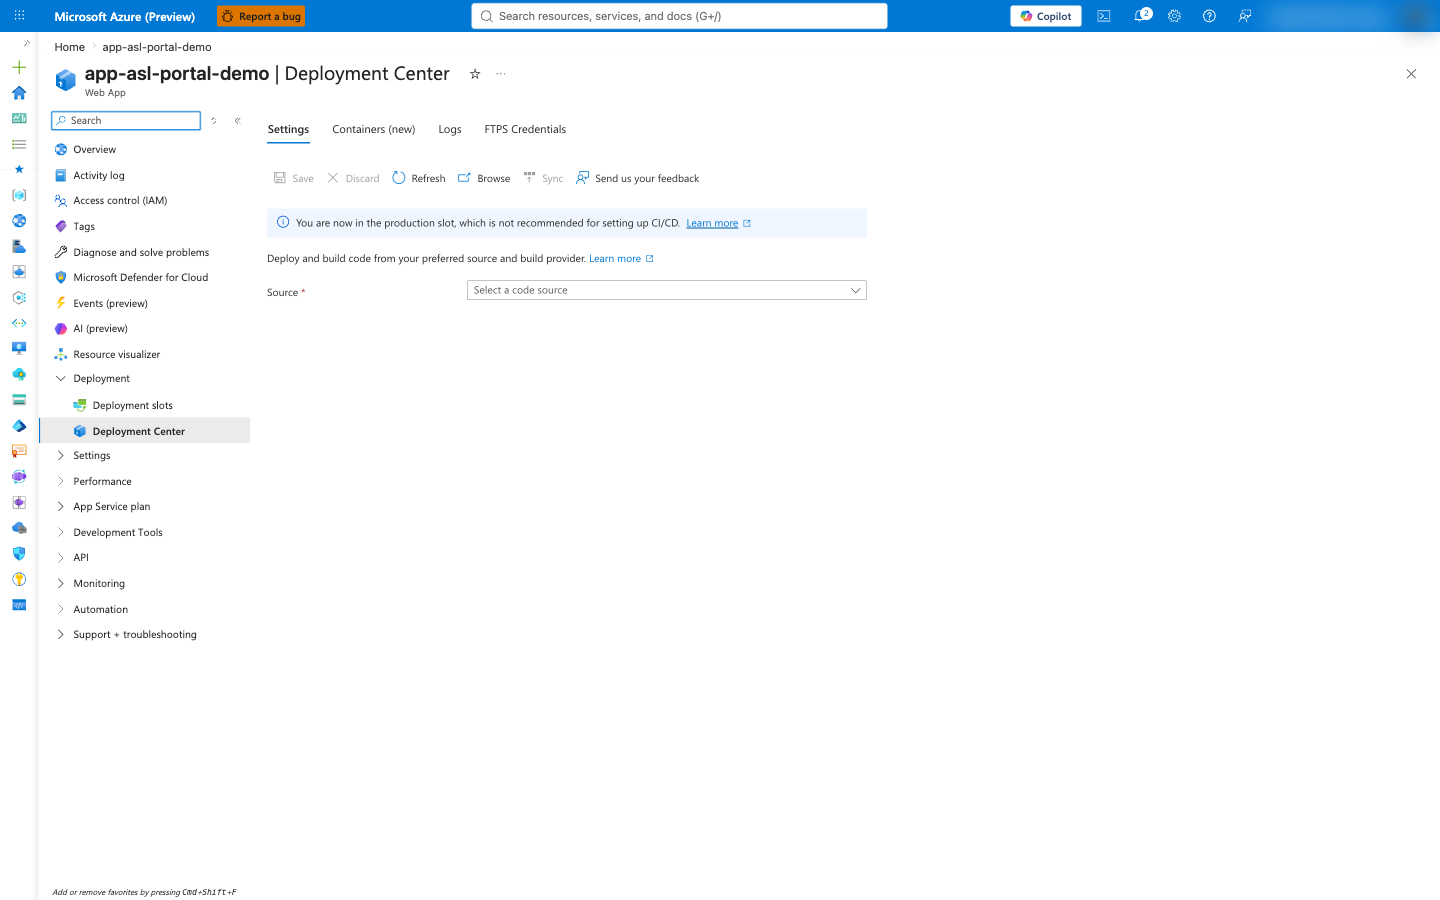
Under Deployment > Deployment Center, connect a source (for example, Local Git or GitHub) and push your code. App Service builds and starts the app.
-
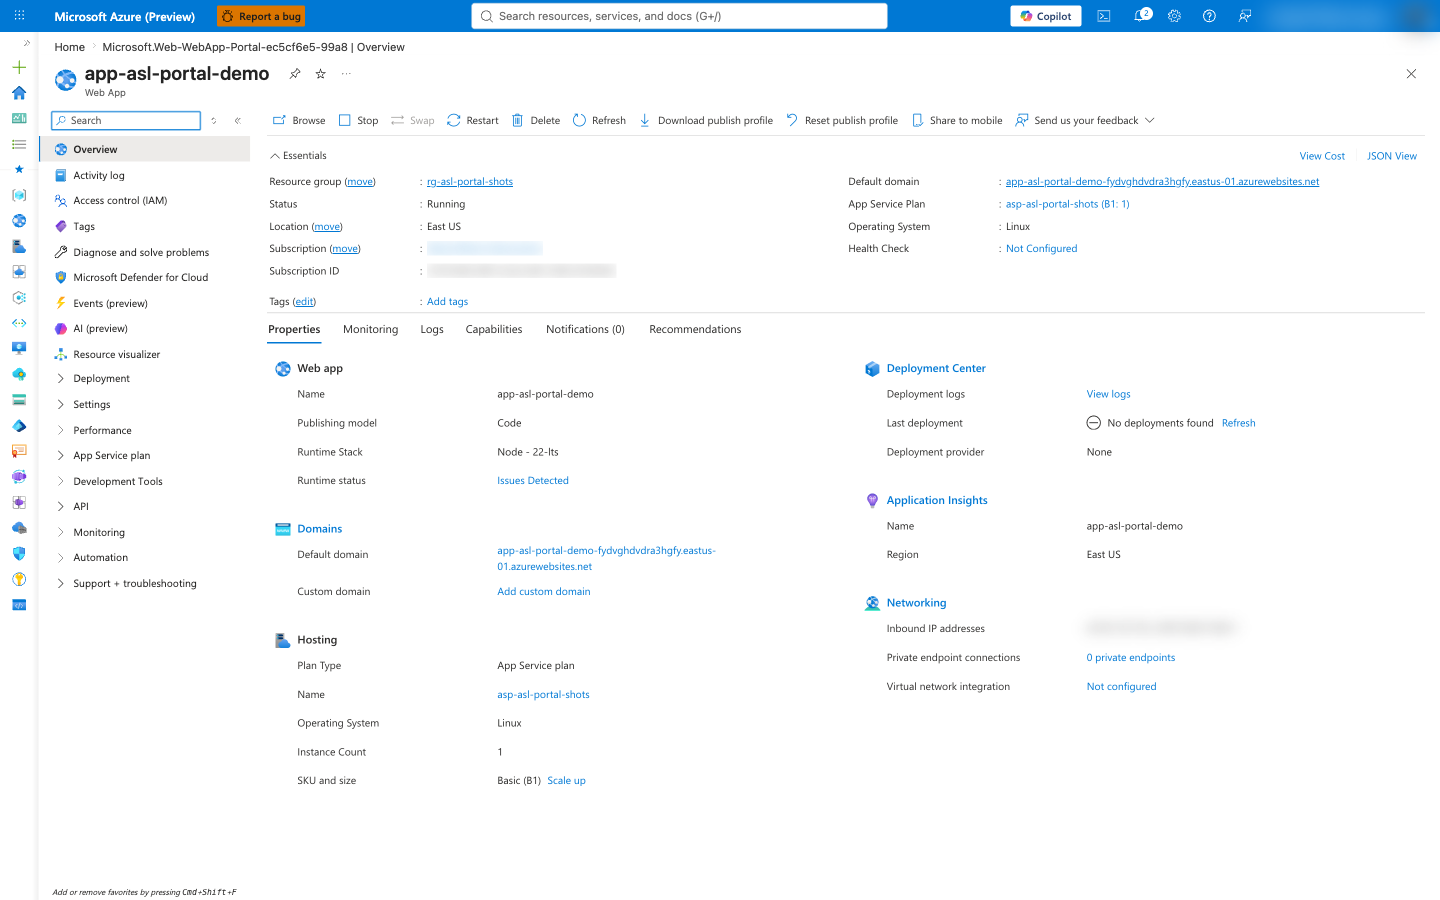
On the app's Overview page, copy the Default domain.
Verify the server
Set APP_URL to your app's hostname, then test the health and MCP endpoints:
export APP_URL="https://app-asl-mcp-xxxxxx.azurewebsites.net"

# 1) Health check
curl -i "$APP_URL/health"

# 2) MCP initialize - the core protocol handshake
curl -s -X POST "$APP_URL/mcp" \
  -H "Content-Type: application/json" \
  -H "Accept: application/json, text/event-stream" \
  -d '{"jsonrpc":"2.0","id":1,"method":"initialize","params":{"protocolVersion":"2024-11-05","capabilities":{},"clientInfo":{"name":"curl","version":"1.0"}}}'
Expected results:
HTTP/1.1 200 OK
{"status":"ok"}
event: message
data: {"result":{"protocolVersion":"2024-11-05","capabilities":{"tools":{"listChanged":true}},"serverInfo":{"name":"appservice-mcp-demo","version":"1.0.0"}},"jsonrpc":"2.0","id":1}
A 200 with a serverInfo payload confirms the MCP endpoint is live. You can also list tools:
curl -s -X POST "$APP_URL/mcp" \
  -H "Content-Type: application/json" \
  -H "Accept: application/json, text/event-stream" \
  -d '{"jsonrpc":"2.0","id":2,"method":"tools/list","params":{}}'
Secure the server with OAuth and Microsoft Entra ID
Right now the endpoint is open. App Service Authentication ("Easy Auth") adds an OAuth 2.0 / OpenID Connect gate in front of your app with no code changes. Combined with protected resource metadata (PRM), MCP clients such as Visual Studio Code can discover the authorization server and complete the sign-in flow automatically.
Enabling a Microsoft identity provider creates a Microsoft Entra ID app registration and may require administrator consent in your tenant. The app-registration and consent steps below are marked [Manual / admin]. If you can't create app registrations, ask an administrator to complete them. This lab live-tested only the App Service hosting and endpoint reachability; the app-registration and consent flow must be verified in your own tenant.
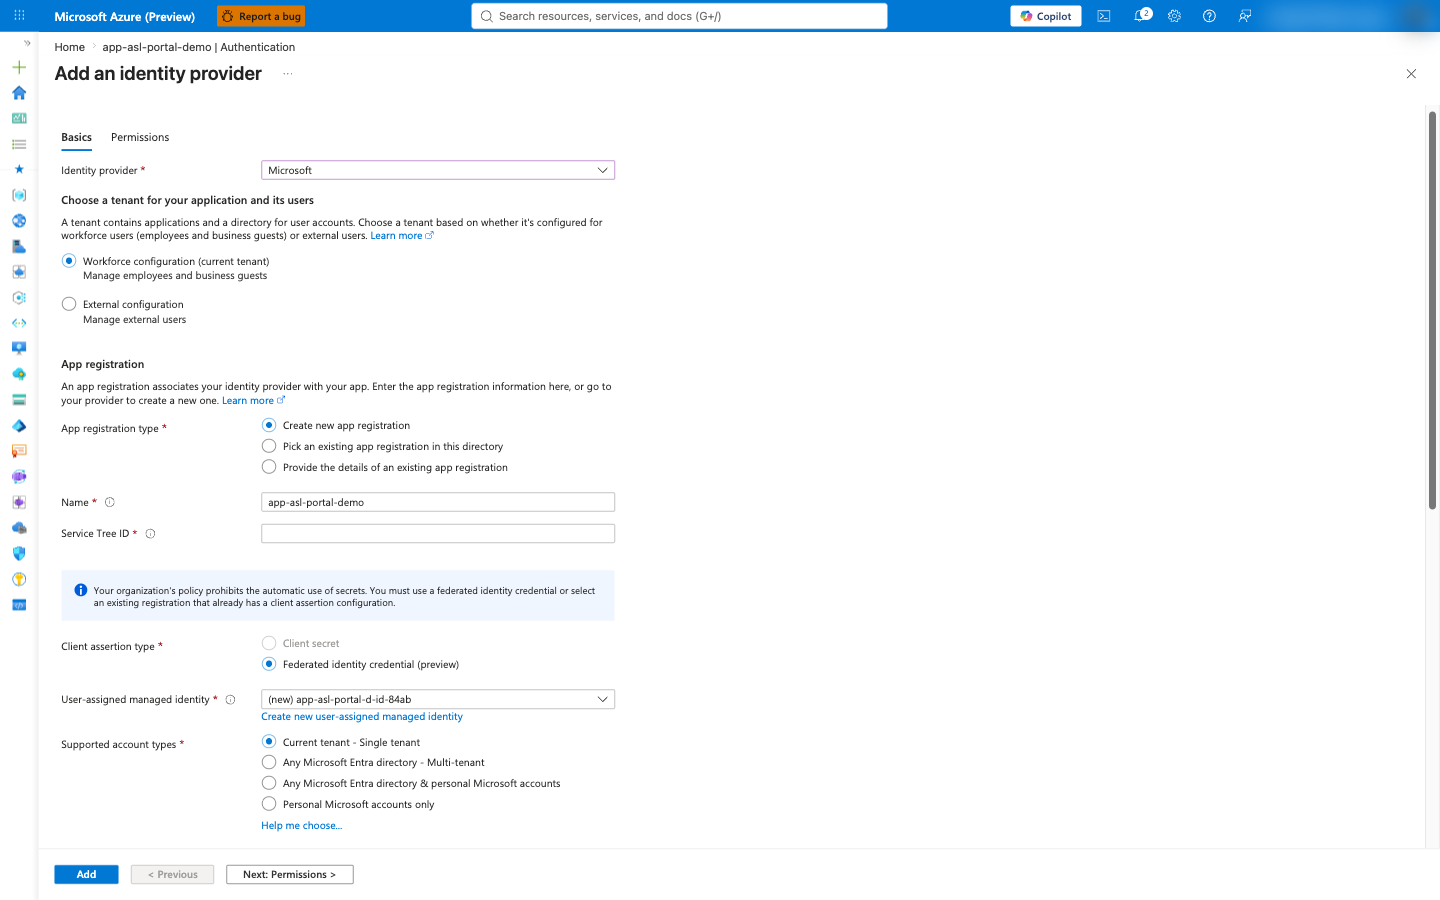
Step 1 - Enable Microsoft Entra authentication [Manual / admin]
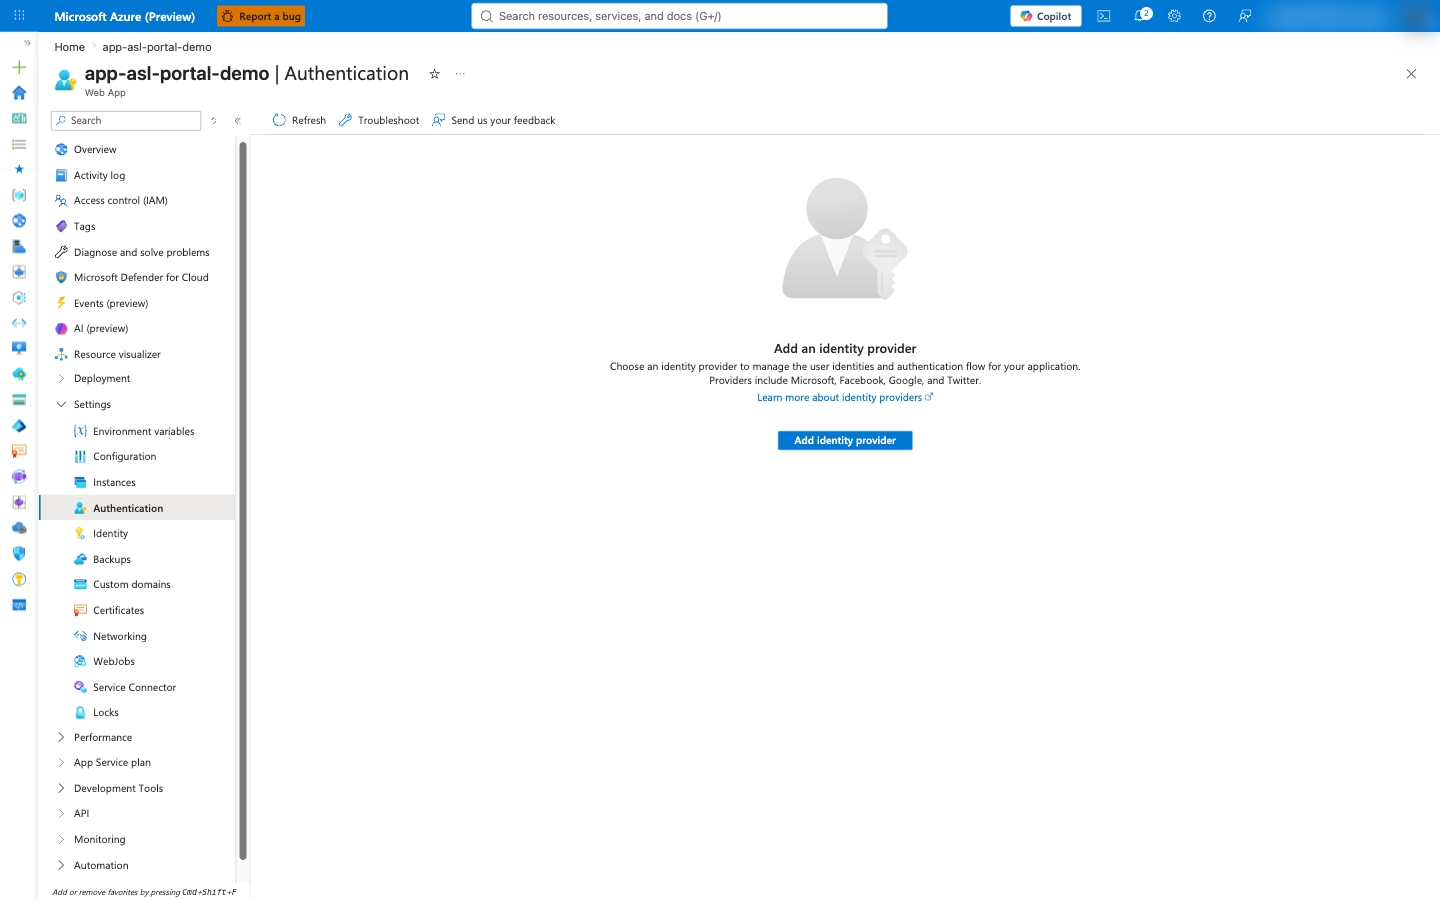
- In the portal, go to your App Service app > Settings > Authentication > Add identity provider.
- Select Microsoft as the identity provider.
- For Client secret expiration, choose a period (for example, 6 months).
- Accept the defaults and select Add. This creates an app registration and configures the app to require authentication.
Step 2 - Allow the Visual Studio Code client [Manual / admin]
- On the Authentication page, select Edit (pencil) next to the Microsoft provider.
- Under Additional checks > Client application requirement, select Allow requests from specific client applications.
- Add the Visual Studio Code client ID:
aebc6443-996d-45c2-90f0-388ff96faa56. - Select OK, then Save.

Step 3 - Expose the API to Visual Studio Code [Manual / admin]
- On the Authentication page, select the Microsoft provider to open its app registration.
- Select Manage > Expose an API.
- Under Authorized client applications, select Add a client application.
- Enter the Visual Studio Code client ID
aebc6443-996d-45c2-90f0-388ff96faa56, check the user_impersonation scope, and select Add application. - Copy the full scope value; it looks like
api://<app-registration-app-id>/user_impersonation.
Step 4 - Publish protected resource metadata
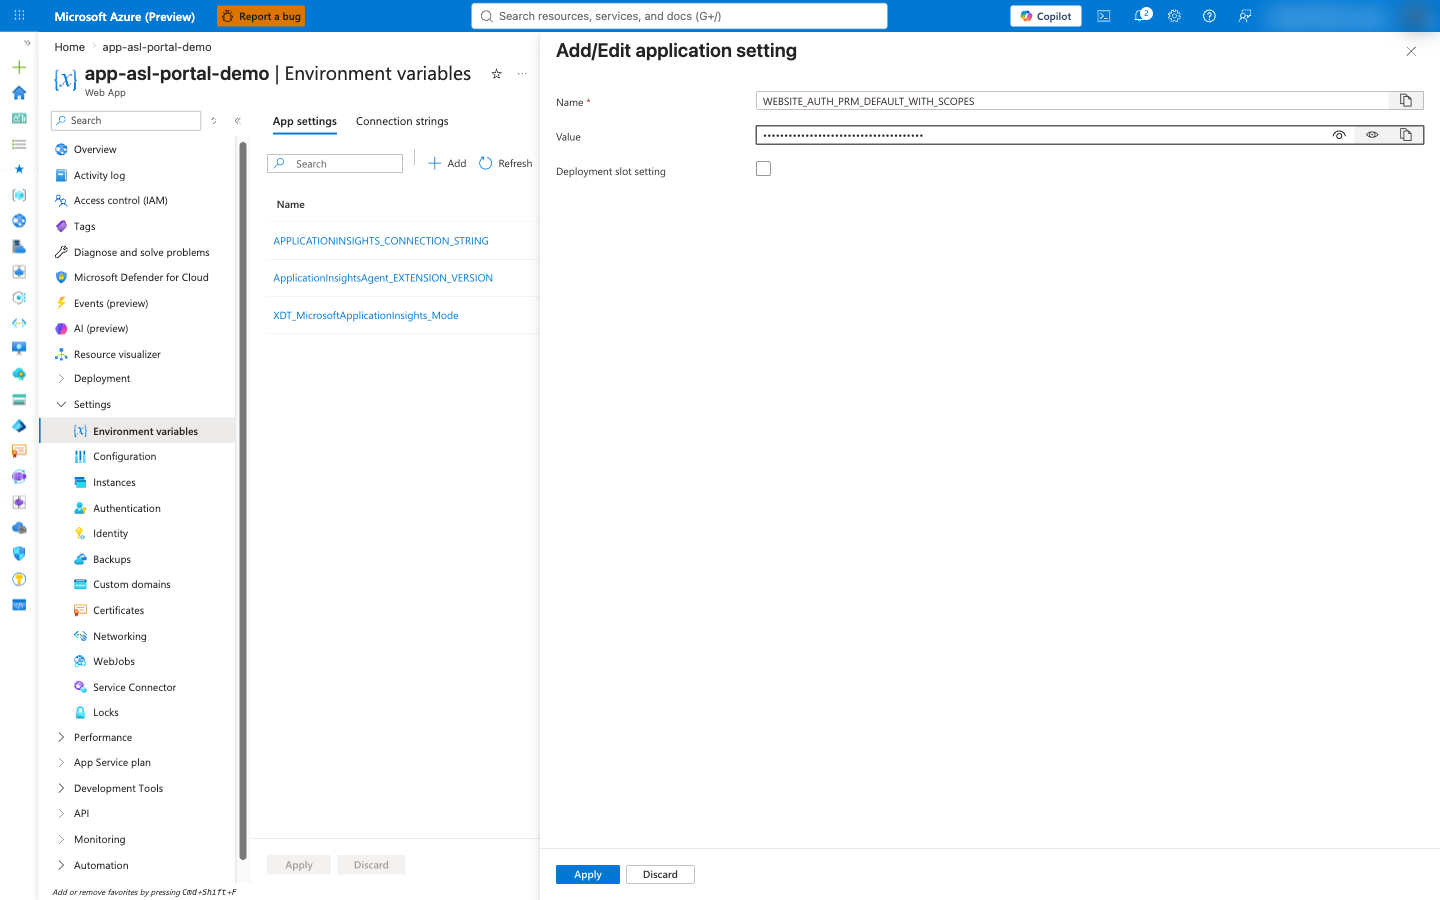
Setting the authorization scope in an app setting turns on the /.well-known/oauth-protected-resource endpoint, which is how MCP clients discover your authorization requirements.
- Go to your App Service app > Settings > Environment variables.
- Add a setting named
WEBSITE_AUTH_PRM_DEFAULT_WITH_SCOPESwith the scope value you copied, for exampleapi://<app-registration-app-id>/user_impersonation. - Select Apply to save and restart the app.
You can set the same app setting from the CLI:
az webapp config appsettings set --resource-group "$RG" --name "$APP" \
  --settings WEBSITE_AUTH_PRM_DEFAULT_WITH_SCOPES="api://<app-registration-app-id>/user_impersonation"
Step 5 - Connect from Visual Studio Code
-
In your workspace, create
.vscode/mcp.json:{"servers": {"my-app-service-mcp": {"type": "http","url": "https://app-asl-mcp-xxxxxx.azurewebsites.net/mcp"}}} -
Open the Command Palette, run MCP: List Servers, select your server, and choose Start Server.
-
VS Code prompts you to authenticate with Microsoft. Complete the sign-in.
-
In GitHub Copilot Chat (agent mode), try the tool:
Roll a 20-sided dice.
If VS Code prompts you to authenticate against https://<your-app>.azurewebsites.net/authorize instead of Microsoft, the PRM isn't configured. Confirm WEBSITE_AUTH_PRM_DEFAULT_WITH_SCOPES is set to the full api://.../user_impersonation scope and that the app fully restarted. See Secure MCP calls with Microsoft Entra authentication.
Clean up resources
To avoid ongoing charges, delete the resource group when you're done:
az group delete --name "$RG" --yes --no-wait
If you deployed with azd, you can instead run:
azd down --force --purge
Summary
You built a stateless MCP server, deployed it to Azure App Service with azd, the Azure CLI, and the portal, and confirmed the /mcp endpoint answered an initialize request over HTTPS. You then secured it with OAuth 2.0 / Microsoft Entra ID using Easy Auth and protected resource metadata, so MCP clients like Visual Studio Code sign in before calling your tools. The stateless design means you can scale the app out on App Service without pinning clients to a single instance - the shift that makes remote MCP servers production-ready.
Learn more
- App Service as Model Context Protocol (MCP) servers
- Integrate an App Service app as an MCP Server for GitHub Copilot Chat (Node.js)
- Secure MCP calls to App Service from VS Code with Microsoft Entra authentication
- Authentication and authorization in App Service (Easy Auth)
- Configure a Node.js app for App Service
- Scale up an app in App Service
- Model Context Protocol specification
- Apps on Azure blog: Only 8.5% of MCP Servers Use OAuth - Here's How to Host One Securely on App Service and MCP Just Went Stateless - What the 2026 Spec Changes About Scaling on App Service
- Back to the Scenarios & Modern Apps overview