Build and deploy an AI-powered app
Adding AI to a web app usually means calling a large language model from your code. The tempting shortcut is to paste an API key into an app setting - but keys leak, expire, and end up in source control. This lab shows the recommended path instead: a web app on Azure App Service that calls an Azure OpenAI model using a managed identity, so there are no keys in your code or configuration at all.
In this lab you will:
- Build a small web app that calls an Azure OpenAI chat model (Python and Node.js variants, with notes for .NET, Java, and PHP).
- Provision Azure OpenAI and deploy a
gpt-4omodel. - Deploy the app to App Service three ways: Azure Developer CLI (azd), Azure CLI (az), and the Azure portal.
- Wire up keyless authentication: turn on the app's managed identity and grant it the Cognitive Services OpenAI User role.
- Verify a real AI completion returns over HTTPS - with no API key anywhere.
App Service is a strong home for AI apps: managed HTTPS, built-in managed identity, autoscale, and the same deployment tooling you already use for web apps. This lab complements the reference docs - see Tutorial: Build a web app with Azure OpenAI on App Service for the conceptual overview.
Estimated time: 30 to 45 minutes.
Objectives
By the end of this lab you will be able to:
- Explain why managed identity is the recommended way to reach Azure OpenAI from App Service.
- Provision an Azure OpenAI resource and deploy a chat model.
- Deploy an AI web app to App Service with azd, az, or the portal.
- Grant a managed identity the right role and confirm a keyless call succeeds.
Prerequisites
- An Azure subscription with access to Azure OpenAI. Some subscriptions require you to request access before you can create an Azure OpenAI resource.
- Permission to create role assignments on the Azure OpenAI resource (Owner, or User Access Administrator on the resource). Granting the managed identity its role needs this.
- Azure CLI 2.60 or later.
- Azure Developer CLI (azd) 1.9 or later (for the azd path).
- One runtime for the sample:
Sign in first:
az login
azd auth login
This lab uses the East US region and the B1 (Basic) App Service tier, a low-cost option that's ideal for learning. Azure OpenAI is billed per 1,000 tokens on top of the plan. Delete the resource group when you're done (see Clean up) to stop charges.
Why keyless, and how it works
An Azure OpenAI resource accepts two kinds of authentication: an API key or a Microsoft Entra ID token. Keys are simple but risky - anyone who reads the key can call your model, and rotating a leaked key means redeploying every app that uses it. A managed identity removes the key entirely: App Service gives your app an identity in Microsoft Entra ID, you grant that identity a role on the Azure OpenAI resource, and the Azure SDK fetches short-lived tokens automatically at runtime.
In code, this is the DefaultAzureCredential from the Azure Identity library. Locally it uses your az login session; on App Service it uses the app's managed identity - the same code, no keys, in both places.
The app sample
The sample exposes a /health endpoint for App Service health checks and a /chat endpoint that forwards a prompt to the model. Pick your language.
- Python
- Node.js
- .NET
- Java
- PHP
Create a project with these files.
requirements.txt
flask
gunicorn
openai
azure-identity
app.py
import os

from azure.identity import DefaultAzureCredential, get_bearer_token_provider
from flask import Flask, jsonify, request
from openai import AzureOpenAI

app = Flask(__name__)

ENDPOINT = os.environ["AZURE_OPENAI_ENDPOINT"]
DEPLOYMENT = os.environ["AZURE_OPENAI_DEPLOYMENT"]
API_VERSION = os.environ.get("AZURE_OPENAI_API_VERSION", "2024-10-21")

# Keyless auth: DefaultAzureCredential uses the App Service managed identity in
# Azure and your az login session locally. No API keys anywhere.
token_provider = get_bearer_token_provider(
    DefaultAzureCredential(),
    "https://cognitiveservices.azure.com/.default",
)

client = AzureOpenAI(
    azure_endpoint=ENDPOINT,
    azure_ad_token_provider=token_provider,
    api_version=API_VERSION,
)


@app.route("/health")
def health():
    return jsonify(status="ok")


@app.route("/")
def home():
    return (
        "<h1>AI app on Azure App Service</h1>"
        "<p>POST JSON {\"prompt\": \"...\"} to <code>/chat</code>.</p>"
    )


@app.route("/chat", methods=["POST"])
def chat():
    data = request.get_json(silent=True) or {}
    prompt = data.get("prompt", "Say hello from Azure App Service in one sentence.")
    completion = client.chat.completions.create(
        model=DEPLOYMENT,
        messages=[
            {"role": "system", "content": "You are a helpful assistant."},
            {"role": "user", "content": prompt},
        ],
        max_tokens=200,
    )
    return jsonify(reply=completion.choices[0].message.content)


if __name__ == "__main__":
    app.run(host="0.0.0.0", port=int(os.environ.get("PORT", 8000)))
Run it locally to confirm it works (your az login session provides the token):
python -m venv .venv
source .venv/bin/activate   # Windows: .venv\Scripts\activate
pip install -r requirements.txt
export AZURE_OPENAI_ENDPOINT="https://<your-openai>.openai.azure.com/"
export AZURE_OPENAI_DEPLOYMENT="gpt-4o"
python app.py
# In another terminal:
curl http://localhost:8000/health
The App Service startup command for this app is gunicorn --bind=0.0.0.0 --timeout 600 app:app.
Python App Service apps run on Linux plans only. If you need Windows, use the Node.js or .NET variant.
Create a project with these files.
package.json
{
  "name": "ai-app-appservice",
  "version": "1.0.0",
  "main": "server.js",
  "scripts": {
    "start": "node server.js"
  },
  "engines": {
    "node": ">=20"
  },
  "dependencies": {
    "@azure/identity": "^4.5.0",
    "express": "^4.21.2",
    "openai": "^4.73.0"
  }
}
server.js
const express = require("express");
const { DefaultAzureCredential, getBearerTokenProvider } = require("@azure/identity");
const { AzureOpenAI } = require("openai");

const app = express();
app.use(express.json());

const endpoint = process.env.AZURE_OPENAI_ENDPOINT;
const deployment = process.env.AZURE_OPENAI_DEPLOYMENT;
const apiVersion = process.env.AZURE_OPENAI_API_VERSION || "2024-10-21";

// Keyless auth: DefaultAzureCredential uses the App Service managed identity in
// Azure and your az login session locally. No API keys anywhere.
const tokenProvider = getBearerTokenProvider(
  new DefaultAzureCredential(),
  "https://cognitiveservices.azure.com/.default"
);
const client = new AzureOpenAI({ endpoint, apiVersion, azureADTokenProvider: tokenProvider });

app.get("/health", (_req, res) => res.json({ status: "ok" }));

app.get("/", (_req, res) =>
  res.send('<h1>AI app on Azure App Service</h1><p>POST JSON {"prompt":"..."} to <code>/chat</code>.</p>')
);

app.post("/chat", async (req, res) => {
  try {
    const prompt = req.body?.prompt || "Say hello from Azure App Service in one sentence.";
    const completion = await client.chat.completions.create({
      model: deployment,
      messages: [
        { role: "system", content: "You are a helpful assistant." },
        { role: "user", content: prompt },
      ],
      max_tokens: 200,
    });
    res.json({ reply: completion.choices[0].message.content });
  } catch (err) {
    console.error(err);
    res.status(500).json({ error: "completion failed" });
  }
});

const port = process.env.PORT || 3000;
app.listen(port, () => console.log(`Listening on ${port}`));
Install and run locally:
npm install
export AZURE_OPENAI_ENDPOINT="https://<your-openai>.openai.azure.com/"
export AZURE_OPENAI_DEPLOYMENT="gpt-4o"
node server.js
# In another terminal:
curl http://localhost:3000/health
The Node.js sample runs on both Windows and Linux App Service plans. The steps below use Linux; the Windows notes call out the differences.
The deployment steps are identical - only the keyless client setup differs. Add the Azure.AI.OpenAI and Azure.Identity packages, then build the client with DefaultAzureCredential:
using Azure.AI.OpenAI;
using Azure.Identity;
using OpenAI.Chat;

var endpoint = new Uri(Environment.GetEnvironmentVariable("AZURE_OPENAI_ENDPOINT")!);
var deployment = Environment.GetEnvironmentVariable("AZURE_OPENAI_DEPLOYMENT")!;

// Keyless: no API key, uses the App Service managed identity at runtime.
var client = new AzureOpenAIClient(endpoint, new DefaultAzureCredential());
ChatClient chat = client.GetChatClient(deployment);

var completion = await chat.CompleteChatAsync(
    new UserChatMessage("Say hello from Azure App Service in one sentence."));
Console.WriteLine(completion.Value.Content[0].Text);
.NET runs on both Windows and Linux plans. Use az webapp create --runtime "DOTNETCORE:8.0" (Linux) or "dotnet:8" (Windows) in the deployment steps.
Python and Node.js are the fully worked samples in this lab; the pattern is the same in Java. Add the azure-ai-openai and azure-identity dependencies, then build the client with DefaultAzureCredential:
import com.azure.ai.openai.OpenAIClient;
import com.azure.ai.openai.OpenAIClientBuilder;
import com.azure.identity.DefaultAzureCredentialBuilder;

String endpoint = System.getenv("AZURE_OPENAI_ENDPOINT");

// Keyless: credential resolves to the App Service managed identity in Azure.
OpenAIClient client = new OpenAIClientBuilder()
    .endpoint(endpoint)
    .credential(new DefaultAzureCredentialBuilder().build())
    .buildClient();
Java runs on both Windows and Linux plans. Package your app as an executable JAR and use a Java runtime such as JAVA|17-java17 in the deployment steps.
The Azure OpenAI SDKs target Python, Node.js, .NET, and Java. For PHP, call the REST API directly and fetch a Microsoft Entra token with the managed identity. On App Service, the identity endpoint is available through the IDENTITY_ENDPOINT and IDENTITY_HEADER environment variables:
<?php
// Fetch a token for Azure OpenAI from the App Service managed identity endpoint.
$resource = "https://cognitiveservices.azure.com";
$url = getenv("IDENTITY_ENDPOINT") . "?resource=$resource&api-version=2019-08-01";
$ch = curl_init($url);
curl_setopt($ch, CURLOPT_RETURNTRANSFER, true);
curl_setopt($ch, CURLOPT_HTTPHEADER, ["X-IDENTITY-HEADER: " . getenv("IDENTITY_HEADER")]);
$token = json_decode(curl_exec($ch), true)["access_token"];
// Use $token as a Bearer token against
// $AZURE_OPENAI_ENDPOINT/openai/deployments/<name>/chat/completions?api-version=2024-10-21
PHP is supported on Linux plans only.
Create the Azure OpenAI resource
The app needs an Azure OpenAI resource with a chat model deployed. You create this once, regardless of how you deploy the app.
- Azure Developer CLI (azd)
- Azure CLI (az)
- Azure portal
With azd, the Azure OpenAI resource, the model deployment, the App Service, and the role assignment are all defined in Bicep and created by azd up in the next section. Skip ahead to Deploy to App Service.
Create the resource group and Azure OpenAI account, then deploy a gpt-4o model. Use a unique suffix so the OpenAI endpoint is globally unique:
SUFFIX=$(openssl rand -hex 3)   # 6 lowercase hex chars
export RG="rg-asl-aiapp-${SUFFIX}"
export LOCATION=eastus
export AOAI="aoai-asl-${SUFFIX}"
export DEPLOYMENT="gpt-4o"

az group create --name "$RG" --location "$LOCATION"

az cognitiveservices account create --name "$AOAI" --resource-group "$RG" \
  --location "$LOCATION" --kind OpenAI --sku S0 --custom-domain "$AOAI" --yes

az cognitiveservices account deployment create --name "$AOAI" --resource-group "$RG" \
  --deployment-name "$DEPLOYMENT" \
  --model-name gpt-4o --model-version "2024-11-20" --model-format OpenAI \
  --sku-name Standard --sku-capacity 10
Capture the endpoint for later:
export ENDPOINT=$(az cognitiveservices account show --name "$AOAI" \
  --resource-group "$RG" --query properties.endpoint --output tsv)
echo "$ENDPOINT"
gpt-4o version 2024-11-20 was current when this lab was validated. If Azure reports a version as deprecated, list what's available with az cognitiveservices account list-models --name "$AOAI" --resource-group "$RG" --output table and pick a current one.
-
In the Azure portal, select Create a resource, search for Azure OpenAI, and select Create.
-
On the Basics tab, set Region to East US, enter a unique Name (for example
aoai-asl-xxxxxx), and choose the Standard S0 pricing tier. Select Review + create, then Create.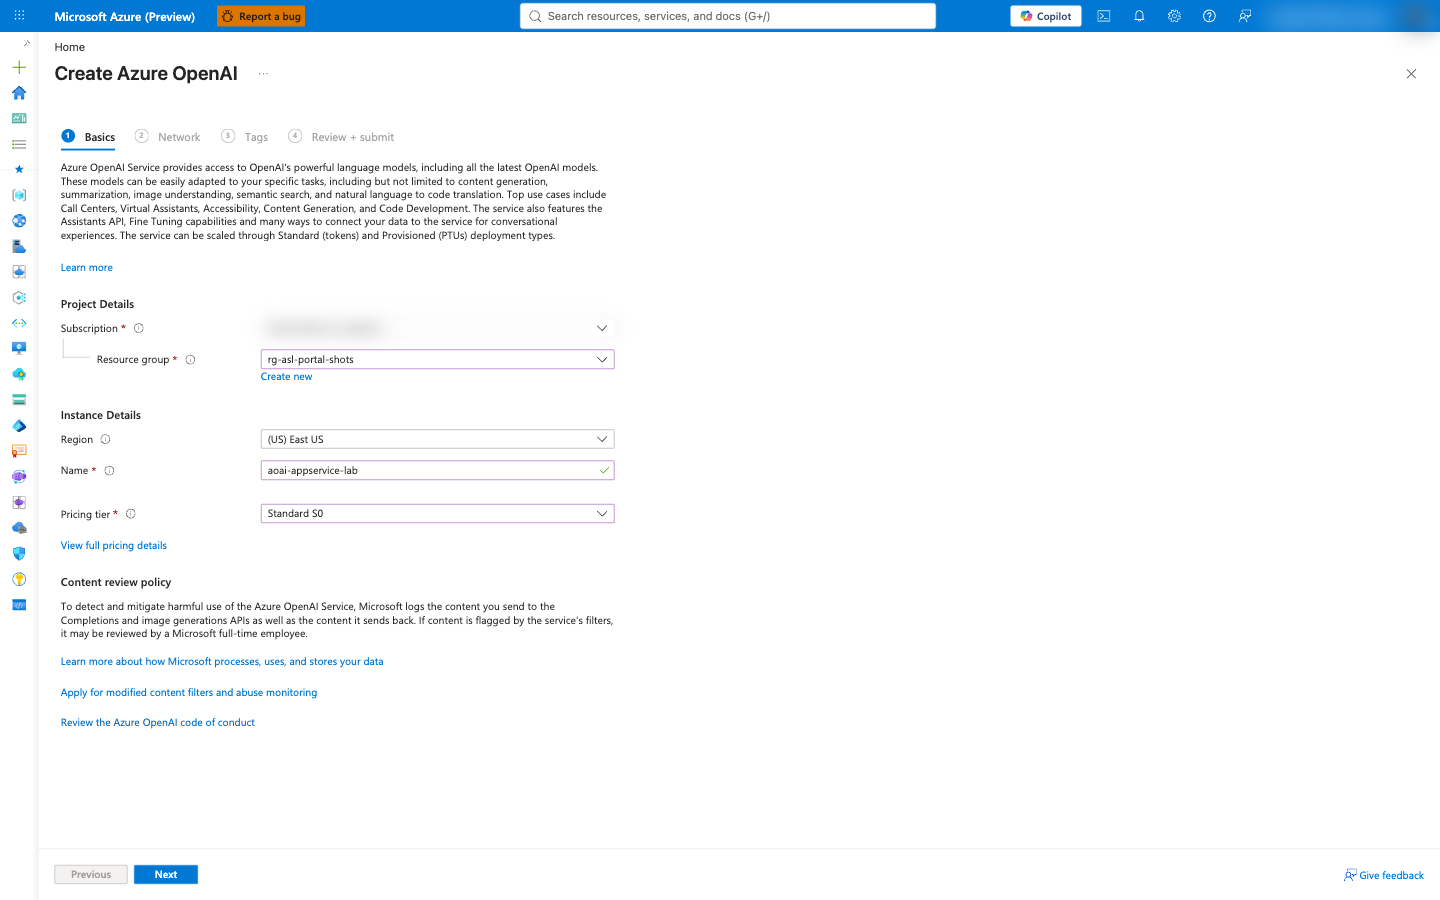
-
When the resource is ready, open it and select Go to Azure AI Foundry portal (or open ai.azure.com). Under Deployments, select Deploy model > Deploy base model.
-
Choose gpt-4o, set the Deployment name to
gpt-4o, keep Deployment type = Standard, and select Deploy.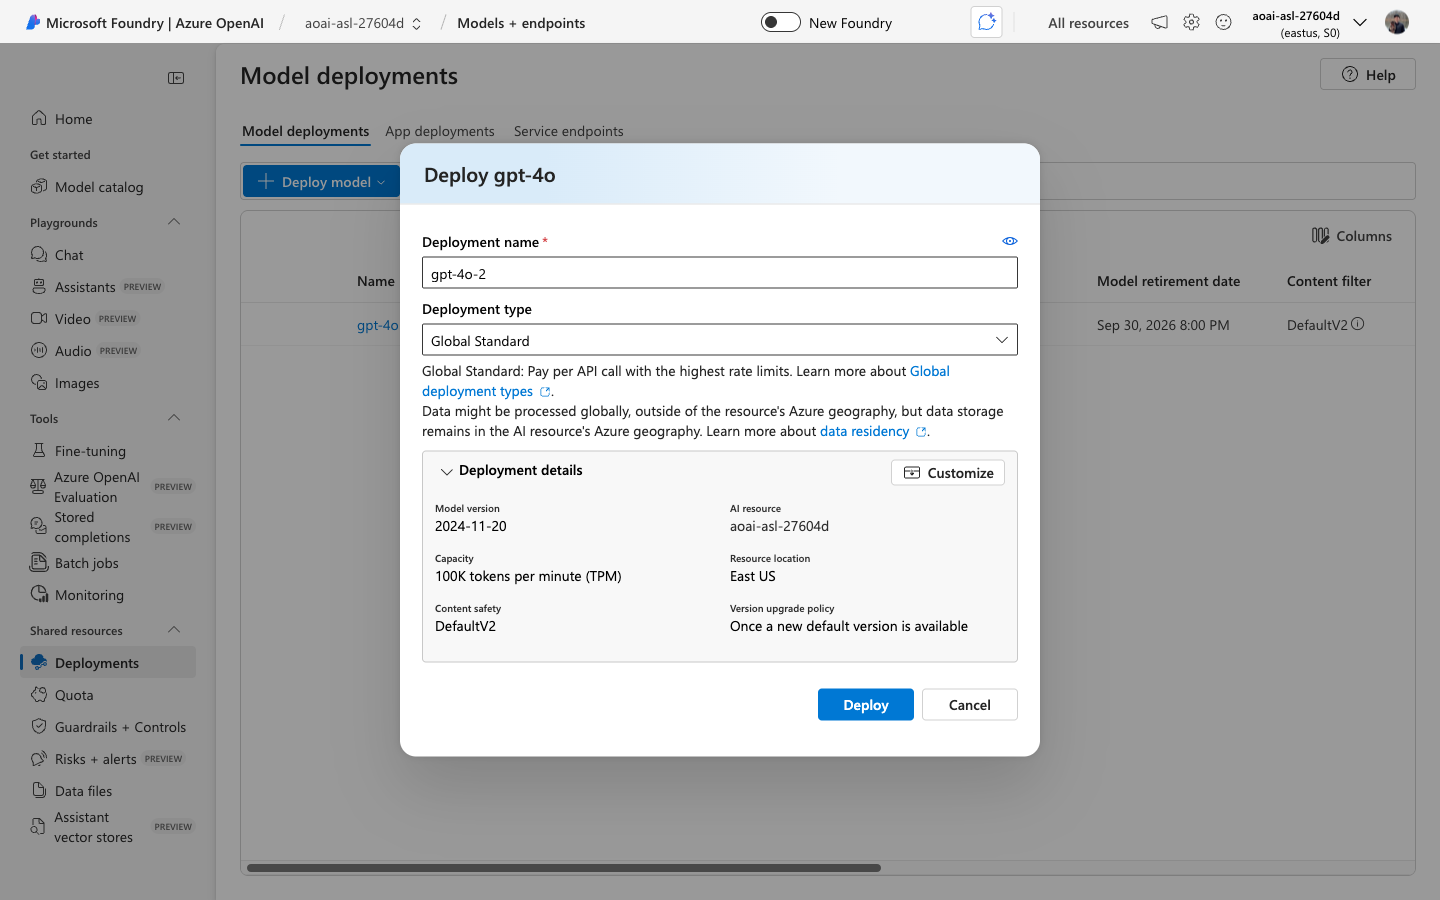
-
On the OpenAI resource Overview, copy the Endpoint (for example
https://aoai-asl-xxxxxx.openai.azure.com/). You'll use it as an app setting.
Deploy to App Service
Choose one deployment mechanism. All three create a Linux App Service on a low-cost B1 plan, turn on the app's managed identity, and grant it the Cognitive Services OpenAI User role so the keyless call works.
- Azure Developer CLI (azd)
- Azure CLI (az)
- Azure portal
The Azure Developer CLI provisions everything - Azure OpenAI, the model deployment, the App Service, the managed identity, and the role assignment - then deploys your code in one step. Add these files to your project.
azure.yaml
# yaml-language-server: $schema=https://raw.githubusercontent.com/Azure/azure-dev/main/schemas/v1.0/azure.yaml.json
name: ai-app-appservice
services:
  web:
    project: .
    language: py   # use "js" for the Node.js variant
    host: appservice
infra/main.bicep
targetScope = 'subscription'

param resourceGroupName string
param location string
param openAiAccountName string
param webAppName string
param appServicePlanName string
param chatDeploymentName string = 'gpt-4o'

resource rg 'Microsoft.Resources/resourceGroups@2024-03-01' = {
  name: resourceGroupName
  location: location
}

module resources 'resources.bicep' = {
  name: 'ai-app-resources'
  scope: rg
  params: {
    location: location
    openAiAccountName: openAiAccountName
    webAppName: webAppName
    appServicePlanName: appServicePlanName
    chatDeploymentName: chatDeploymentName
  }
}

output WEB_URI string = resources.outputs.webUri
output AZURE_OPENAI_ENDPOINT string = resources.outputs.openAiEndpoint
infra/resources.bicep
param location string
param openAiAccountName string
param webAppName string
param appServicePlanName string
param chatDeploymentName string = 'gpt-4o'

// Role definition ID for "Cognitive Services OpenAI User".
var openAiUserRoleId = '5e0bd9bd-7b93-4f28-af87-19fc36ad61bd'

resource openAi 'Microsoft.CognitiveServices/accounts@2024-10-01' = {
  name: openAiAccountName
  location: location
  kind: 'OpenAI'
  sku: { name: 'S0' }
  properties: {
    customSubDomainName: openAiAccountName
    publicNetworkAccess: 'Enabled'
    disableLocalAuth: true   // keyless only: block API-key auth entirely
  }
}

resource chat 'Microsoft.CognitiveServices/accounts/deployments@2024-10-01' = {
  parent: openAi
  name: chatDeploymentName
  sku: { name: 'Standard', capacity: 10 }
  properties: {
    model: { format: 'OpenAI', name: 'gpt-4o', version: '2024-11-20' }
  }
}

resource plan 'Microsoft.Web/serverfarms@2023-12-01' = {
  name: appServicePlanName
  location: location
  sku: { name: 'B1', tier: 'Basic' }
  kind: 'linux'
  properties: { reserved: true }
}

resource web 'Microsoft.Web/sites@2023-12-01' = {
  name: webAppName
  location: location
  kind: 'app,linux'
  tags: { 'azd-service-name': 'web' }
  identity: { type: 'SystemAssigned' }
  properties: {
    serverFarmId: plan.id
    httpsOnly: true
    siteConfig: {
      linuxFxVersion: 'PYTHON|3.12'   // use 'NODE|22-lts' for Node.js
      alwaysOn: true
      minTlsVersion: '1.2'
      healthCheckPath: '/health'
      appCommandLine: 'gunicorn --bind=0.0.0.0 --timeout 600 app:app'  // Node.js: leave empty (uses npm start)
      appSettings: [
        { name: 'SCM_DO_BUILD_DURING_DEPLOYMENT', value: 'true' }
        { name: 'AZURE_OPENAI_ENDPOINT', value: openAi.properties.endpoint }
        { name: 'AZURE_OPENAI_DEPLOYMENT', value: chatDeploymentName }
        { name: 'AZURE_OPENAI_API_VERSION', value: '2024-10-21' }
      ]
    }
  }
}

// Grant the web app's managed identity keyless access to Azure OpenAI.
resource roleAssignment 'Microsoft.Authorization/roleAssignments@2022-04-01' = {
  name: guid(openAi.id, web.id, openAiUserRoleId)
  scope: openAi
  properties: {
    principalId: web.identity.principalId
    roleDefinitionId: subscriptionResourceId('Microsoft.Authorization/roleDefinitions', openAiUserRoleId)
    principalType: 'ServicePrincipal'
  }
}

output webUri string = 'https://${web.properties.defaultHostName}'
output openAiEndpoint string = openAi.properties.endpoint
infra/main.parameters.json
{
  "$schema": "https://schema.management.azure.com/schemas/2019-04-01/deploymentParameters.json#",
  "contentVersion": "1.0.0.0",
  "parameters": {
    "resourceGroupName": { "value": "${AZURE_RESOURCE_GROUP}" },
    "location": { "value": "${AZURE_LOCATION}" },
    "openAiAccountName": { "value": "${OPENAI_ACCOUNT_NAME}" },
    "webAppName": { "value": "${WEB_APP_NAME}" },
    "appServicePlanName": { "value": "${APP_SERVICE_PLAN_NAME}" },
    "chatDeploymentName": { "value": "${CHAT_DEPLOYMENT_NAME=gpt-4o}" }
  }
}
Create an environment and set names. Use a unique suffix so the hostnames are globally unique:
SUFFIX=$(openssl rand -hex 3)
azd env new aiapp --location eastus --subscription <your-subscription-id>
azd env set AZURE_RESOURCE_GROUP "rg-asl-aiapp-${SUFFIX}"
azd env set OPENAI_ACCOUNT_NAME "aoai-asl-${SUFFIX}"
azd env set WEB_APP_NAME "app-asl-aiapp-${SUFFIX}"
azd env set APP_SERVICE_PLAN_NAME "plan-asl-aiapp-${SUFFIX}"
Provision and deploy:
azd up
When it finishes, azd prints the endpoint, for example:
Endpoint: https://app-asl-aiapp-xxxxxx.azurewebsites.net/
SUCCESS: Your application was deployed to Azure in 6 minutes 12 seconds.
Because the role assignment is in the Bicep, the keyless call works as soon as the app starts - no extra steps.
On the very first azd up, azd occasionally reports it can't find the tagged resource because provisioning outputs aren't cached yet. If that happens, run azd deploy once more - the resources already exist and the code deploy completes.
Skip to Verify the app.
You already created the resource group and Azure OpenAI resource above. Now create the App Service, deploy the code, turn on the managed identity, and grant it the role.
Create the plan and web app (Python 3.12 shown; for Node.js use NODE:22-lts):
export PLAN="plan-asl-aiapp-${SUFFIX}"
export APP="app-asl-aiapp-${SUFFIX}"

az appservice plan create --resource-group "$RG" --name "$PLAN" --is-linux --sku B1
az webapp create --resource-group "$RG" --plan "$PLAN" --name "$APP" --runtime "PYTHON:3.12"
Configure build, startup, health check, and the app settings the code reads:
az webapp config appsettings set --resource-group "$RG" --name "$APP" --settings \
  SCM_DO_BUILD_DURING_DEPLOYMENT=true \
  AZURE_OPENAI_ENDPOINT="$ENDPOINT" \
  AZURE_OPENAI_DEPLOYMENT="$DEPLOYMENT" \
  AZURE_OPENAI_API_VERSION="2024-10-21"

az webapp config set --resource-group "$RG" --name "$APP" \
  --startup-file "gunicorn --bind=0.0.0.0 --timeout 600 app:app" \
  --generic-configurations '{"healthCheckPath":"/health"}'
Turn on the system-assigned managed identity and grant it the Cognitive Services OpenAI User role on the OpenAI resource:
PRINCIPAL_ID=$(az webapp identity assign --resource-group "$RG" --name "$APP" \
  --query principalId --output tsv)

AOAI_ID=$(az cognitiveservices account show --name "$AOAI" \
  --resource-group "$RG" --query id --output tsv)

az role assignment create --assignee-object-id "$PRINCIPAL_ID" \
  --assignee-principal-type ServicePrincipal \
  --role "Cognitive Services OpenAI User" --scope "$AOAI_ID"
Package the source (App Service installs dependencies remotely) and deploy:
zip -r app.zip app.py requirements.txt
az webapp deploy --resource-group "$RG" --name "$APP" --src-path app.zip --type zip
For the Node.js variant, use --runtime "NODE:22-lts", leave the startup command empty (App Service runs npm start), and zip server.js package.json.
The remote build can take a few minutes. If az webapp deploy returns a 504 GatewayTimeout, the build is usually still finishing - wait a minute and check the endpoint. It succeeds even when the client-side poll times out.
Get the hostname:
az webapp show --resource-group "$RG" --name "$APP" --query defaultHostName --output tsv
-
In the Azure portal, select Create a resource > Web App.
-
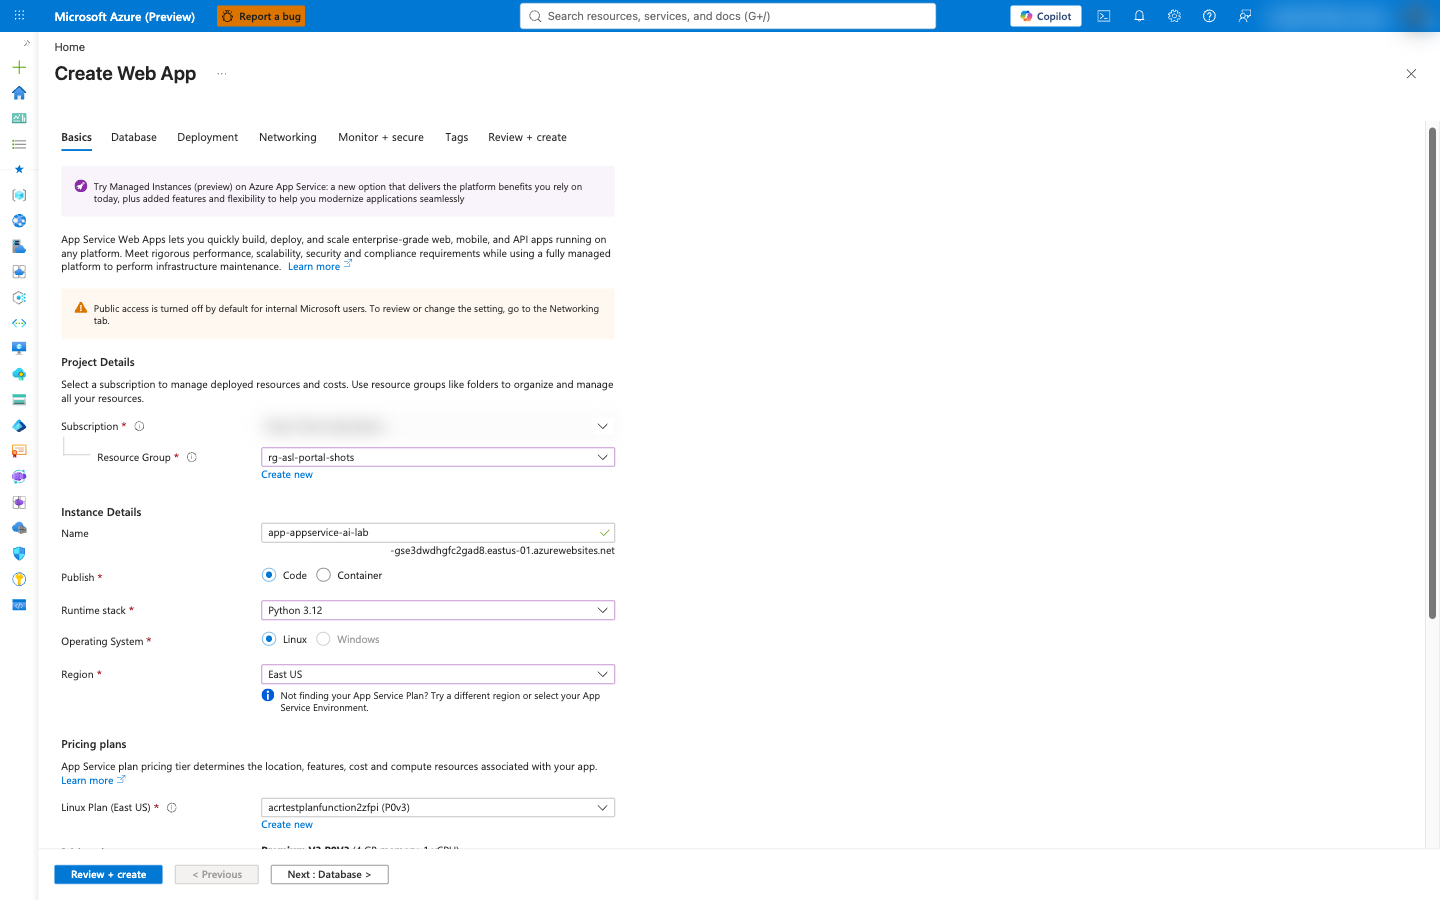
On the Basics tab, set:
- Publish: Code
- Runtime stack: Python 3.12 (or Node 22 LTS)
- Operating System: Linux
- Region: East US
- Pricing plan: create or select a Basic B1 plan.
-
Select Review + create, then Create. Wait for deployment to finish, then open the app.
-
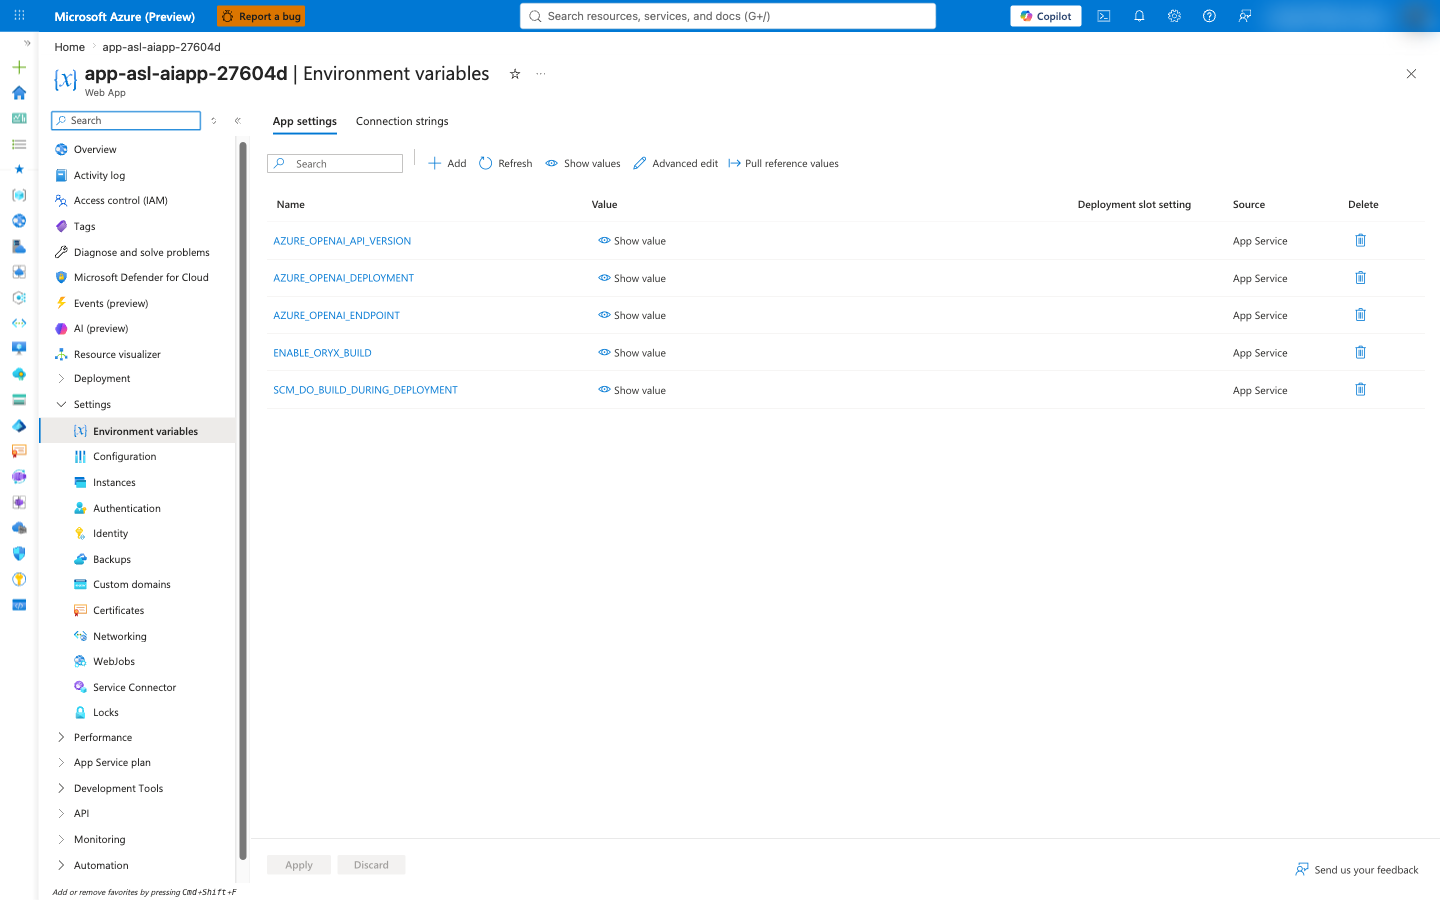
Under Settings > Configuration (or Environment variables), add these app settings, then select Apply:
SCM_DO_BUILD_DURING_DEPLOYMENT=trueAZURE_OPENAI_ENDPOINT= your OpenAI endpointAZURE_OPENAI_DEPLOYMENT=gpt-4oAZURE_OPENAI_API_VERSION=2024-10-21
-
Under Settings > Configuration > General settings, set the Startup Command to
gunicorn --bind=0.0.0.0 --timeout 600 app:app(leave empty for Node.js), turn Always On to On, and set the Health check path to/health. -
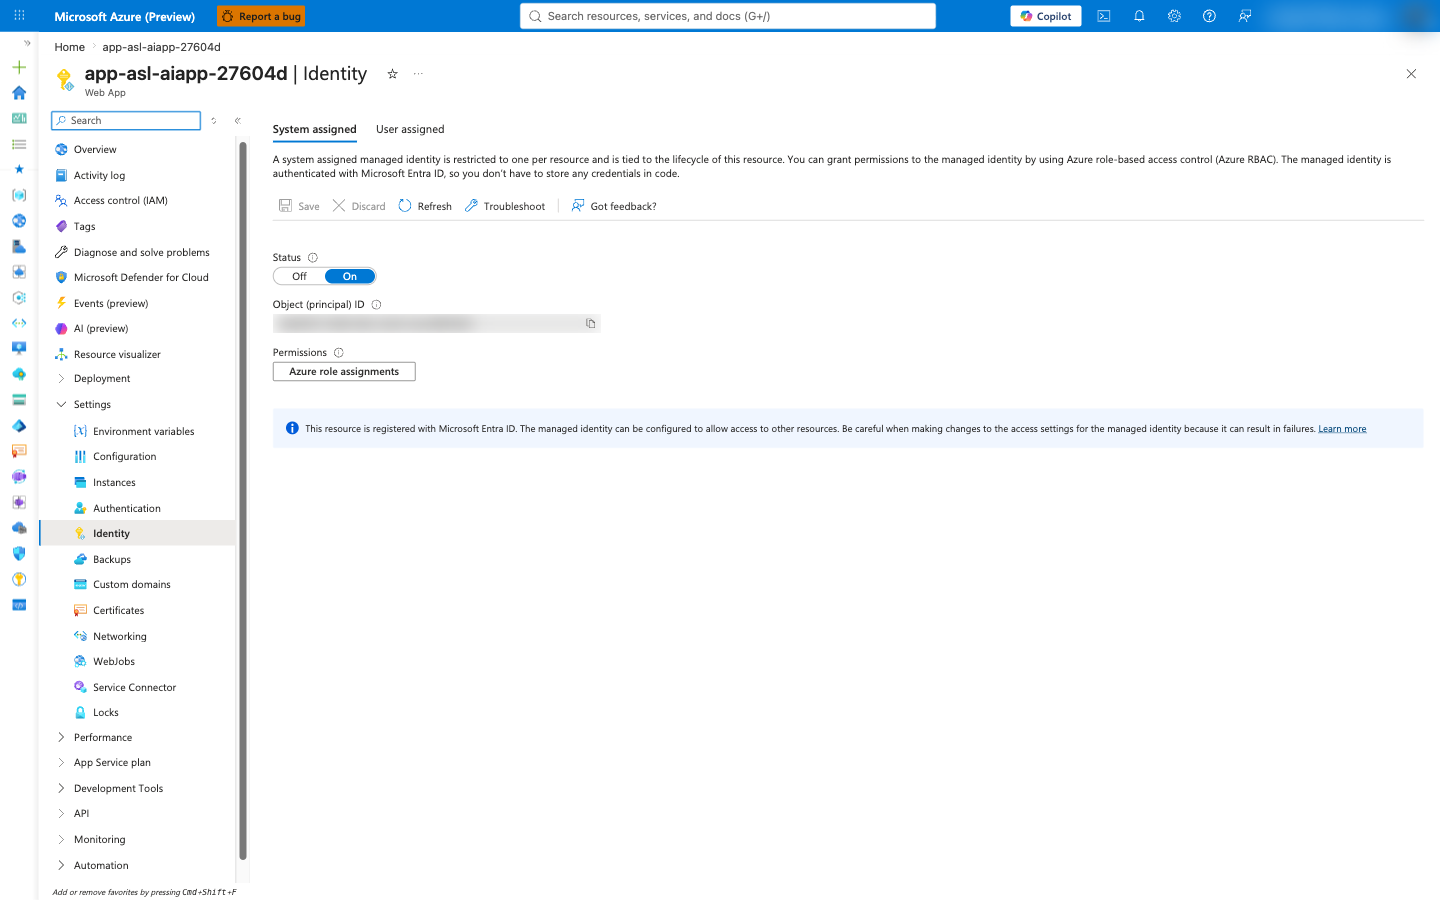
Under Settings > Identity > System assigned, set Status to On and select Save. Copy the Object (principal) ID.
-
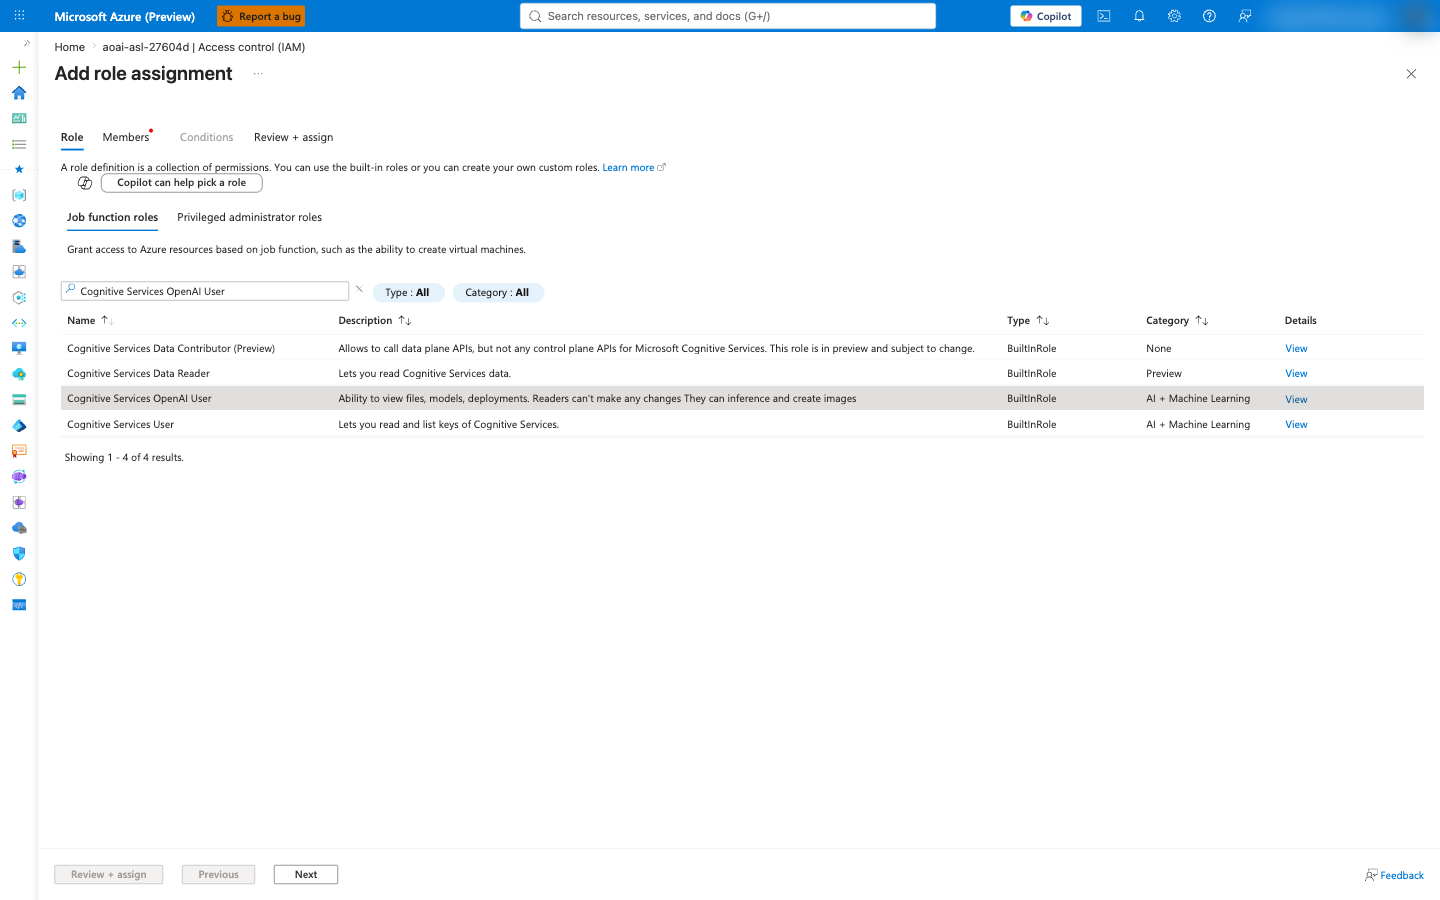
Open your Azure OpenAI resource > Access control (IAM) > Add > Add role assignment. Select the Cognitive Services OpenAI User role, then under Members choose Managed identity and select your web app. Select Review + assign.
-
Under Deployment > Deployment Center, connect a source (for example, Local Git or GitHub) and push your code. App Service builds and starts the app.
-
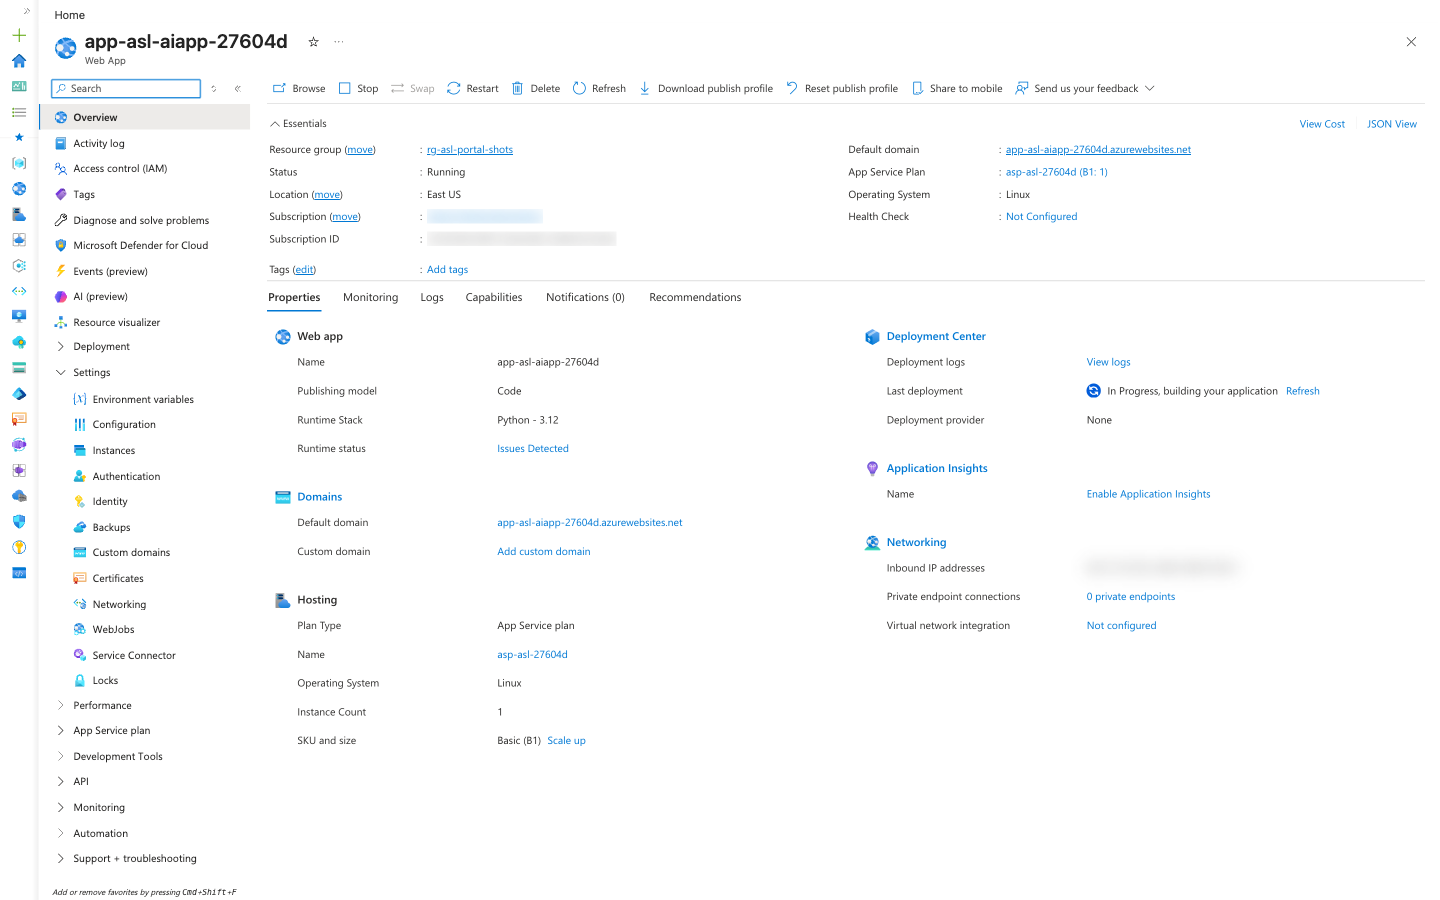
On the app's Overview page, copy the Default domain.
Verify the app
Set APP_URL to your app's hostname, then test the health and chat endpoints:
export APP_URL="https://app-asl-aiapp-xxxxxx.azurewebsites.net"

# 1) Health check
curl -i "$APP_URL/health"

# 2) Keyless AI call - no API key in the request
curl -s -X POST "$APP_URL/chat" \
  -H "Content-Type: application/json" \
  -d '{"prompt":"In one short sentence, say hello from Azure App Service using a keyless managed identity."}'
Expected results (captured during authoring):
HTTP/1.1 200 OK
{"status":"ok"}
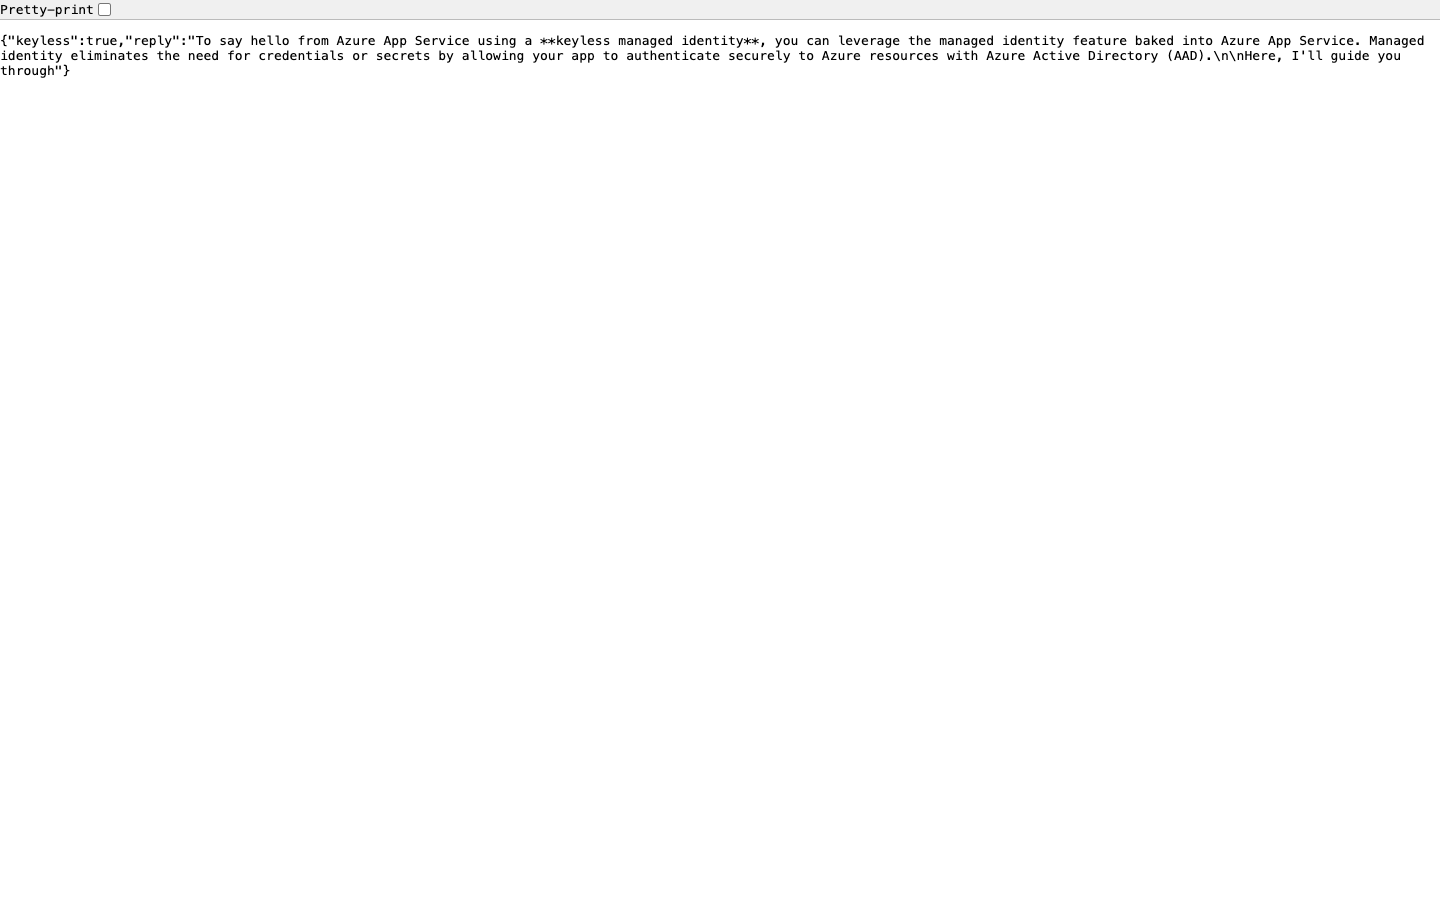
{"reply":"\"Hello from Azure App Service using a keyless managed identity!\""}
A 200 with a reply payload confirms the app reached Azure OpenAI without any key - the managed identity fetched a token and the Cognitive Services OpenAI User role authorized the call.
The first request after a deployment may take a few seconds while the app starts and the identity fetches its first token. If you see a 503 or an auth error immediately after granting the role, wait a minute for the role assignment to propagate and try again.
Clean up resources
To avoid ongoing charges (App Service plan plus Azure OpenAI token usage), delete the resource group when you're done:
az group delete --name "$RG" --yes --no-wait
Confirm it's gone:
az group exists --name "$RG" # should print: false
If you deployed with azd, you can instead run:
azd down --force --purge
Azure OpenAI accounts are soft-deleted and still count against your regional quota until purged. If you plan to recreate one with the same name, purge it with az cognitiveservices account purge --name "$AOAI" --resource-group "$RG" --location "$LOCATION" after the group is deleted.
Summary
You built a small AI web app, provisioned Azure OpenAI with a gpt-4o deployment, and deployed the app to Azure App Service with azd, the Azure CLI, and the portal. Instead of storing an API key, you turned on the app's managed identity and granted it the Cognitive Services OpenAI User role, then confirmed a real completion returned over HTTPS with no key anywhere in your code or configuration. This keyless pattern is the recommended way to reach Azure OpenAI - and the same DefaultAzureCredential code works locally and in the cloud, so there's nothing to change between environments.
Troubleshooting
401orPermissionDeniedfrom/chat. The managed identity is missing the role, or the assignment hasn't propagated. Confirm the app has a system-assigned identity, that it holds Cognitive Services OpenAI User on the OpenAI resource, and wait a minute after assigning before retrying.DefaultAzureCredential failed to retrieve a token. Locally, runaz login. On App Service, confirm the system-assigned identity is On under Settings > Identity.DeploymentNotFoundor404on the model. TheAZURE_OPENAI_DEPLOYMENTapp setting must match the deployment name you created (this lab usesgpt-4o), not the model name.ServiceModelDeprecatedwhen creating the deployment. The pinned model version is no longer available. List current versions withaz cognitiveservices account list-models --name "$AOAI" --resource-group "$RG" --output tableand update the version.503right after deploy. The app is still starting. Turn on Always On, confirm the startup command, and check logs withaz webapp log tail --resource-group "$RG" --name "$APP".
Learn more
- What is Azure OpenAI Service?
- How to configure Azure OpenAI with managed identities
- Managed identities for App Service
- DefaultAzureCredential in the Azure Identity library
- Configure a Python app for App Service
- Configure a Node.js app for App Service
- Role-based access control for Azure OpenAI
- Back to the Scenarios & Modern Apps overview