Deploy a custom container
In this lab, you package a small web app as a container image, push it to Azure Container Registry, and run it on Azure App Service with Web App for Containers. A custom container lets you bring your own runtime, system packages, and dependencies while App Service handles TLS, scaling, and patching of the host.
The app pulls its image from your registry using a managed identity granted the AcrPull role - so App Service authenticates to the registry with an Azure identity instead of admin username and password credentials.
You'll build the same result three ways so you can pick the workflow that fits you:
- Azure Developer CLI (azd) - an opinionated, repeatable workflow that provisions the registry and app, then builds and pushes your image in one step.
- Azure CLI (az) - explicit commands that create each resource, build the image, and wire up managed-identity pull.
- Azure portal - a visual, click-through experience.
You can follow the lab in your language of choice: .NET, Node.js, Python, Java, or PHP. Each path pins its base image to a specific tag so builds stay reproducible.
This lab is a hands-on, end-to-end walkthrough. For reference depth on any concept, follow the "Learn more" links to the official Microsoft Learn quickstarts.
Estimated time: 20-30 minutes
What you'll build
A Linux web app running on an App Service plan that pulls a container image from Azure Container Registry. App Service uses the app's system-assigned managed identity (holding the AcrPull role) to authenticate to the registry, then serves the container at a default https://<app-name>.azurewebsites.net hostname that returns HTTP 200.
Prerequisites
Before you begin, you will need an Azure subscription with Owner permissions and a GitHub account.
In addition, you will need the following tools installed on your local machine:
- Visual Studio Code with the following extensions:
- Azure CLI
- GitHub CLI
- Git
- Docker Desktop (optional - only needed if you build images locally instead of with az acr build)
- Azure Developer CLI (azd) (for the azd path)
- The SDK or runtime for your chosen language (.NET SDK, Node.js, Python, JDK + Maven, or PHP - only if you want to run the app locally first)
- POSIX-compliant shell (bash, zsh, Azure Cloud Shell)
Setup Azure CLI
Start by logging into Azure by run the following command and follow the prompts:
az login --use-device-code
You can log into a different tenant by passing in the --tenant flag to specify your tenant domain or tenant ID.
This lab uses the East US region and the B1 (Basic) pricing tier, a low-cost option that's ideal for learning. Custom containers require a Basic tier or higher - the Free (F1) tier doesn't support them. You can change the region to one near you.
Containerize the app
Each language below packages a tiny web server that returns Hello from a custom container on Azure App Service! and listens on port 80. Pick your language, create the files, then build the image in a later step.
App Service for Linux containers routes public traffic to the port your container listens on. This lab has every container listen on port 80 and sets the WEBSITES_PORT app setting to 80 so the mapping is explicit.
- .NET
- Node.js
- Python
- Java
- PHP
Create an ASP.NET Core app:
mkdir custom-container-app && cd custom-container-app
dotnet new web -n MyApp
Make the app listen on port 80. In MyApp/Program.cs, ensure the app responds on the root path:
var builder = WebApplication.CreateBuilder(args);
var app = builder.Build();
app.MapGet("/", () => Results.Content(
    "<h1>Hello from a custom container on Azure App Service!</h1>", "text/html"));
app.Run();
Create Dockerfile in the custom-container-app folder. This multi-stage build compiles with the SDK image and runs on the smaller ASP.NET runtime image:
# Build stage - pinned to a specific tag, never :latest
FROM mcr.microsoft.com/dotnet/sdk:8.0 AS build
WORKDIR /src
COPY MyApp/. ./MyApp/
RUN dotnet publish MyApp -c Release -o /app

# Runtime stage
FROM mcr.microsoft.com/dotnet/aspnet:8.0
WORKDIR /app
COPY --from=build /app .
ENV ASPNETCORE_URLS=http://+:80
EXPOSE 80
ENTRYPOINT ["dotnet", "MyApp.dll"]
Create server.js:
const http = require('http');
const port = process.env.PORT || 80;
http.createServer((req, res) => {
  res.writeHead(200, { 'Content-Type': 'text/html' });
  res.end('<h1>Hello from a custom container on Azure App Service!</h1>');
}).listen(port, () => console.log('listening on ' + port));
Create package.json:
{
  "name": "custom-container-webapp",
  "version": "1.0.0",
  "main": "server.js",
  "scripts": { "start": "node server.js" }
}
Create Dockerfile:
# Pinned to a specific tag, never :latest
FROM node:22-alpine
WORKDIR /app
COPY package.json ./
COPY server.js ./
ENV PORT=80
EXPOSE 80
CMD ["node", "server.js"]
Create app.py (a minimal Flask app):
from flask import Flask

app = Flask(__name__)

@app.route("/")
def home():
    return "<h1>Hello from a custom container on Azure App Service!</h1>"
Create requirements.txt:
flask
gunicorn
Create Dockerfile. Gunicorn serves the Flask app object on port 80:
# Pinned to a specific tag, never :latest
FROM python:3.13-slim
WORKDIR /app
COPY requirements.txt ./
RUN pip install --no-cache-dir -r requirements.txt
COPY . .
EXPOSE 80
CMD ["gunicorn", "--bind", "0.0.0.0:80", "app:app"]
Use a Spring Boot app that returns the greeting from the root path, packaged as an executable JAR. Create Dockerfile. This multi-stage build compiles with Maven and runs on a slim JRE image:
# Build stage - pinned to a specific tag, never :latest
FROM maven:3.9-eclipse-temurin-17 AS build
WORKDIR /src
COPY . .
RUN mvn -q clean package -DskipTests

# Runtime stage
FROM eclipse-temurin:17-jre
WORKDIR /app
COPY --from=build /src/target/*.jar app.jar
EXPOSE 80
ENTRYPOINT ["java", "-jar", "app.jar", "--server.port=80"]
Set server.port=80 (as shown) so Spring Boot binds the port App Service expects.
Create index.php:
<?php echo "<h1>Hello from a custom container on Azure App Service!</h1>"; ?>
Create Dockerfile. The Apache image serves on port 80 by default:
# Pinned to a specific tag, never :latest
FROM php:8.4-apache
COPY index.php /var/www/html/
EXPOSE 80
Pinning to a tag (for example, node:22-alpine) is required by this lab - never use :latest. For the strongest guarantee, pin to an immutable digest, for example node:22-alpine@sha256:..., so the base image can never change underneath you.
Deploy to App Service
Choose a deployment mechanism. All three create a Basic B1 Linux App Service plan, an Azure Container Registry with the admin user disabled, and a web app that pulls the image using its system-assigned managed identity.
- Azure Developer CLI (azd)
- Azure CLI (az)
- Azure portal
The Azure Developer CLI provisions the registry and app with Bicep, then a postprovision hook builds your image with az acr build, pushes it to the registry, and points the app at it. Add these files alongside your Dockerfile.
azure.yaml
# yaml-language-server: $schema=https://raw.githubusercontent.com/Azure/azure-dev/main/schemas/v1.0/azure.yaml.json
name: asl-custom-container
hooks:
  postprovision:
    posix:
      shell: sh
      # Build the image in the cloud and point the app at it after provisioning.
      # The variables come from the Bicep outputs (azd exposes them as env vars).
      run: |
        az acr build --registry "$ACR_NAME" --image customwebapp:v1 .
        az webapp config container set \
          --name "$WEB_APP_NAME" --resource-group "$AZURE_RESOURCE_GROUP" \
          --container-image-name "$ACR_LOGIN_SERVER/customwebapp:v1" \
          --container-registry-url "https://$ACR_LOGIN_SERVER"
        az webapp restart --name "$WEB_APP_NAME" --resource-group "$AZURE_RESOURCE_GROUP"
azd's built-in code deploy (the services block) publishes app code, not container images, to App Service. Building the image in a postprovision hook keeps everything in one azd up and pulls with managed identity - no admin credentials.
infra/main.bicep
targetScope = 'subscription'

@description('Name of the azd environment; used to derive resource names.')
param environmentName string

@description('Azure region for all resources.')
param location string

@description('Resource group to create for this environment.')
param resourceGroupName string

resource rg 'Microsoft.Resources/resourceGroups@2024-03-01' = {
  name: resourceGroupName
  location: location
}

module resources 'resources.bicep' = {
  name: 'resources'
  scope: rg
  params: {
    location: location
    environmentName: environmentName
  }
}

// azd surfaces these outputs as environment variables the postprovision hook reads.
output ACR_NAME string = resources.outputs.acrName
output ACR_LOGIN_SERVER string = resources.outputs.registryEndpoint
output WEB_APP_NAME string = resources.outputs.webAppName
output WEB_URI string = resources.outputs.webUri
infra/resources.bicep
@description('Azure region for all resources.')
param location string

@description('azd environment name used to derive globally unique names.')
param environmentName string

var suffix = uniqueString(subscription().id, resourceGroup().id, environmentName)
var acrName = toLower('acr${suffix}')
var planName = 'plan-${suffix}'
var webName = 'app-${suffix}'
// Built-in AcrPull role definition ID.
var acrPullRoleId = subscriptionResourceId('Microsoft.Authorization/roleDefinitions', '7f951dda-4ed3-4680-a7ca-43fe172d538d')

resource acr 'Microsoft.ContainerRegistry/registries@2023-11-01-preview' = {
  name: acrName
  location: location
  sku: { name: 'Basic' }
  properties: {
    adminUserEnabled: false // pull uses managed identity, not admin creds
  }
}

resource plan 'Microsoft.Web/serverfarms@2023-12-01' = {
  name: planName
  location: location
  sku: { name: 'B1', tier: 'Basic' }
  kind: 'linux'
  properties: { reserved: true } // required for Linux plans
}

resource web 'Microsoft.Web/sites@2023-12-01' = {
  name: webName
  location: location
  kind: 'app,linux,container'
  identity: { type: 'SystemAssigned' } // system-assigned managed identity for ACR pull
  properties: {
    serverFarmId: plan.id
    httpsOnly: true
    siteConfig: {
      // The hook sets the real image after provisioning; this is just a placeholder.
      linuxFxVersion: 'DOCKER|${acr.properties.loginServer}/${webName}:starter'
      acrUseManagedIdentityCreds: true // pull from ACR with the managed identity
      appSettings: [
        { name: 'WEBSITES_PORT', value: '80' }
      ]
    }
  }
}

// Grant the web app's managed identity permission to pull from the registry.
resource acrPull 'Microsoft.Authorization/roleAssignments@2022-04-01' = {
  name: guid(acr.id, web.id, acrPullRoleId)
  scope: acr
  properties: {
    roleDefinitionId: acrPullRoleId
    principalId: web.identity.principalId
    principalType: 'ServicePrincipal'
  }
}

output acrName string = acr.name
output registryEndpoint string = acr.properties.loginServer
output webAppName string = web.name
output webUri string = 'https://${web.properties.defaultHostName}'
infra/main.parameters.json
{
  "$schema": "https://schema.management.azure.com/schemas/2019-04-01/deploymentParameters.json#",
  "contentVersion": "1.0.0.0",
  "parameters": {
    "environmentName": { "value": "${AZURE_ENV_NAME}" },
    "location": { "value": "${AZURE_LOCATION}" },
    "resourceGroupName": { "value": "${AZURE_RESOURCE_GROUP}" }
  }
}
Sign in, create an environment with a unique suffix, then provision and deploy:
azd auth login

SUFFIX=$(openssl rand -hex 3)   # 6 lowercase hex chars
azd env new "asl-cc-${SUFFIX}" --location eastus
azd env set AZURE_RESOURCE_GROUP "rg-customcontainer-${SUFFIX}"

azd up
azd up provisions the registry, plan, and app, then runs the hook to build the image and point the app at it. When it finishes, azd prints a success message and the WEB_URI output:
SUCCESS: Your up workflow to provision and deploy to Azure completed in 2 minutes 16 seconds.
Get the app URL any time with:
azd env get-value WEB_URI
With the Azure CLI you create each resource explicitly, build and push the image, then wire up managed-identity pull.
1. Sign in and set variables
az login
SUFFIX=$(openssl rand -hex 3)
export RG="rg-customcontainer-${SUFFIX}"
export LOCATION=eastus
export ACR="acrcustom${SUFFIX}"       # registry names are alphanumeric, 5-50 chars
export PLAN="plan-customcontainer-${SUFFIX}"
export APP="app-customcontainer-${SUFFIX}"
export IMAGE="customwebapp:v1"
2. Create the resource group and registry
Create the registry with the admin user disabled - the app pulls with a managed identity, not admin credentials:
az group create --name "$RG" --location "$LOCATION"

az acr create --name "$ACR" --resource-group "$RG" --sku Basic --admin-enabled false

export LOGIN_SERVER=$(az acr show --name "$ACR" --query loginServer --output tsv)
3. Build and push the image
The simplest option is az acr build, which builds the image in the cloud from your Dockerfile - no local Docker required:
az acr build --registry "$ACR" --image "$IMAGE" .
If you prefer to build locally with Docker, sign in to the registry and push instead:
az acr login --name "$ACR"
docker build --tag "$LOGIN_SERVER/$IMAGE" .
docker push "$LOGIN_SERVER/$IMAGE"
4. Create the plan and web app
az appservice plan create \
  --resource-group "$RG" \
  --name "$PLAN" \
  --is-linux \
  --sku B1

az webapp create \
  --resource-group "$RG" \
  --plan "$PLAN" \
  --name "$APP" \
  --container-image-name "$LOGIN_SERVER/$IMAGE"
5. Grant the app's managed identity AcrPull
Turn on a system-assigned managed identity, then give it the AcrPull role scoped to the registry:
export PRINCIPAL_ID=$(az webapp identity assign \
  --resource-group "$RG" --name "$APP" \
  --query principalId --output tsv)

export ACR_ID=$(az acr show --name "$ACR" --query id --output tsv)

az role assignment create \
  --assignee-object-id "$PRINCIPAL_ID" \
  --assignee-principal-type ServicePrincipal \
  --role AcrPull \
  --scope "$ACR_ID"
6. Configure managed-identity pull and the port
Tell App Service to authenticate to the registry with the managed identity, point it at the image, and set the container port:
az webapp config set \
  --resource-group "$RG" --name "$APP" \
  --generic-configurations '{"acrUseManagedIdentityCreds": true}'

az webapp config container set \
  --resource-group "$RG" --name "$APP" \
  --container-image-name "$LOGIN_SERVER/$IMAGE" \
  --container-registry-url "https://$LOGIN_SERVER"

az webapp config appsettings set \
  --resource-group "$RG" --name "$APP" \
  --settings WEBSITES_PORT=80

az webapp restart --resource-group "$RG" --name "$APP"
az webapp config container set prints a warning that it couldn't retrieve registry credentials. That's expected here - you disabled the admin user on purpose. Because acrUseManagedIdentityCreds is true, App Service pulls with the managed identity and the warning is safe to ignore.
7. Get the app URL
az webapp show \
  --resource-group "$RG" --name "$APP" \
  --query defaultHostName --output tsv
The Azure portal gives you a visual way to create the registry and app. You create the registry first, push your image, then create the web app and grant it AcrPull.
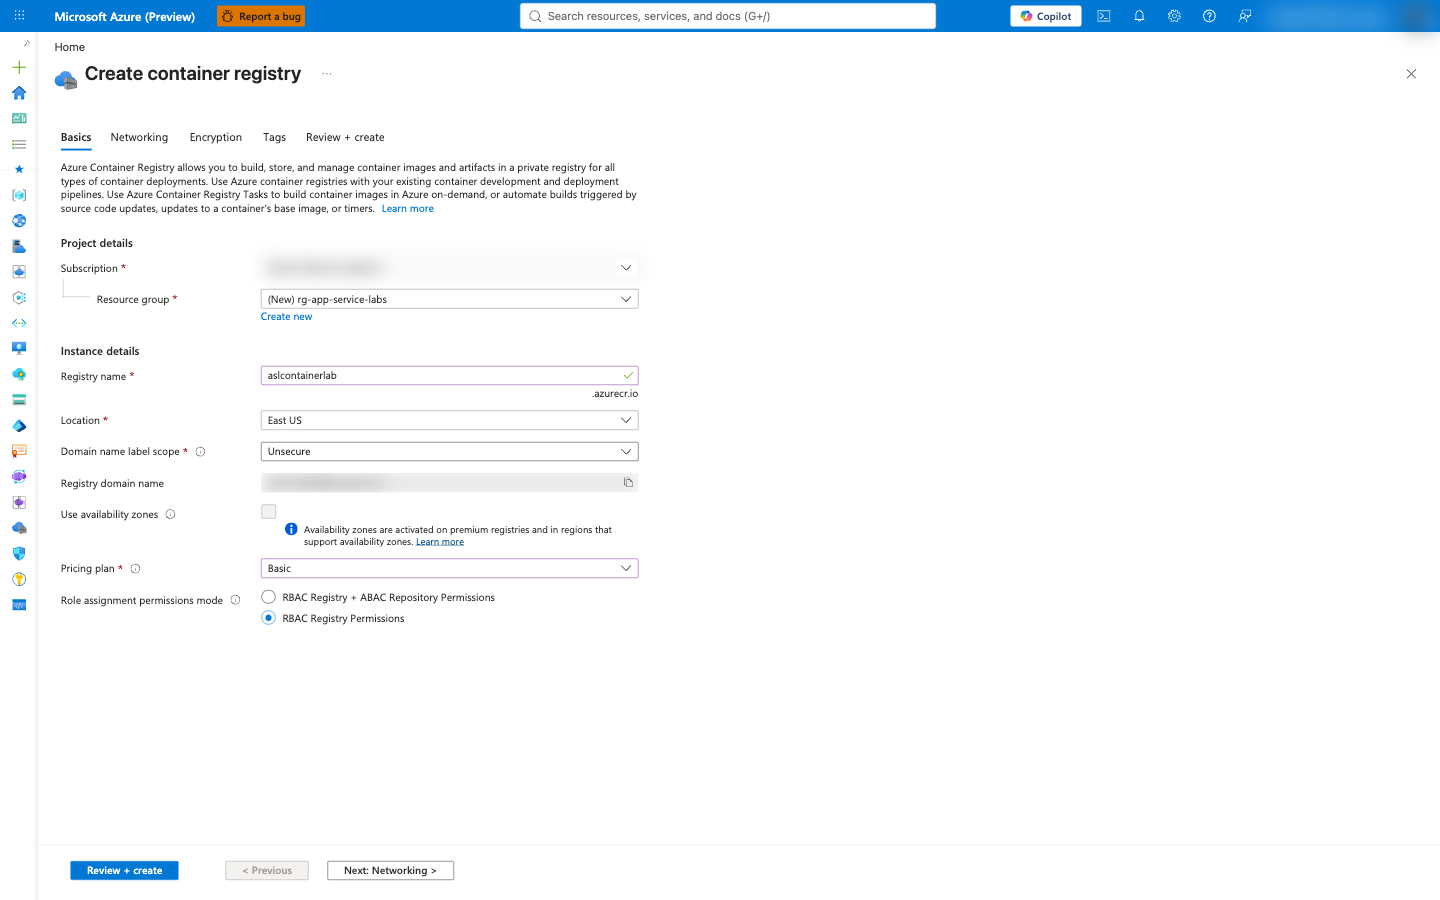
1. Create a container registry
Sign in to the Azure portal. In the top search bar, enter container registries, select Container registries, then select Create.
- Resource group: select Create new and enter
rg-customcontainer. - Registry name: a globally unique name.
- Location: East US.
- Pricing plan: Basic.
Leave the admin user disabled. Select Review + create, then Create.
2. Push your image to the registry
From the folder with your Dockerfile, build the image in the cloud with the Azure CLI (no local Docker needed) - replace <registry-name> with the name you chose:
az acr build --registry <registry-name> --image customwebapp:v1 .
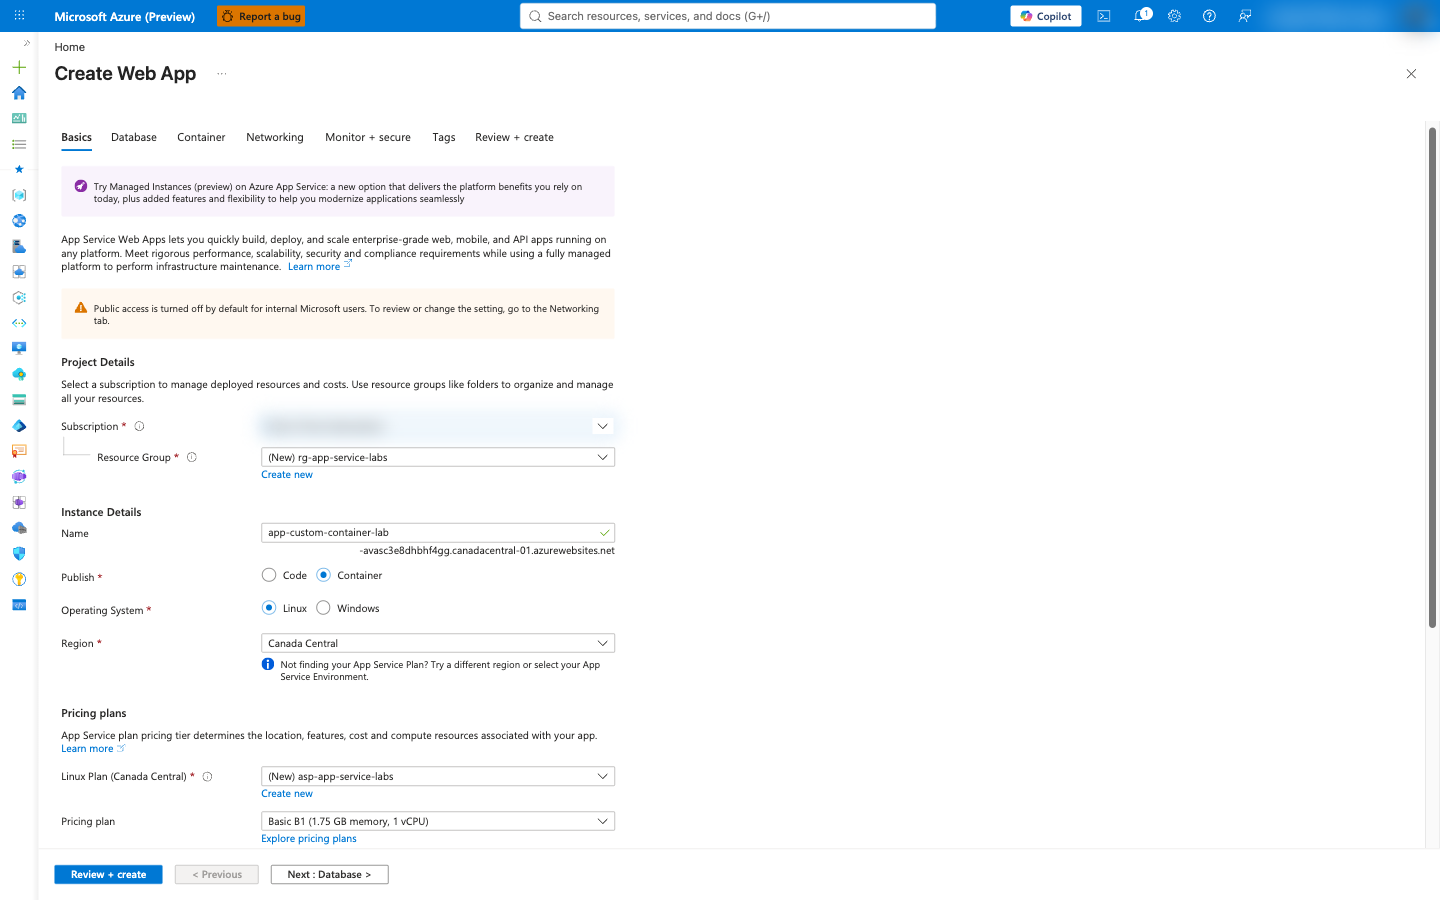
3. Create the web app
Select Create a resource > Web App. On the Basics tab, set:
- Resource Group:
rg-customcontainer. - Name: a globally unique name (this becomes
<name>.azurewebsites.net). - Publish: Container.
- Operating System: Linux.
- Region: East US.
- Pricing plan: create or select a Basic B1 plan.
On the Container tab, set:
- Image Source: Azure Container Registry.
- Registry: your registry.
- Image and Tag:
customwebappandv1. - Authentication: Managed identity (system-assigned).
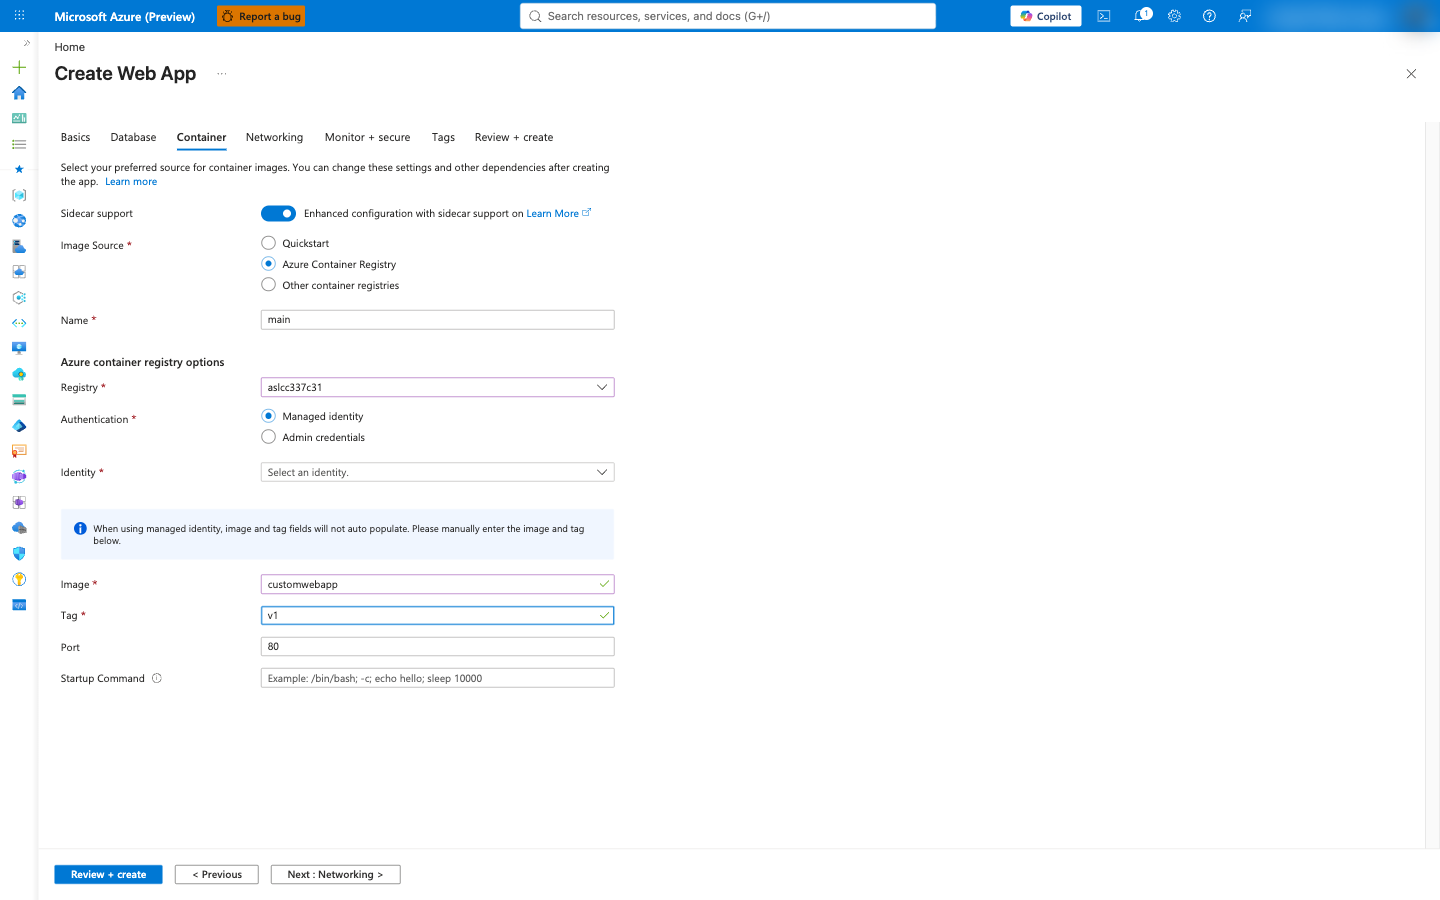
Select Review + create, then Create.
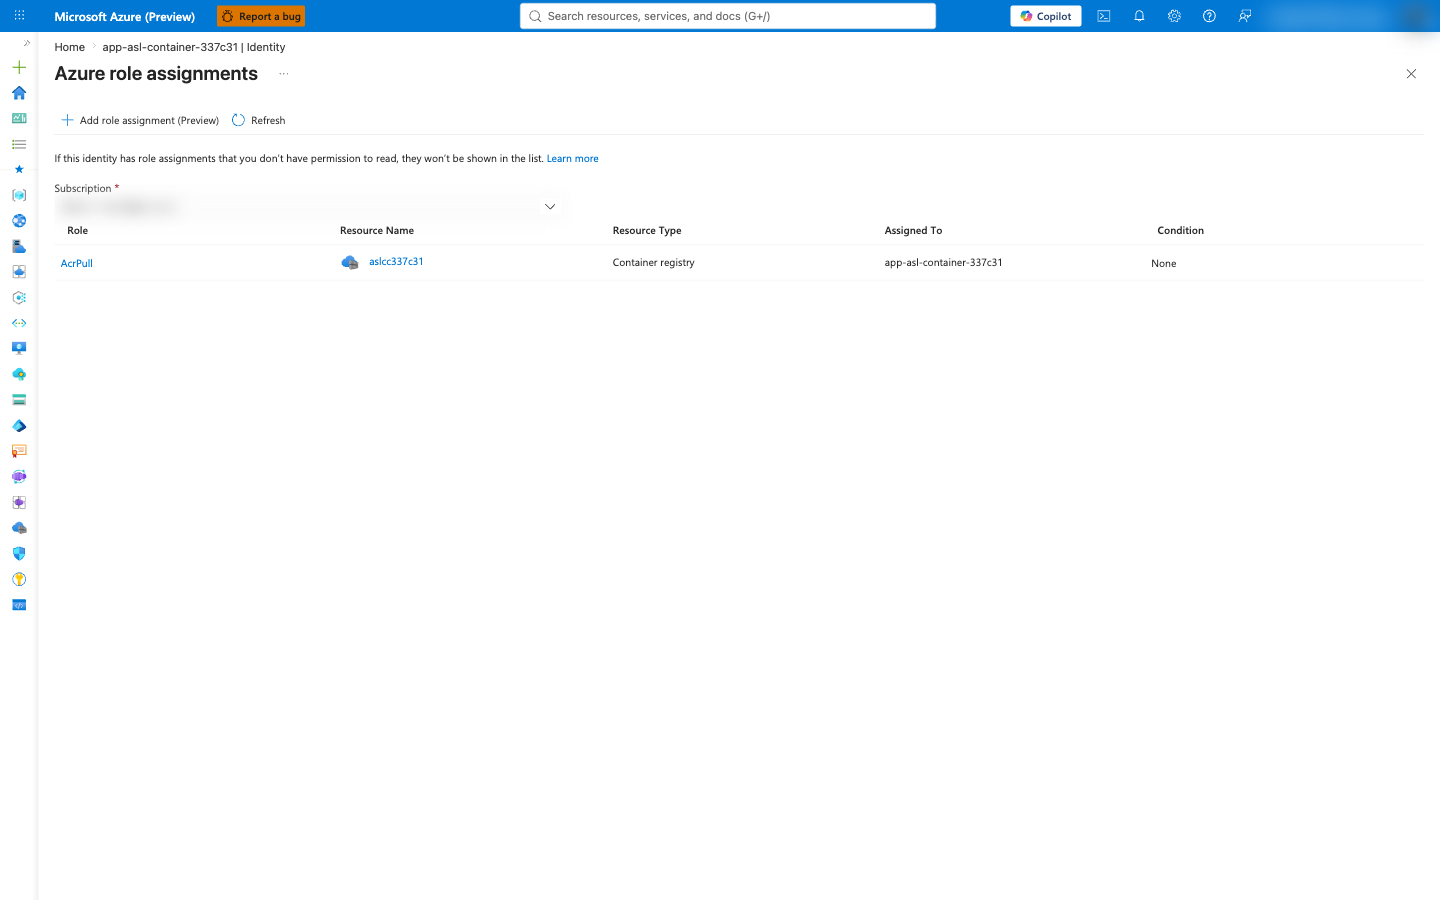
4. Confirm the AcrPull role assignment
When you choose Managed identity authentication, the portal creates the app's system-assigned identity and assigns it the AcrPull role on the registry. Confirm it under the registry's Access control (IAM) > Role assignments.
5. Set the container port
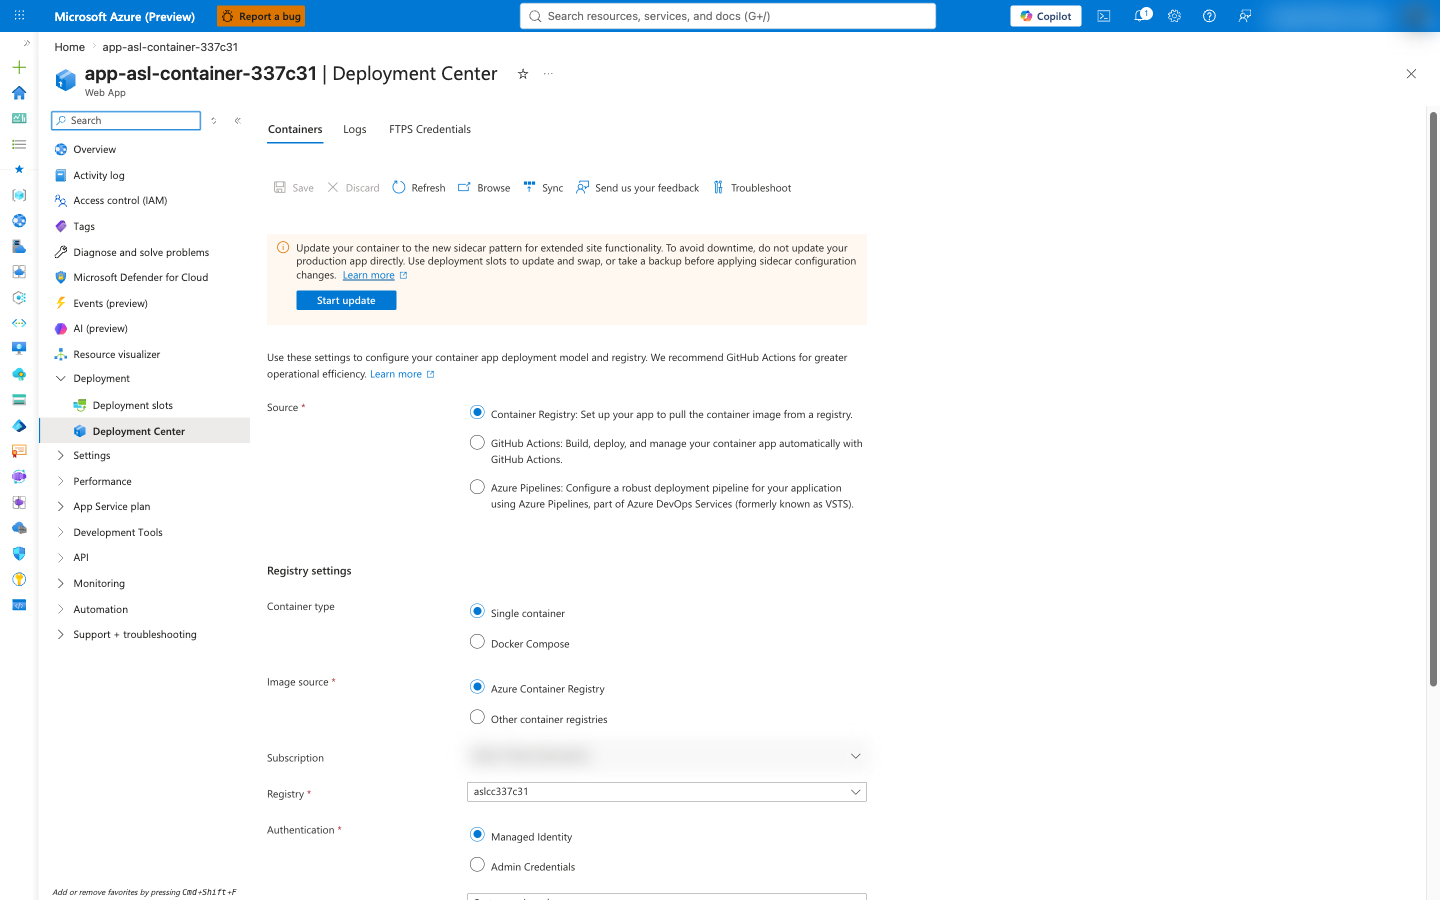
If your container listens on a port other than the default, go to the app's Settings > Environment variables and add WEBSITES_PORT = 80. You can review or change the image later under Deployment > Deployment Center.
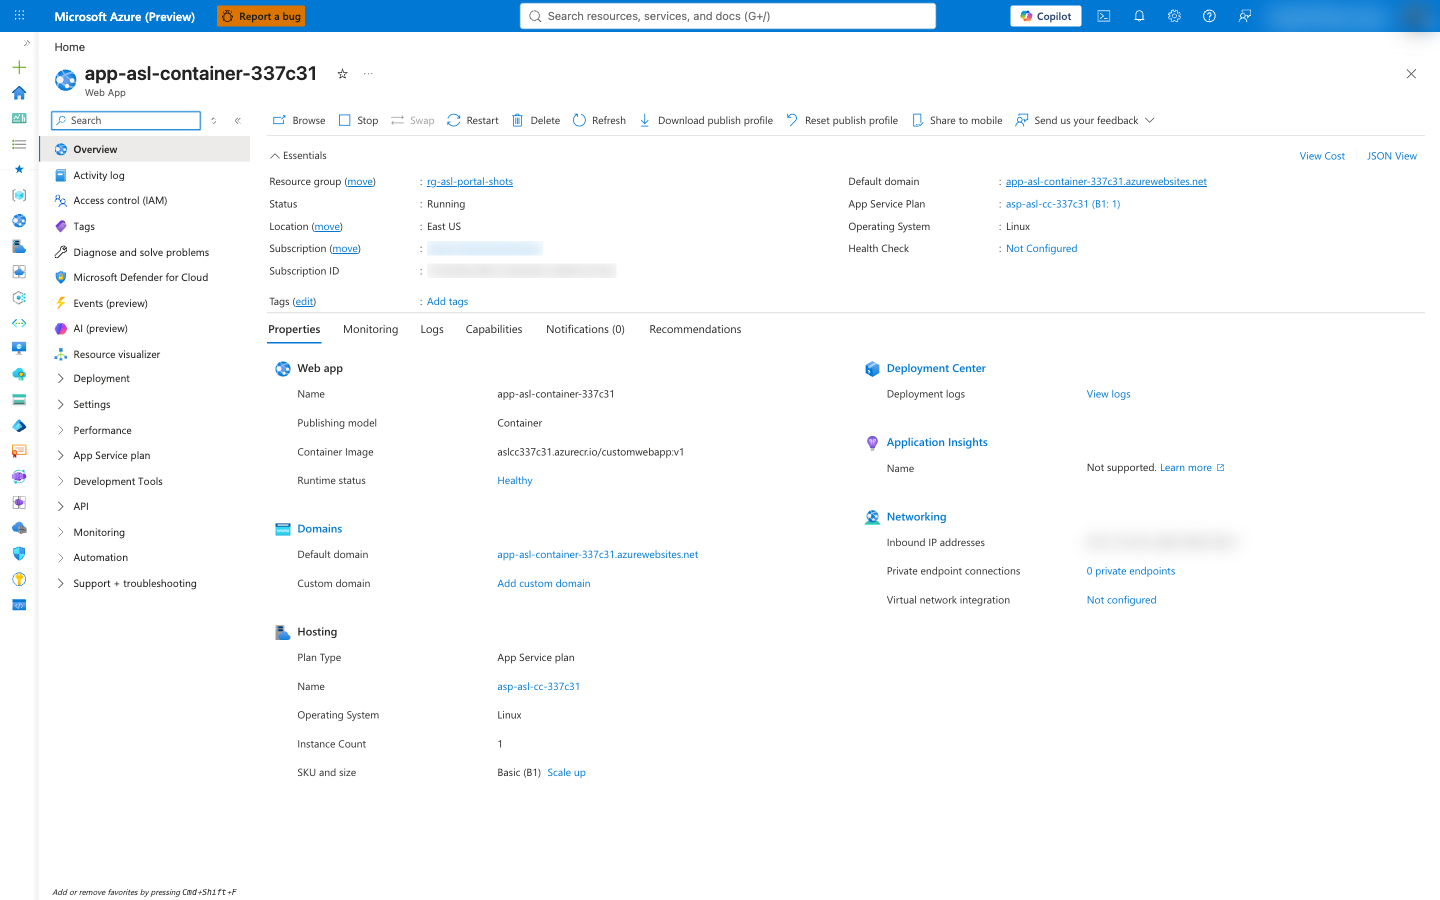
On the app's Overview page, copy the Default domain.
Verify your app is running
Open the app's URL in a browser, or test it from the command line and confirm you get an HTTP 200 response:
curl -I https://<your-app-name>.azurewebsites.net
Expected output (validated during authoring):
HTTP/1.1 200 OK
Content-Type: text/html
You should see the page served by your container:
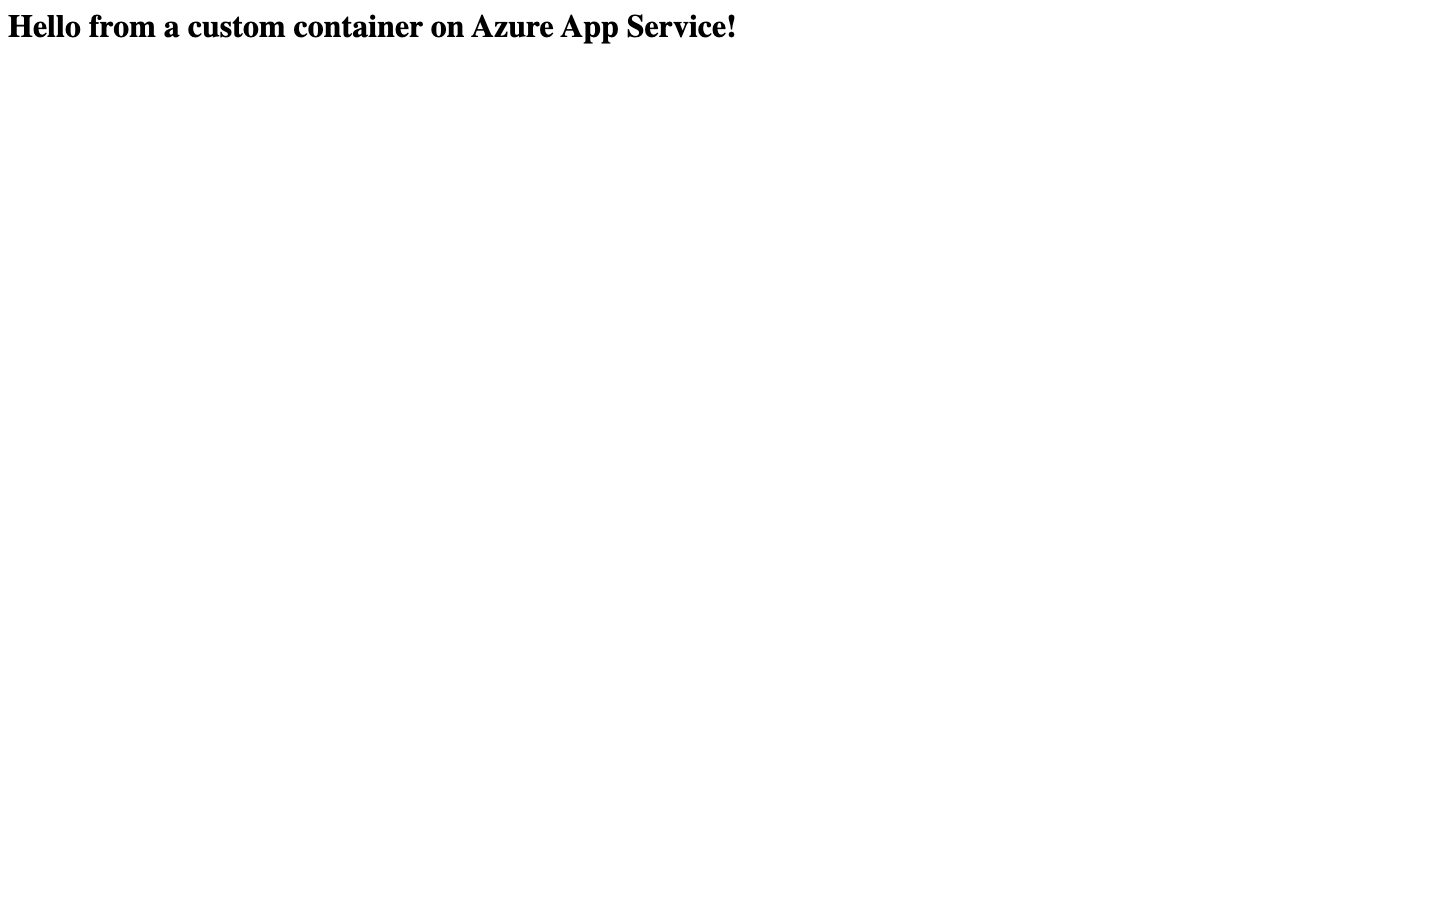
The first request after a deployment pulls the image and starts the container, which can take a minute or two. If you see a "starting" or 503 page, wait a moment and refresh. Check container startup logs any time with az webapp log tail --resource-group "$RG" --name "$APP".
This lab uses Linux containers, the mainstream path for App Service. App Service also supports Windows containers for apps that need the Windows base image - for example, older .NET Framework apps. Windows containers require a Windows container plan (az appservice plan create --hyper-v --sku P1V3) and a Windows base image such as mcr.microsoft.com/dotnet/framework/aspnet:4.8-windowsservercore-ltsc2022. The registry, managed identity, and AcrPull steps are the same. See Run a custom Windows container.
Clean up resources
To avoid ongoing charges, delete the resources when you're done. Deleting the resource group removes the web app, the App Service plan, and the container registry.
- Azure Developer CLI (azd)
- Azure CLI (az)
- Azure portal
azd down --purge --force
az group delete --name "$RG" --yes --no-wait
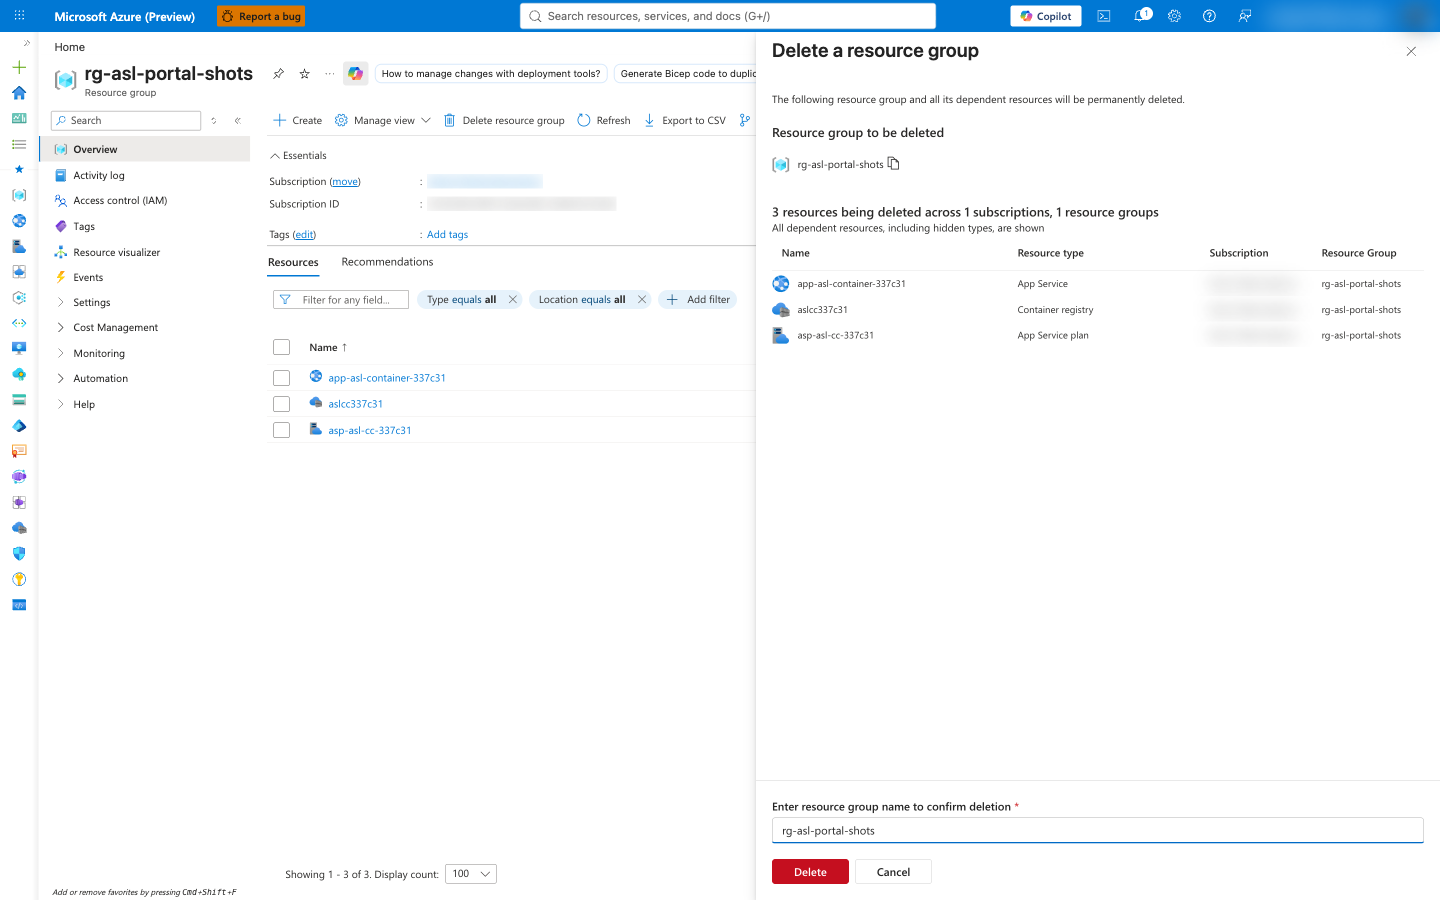
In the portal, open the rg-customcontainer resource group, select Delete resource group, enter the group name to confirm, and select Delete.
Summary
In this lab, you packaged a web app as a container image and ran it on Azure App Service, confirming it returns an HTTP 200 response. You learned how to:
- Write a
Dockerfilefor .NET, Node.js, Python, Java, or PHP, pinned to a specific base image tag instead of:latest. - Build and push an image to Azure Container Registry with
az acr buildor local Docker. - Create a Web App for Containers on a Basic B1 Linux plan three ways - with azd, the Azure CLI, and the Azure portal.
- Pull the image with a system-assigned managed identity granted the AcrPull role, avoiding stored admin credentials.
- Clean up resources to avoid charges.
Troubleshooting
- The app shows a default "welcome" page, not your container. App Service may still be pulling and starting the image. Wait a minute, then refresh. Tail the logs with
az webapp log tail --resource-group "$RG" --name "$APP". 504,503, or a blank page. The container likely isn't listening on the expected port. Confirm the app listens on port80and that the WEBSITES_PORT app setting is80.- Image pull fails with an authentication or
403error. The managed identity may lack the AcrPull role, oracrUseManagedIdentityCredsisn't set. Re-run the role assignment andaz webapp config set --generic-configurations '{"acrUseManagedIdentityCreds": true}', then restart the app. Role assignments can take a minute to propagate. az webapp config container setwarns it couldn't retrieve credentials. Expected when the registry admin user is disabled. Managed identity handles the pull; the warning is safe to ignore.az acr buildfails or is slow. Confirm yourDockerfilebuilds locally withdocker build .. Very large build contexts upload slowly - add a.dockerignoreto exclude files you don't need in the image.
Learn more
- Run a custom container in App Service
- Azure Container Registry introduction
- Authenticate to a registry with a managed identity
- Deploy to App Service using a managed identity to pull from ACR
- Build and push an image with az acr build
- Azure Developer CLI overview
- App Service plans and pricing tiers
- Back to the Getting Started overview