Build a GitOps-Driven Platform on AKS with the App of Apps Pattern
This hands-on lab builds on the previous module, Platform Engineering on AKS with GitOps, CAPZ, and ASO, where you learned:
- Key tools and foundational concepts in platform engineering
- How to build a control plane AKS cluster using Azure CLI
- How to use CAPZ and ASO to provision infrastructure and Kubernetes clusters
In this module, you'll take those concepts further by implementing a modern, production-grade platform engineering environment on Azure Kubernetes Service (AKS). You'll use GitOps to manage both infrastructure and application lifecycles declaratively via Argo CD, enabling a fully automated and auditable workflow.
Objectives
- Bootstrap GitOps with Argo CD using the App of Apps pattern and ApplicationSets
- Deploy application environments across both existing and newly provisioned AKS clusters
Core Concepts
App of Apps Pattern
The App of Apps pattern in Argo CD is critical for scalable platform operations. It allows you to declaratively manage complex environments using a parent application that orchestrates multiple child applications, each responsible for a specific platform or workload layer.
Why adopt this pattern?
- Centralizes control without creating monolithic repositories
- Enables modular, reusable GitOps pipelines with clear environment boundaries
- Simplifies team onboarding and environment provisioning
- Improves governance and consistency across clusters
- Enforces a clean separation of concerns between platform and application teams
GitOps Bridge
The GitOps Bridge is a design pattern that links infrastructure provisioning (e.g., AKS clusters via CAPZ or ASO) with application delivery workflows (e.g., Argo CD).
It ensures that once infrastructure is provisioned, GitOps agents like Argo CD are automatically bootstrapped and begin synchronizing workloads from Git repositories.
Benefits:
- Automates the transition from infrastructure to workload readiness
- Establishes Git as the single source of truth for Day-1 and Day-2 operations
- Enables repeatable, scalable platform rollouts
Prerequisites
This lab builds on the Platform Engineering lab using AKS, GitOps, CAPZ, and ASOv2. Before proceeding:
- Complete that module.
- Load the required environment variables:
source ~/aks-labs/platform-engineering/aks-capz-aso/.envrc
export KUBECONFIG=~/aks-labs/platform-engineering/aks-capz-aso/aks-labs.config
- Create a directory to store the artifacts for this lab:
mkdir -p ~/aks-labs/platform-engineering/app-of-apps
cd ~/aks-labs/platform-engineering/app-of-apps
Management Cluster Add-Ons
Next, we will create an Argo CD Cluster Secret that defines how Argo CD interacts with the Management Cluster (the control plane cluster you’ve bootstrapped on the Platform Engineering on AKS with GitOps, CAPZ, and ASO lab). It also provides metadata and flags used by ApplicationSets and GitOps automation controllers to selectively deploy platform add-ons.
The bootstrapping process leverages the Building a Platform Engineering Environment on Azure Kubernetes Service (AKS) repository.
- This repository provides pre-defined GitOps configurations and Argo CD Applications.
- Specifically, Argo CD is configured to install applications from the
gitops/bootstrap/control-plane/addonsdirectory in this repository, automating the installation of core platform components such as Argo CD itself, Kargo, and others.
Key Purposes of the Argo CD Cluster Secret
-
Registers the Management Cluster with Argo CD
argocd.argoproj.io/secret-type: clustertells Argo CD that this secret defines a Kubernetes cluster connection.- Even though this is the in-cluster connection (
server: https://kubernetes.default.svc), explicitly registering it allows Argo CD to associate metadata and configuration with the cluster.
-
Bootstraps the Management Cluster with Platform Add-Ons
-
The
enable_*labels act as deployment toggles, controlling which platform components Argo CD should deploy to this cluster. -
Examples:
enable_kargo: "true"→ Argo CD will deploy Kargo (used for container image promotions).enable_cert_manager: "false"→ Argo CD will skip deploying cert-manager.enable_argocd: "true"→ Ensures Argo CD’s own management components remain installed.
-
-
Allows ApplicationSets to Filter and Target Clusters Dynamically
- These labels and annotations are used by Argo CD’s
ApplicationSetgenerators to dynamically select which clusters receive specific add-ons.
Example:
generators:- clusters:selector:matchLabels:enable_kargo: "true"This ensures only clusters that explicitly enable Kargo will have it deployed.
- These labels and annotations are used by Argo CD’s
-
Why Bootstrap the Management Cluster?
-
The Management Cluster acts as the central control plane for your platform:
- Hosts Argo CD and GitOps automation tooling.
- Manages cluster lifecycle using CAPZ.
- Manages Azure resources via ASOv2.
-
Bootstrapping ensures that essential platform engineering tools are deployed before any workload or development clusters are created.
-
This cluster remains focused on platform operations, while other clusters are dedicated to running application workloads.
-
Summary
| Field | Purpose |
|---|---|
enable_argocd | Deploy or manage Argo CD components |
enable_cert_manager | Deploy cert-manager if true |
enable_kargo | Deploy Kargo for GitOps promotions |
environment | Labels the environment type (e.g., control-plane) |
| Annotations | Used by ApplicationSets for repository and path targeting |
This makes the entire GitOps process dynamic and declarative. By adjusting these flags, you can control what each cluster receives—without modifying the underlying ApplicationSet definitions. Bootstrap automation, repository structure, and Argo CD ApplicationSets work together to provide a scalable and repeatable platform delivery model.
The following applications will be installed to the cluster:
| Application Name | Purpose |
|---|---|
cluster-addons | Deploys shared platform components (e.g., networking, monitoring) |
addon-aks-labs-gitops-argo-cd | Installs and manages Argo CD |
addon-aks-labs-gitops-argo-events | Installs Argo Events for webhook/schedule-based automation |
addon-aks-labs-gitops-argo-rollouts | Installs progressive delivery tools like canary/blue-green |
addon-aks-labs-gitops-argo-workflows | Installs CI/CD pipelines via Argo Workflows |
addon-aks-labs-gitops-cert-manager | Installs cert-manager for TLS cert automation |
addon-aks-labs-gitops-kargo | Installs Kargo for image promotion workflows |
Since we have already installed cert-manager on the Platform Engineering on AKS with GitOps, CAPZ, and ASO lab, we will skip that installation here by changing the enable_cert_manager to false
Configure Environment Variables
Lets start by creating some environment variables that will be used in the Argo CD secret:
cd ~/aks-labs/platform-engineering/app-of-apps
cat <<EOF > gitops.env
export GITOPS_ADDONS_ORG="https://github.com/Azure-Samples"
export GITOPS_ADDONS_REPO="aks-platform-engineering"
export GITOPS_ADDONS_BASEPATH="gitops/"
export GITOPS_ADDONS_PATH="bootstrap/control-plane/addons"
export GITOPS_ADDONS_REVISION="main"
EOF
Load these environment variables:
source gitops.env
Variable reference:
| Variable | Description |
|---|---|
GITOPS_ADDONS_ORG | GitHub user/org URL |
GITOPS_ADDONS_REPO | Repository name |
GITOPS_ADDONS_BASEPATH | Base directory in the repo for GitOps content |
GITOPS_ADDONS_PATH | Full path to add-ons directory |
GITOPS_ADDONS_REVISION | Git branch or revision to sync (e.g., main, dev) |
Bootstrapping the Add-Ons
Step 1: Create the Argo CD Cluster Secret
cat <<EOF > aks-labs-gitops.yaml
apiVersion: v1
kind: Secret
metadata:
  name: aks-labs-gitops
  namespace: argocd
  labels:
    argocd.argoproj.io/secret-type: cluster
    akuity.io/argo-cd-cluster-name: ${AKS_CLUSTER_NAME}
    enable_argocd: "true"
    enable_cert_manager: "false"
    enable_kargo: "true"
    environment: control-plane
    kargo_chart_version: "1.8.3"
  annotations:
    addons_repo_url: "${GITOPS_ADDONS_ORG}/${GITOPS_ADDONS_REPO}"
    addons_repo_basepath: "${GITOPS_ADDONS_BASEPATH}"
    addons_repo_path: "${GITOPS_ADDONS_PATH}"
    addons_repo_revision: "${GITOPS_ADDONS_REVISION}"
    cluster_name: ${AKS_CLUSTER_NAME}
    infrastructure_provider: capz
    akspe_identity_id: "${AZURE_CLIENT_ID}"
    tenant_id: "${AZURE_TENANT_ID}"
    subscription_id: "${AZURE_SUBSCRIPTION_ID}"
type: Opaque
stringData:
  name: aks-labs-gitops
  server: https://kubernetes.default.svc
  config: |
    {
      "tlsClientConfig": {
        "insecure": false
      }
    }
EOF
kubectl apply -f aks-labs-gitops.yaml
Step 2: Apply the ApplicationSet to Bootstrap Add-Ons
cat <<EOF > bootstrap-addons.yaml
apiVersion: argoproj.io/v1alpha1
kind: ApplicationSet
metadata:
  name: cluster-addons
  namespace: argocd
spec:
  syncPolicy:
    preserveResourcesOnDeletion: true
  generators:
    - clusters:
        selector:
          matchExpressions:
            - key: akuity.io/argo-cd-cluster-name
              operator: NotIn
              values: [in-cluster]
  template:
    metadata:
      name: cluster-addons
    spec:
      project: default
      source:
        repoURL: '{{metadata.annotations.addons_repo_url}}'
        path: '{{metadata.annotations.addons_repo_basepath}}{{metadata.annotations.addons_repo_path}}'
        targetRevision: '{{metadata.annotations.addons_repo_revision}}'
        directory:
          recurse: true
          exclude: exclude/*
      destination:
        namespace: argocd
        name: '{{name}}'
      syncPolicy:
        automated: {}
EOF
kubectl apply -f bootstrap-addons.yaml
You can now connect to the Argo CD instance in the Management Cluster and verify that the new apps were added:
- Retrieve the Argo CD UI secret
kubectl get secrets argocd-initial-admin-secret -n argocd --template="{{index .data.password | base64decode}}" ; echo
- Create the port forward to the Argo CD service
kubectl port-forward svc/argocd-server -n argocd 8080:443
- Open your browser at: https://localhost:8080/
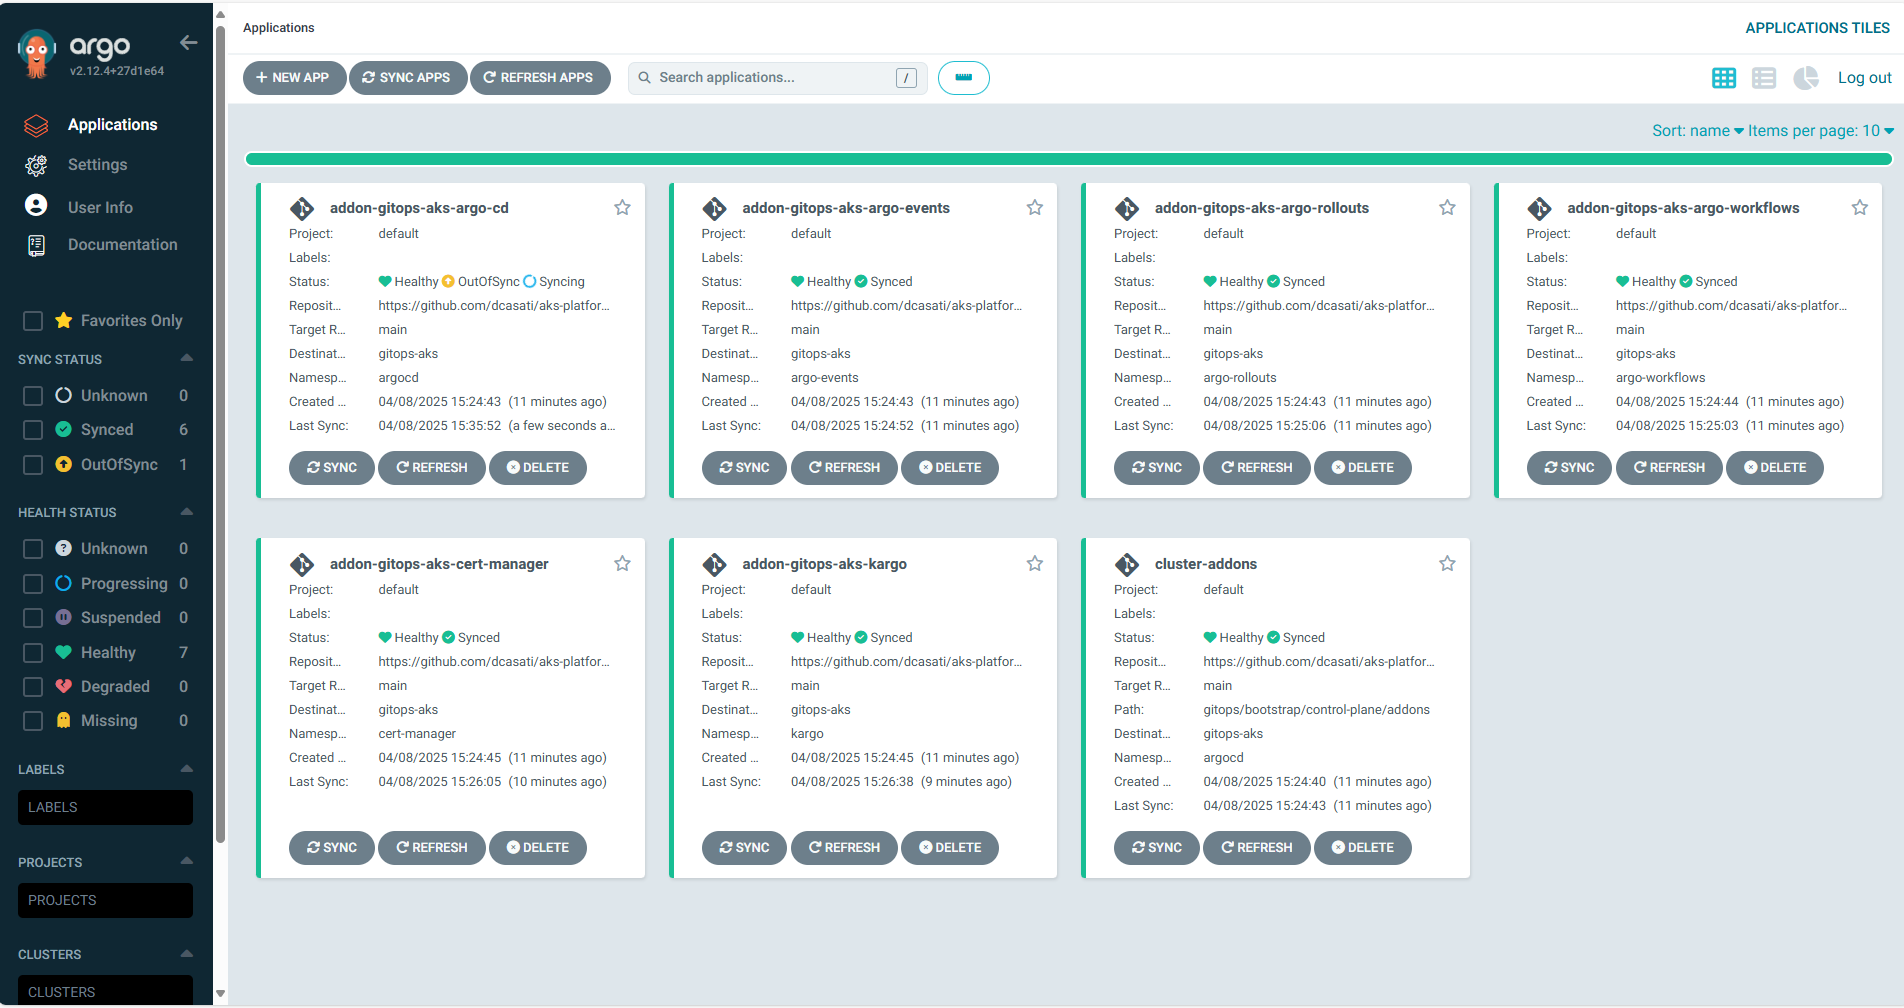
This implements the App of Apps pattern by using a parent (an Argo CD ApplicationSet) to dynamically generate and manage multiple child Argo CD Applications based on cluster metadata. The parent application references the Git repository and controls which add-ons are installed by reading labels and annotations defined in this secret.
This creates a modular, scalable, and declarative way to manage both platform and workload environments through GitOps.
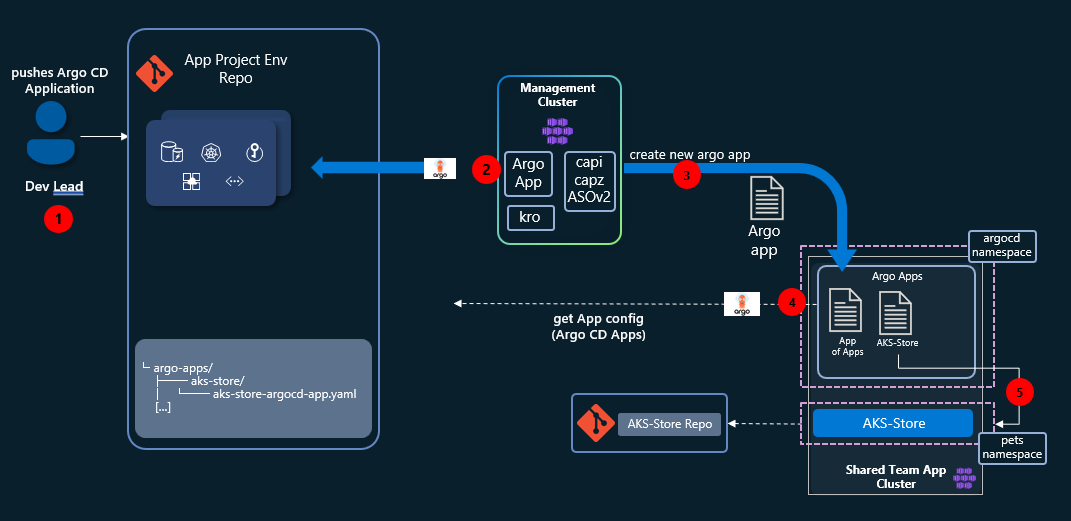
Sample 1: Expanding our AKS Cluster with the App of Apps Pattern
Now that we have seen how to deploy a cluster using the App of Apps pattern, let's try a more complex scenario. In this example, you'll create a new resource, the HelmProxyChart, that will be attached to the cluster created earlier on Platform Engineering on AKS with GitOps, CAPZ, and ASO lab.
Using your GitHub repo created on the Platform Engineering on AKS with GitOps, CAPZ, and ASO lab, let's expand our Sample-1 AKS Cluster. We will also create a new Application and deploy that to our dev cluster.
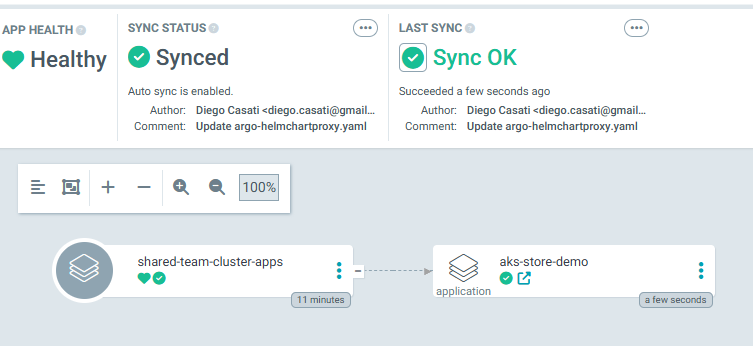
At the end, you will have built this:
Before you proceed, verify that you are running these commands from your local GitHub repo. If you have started this lab at the $HOME directory of your user, that should be at ~/aks-labs/platform-engineering/aks-capz-aso/app-project-env. If not, look at where you have cloned the app-project-env directory.
Adding the HelmChartProxy and AKS Store Application
- Go back to the
~/aks-labs/platform-engineering/aks-capz-aso/app-project-envdirectory:
cd ~/aks-labs/platform-engineering/aks-capz-aso/app-project-env
Important: Label the Dev Cluster for HelmChartProxy Discovery
Before creating the HelmChartProxy, you must label your dev cluster so that the HelmChartProxy can discover and target it. The HelmChartProxy uses a clusterSelector with label matching to find clusters.
kubectl label cluster dev-cluster deploy-argocd="true"
This label must match the clusterSelector.matchLabels in the HelmChartProxy spec (see step 2 below). Additionally, the HelmChartProxy must be created in the same namespace as your clusters (typically the default namespace where clusters are registered). Before we can continue, we need to retrieve the GITHUB_USERNAME for the app-project-env repository:
export GITHUB_USERNAME=$(gh api user --jq .login) # Retrieves the GitHub username
- Create the
HelmChartProxy:
cat <<EOF> samples/sample-1/argo-helmchartproxy.yaml
apiVersion: addons.cluster.x-k8s.io/v1alpha1
kind: HelmChartProxy
metadata:
  name: argocd
  namespace: default
spec:
  clusterSelector:
    matchLabels:
      deploy-argocd: "true"
  repoURL: https://argoproj.github.io/argo-helm
  chartName: argo-cd
  releaseName: argocd
  namespace: argocd
  options:
    waitForJobs: true
    wait: true
    timeout: 5m
    install:
      createNamespace: true
---
apiVersion: addons.cluster.x-k8s.io/v1alpha1
kind: HelmChartProxy
metadata:
  name: argocd-app
  namespace: default
spec:
  clusterSelector:
    matchLabels:
      deploy-argocd: "true"
  repoURL: https://argoproj.github.io/argo-helm
  chartName: argocd-apps
  releaseName: argocd-apps
  namespace: argocd
  options:
    waitForJobs: true
    wait: true
    timeout: 5m
    install:
      createNamespace: true
  valuesTemplate: |
    applications:
      shared-team-cluster-apps:
        namespace: argocd
        finalizers:
          - resources-finalizer.argocd.argoproj.io
        project: default
        sources:
          - repoURL: https://github.com/${GITHUB_USERNAME}/app-project-env.git
            path: argocd-apps
            targetRevision: HEAD
            directory:
              recurse: true
              exclude: namespaces/**
        destination:
          server: https://kubernetes.default.svc
          namespace: argocd
      cluster-namespaces:
        namespace: argocd
        project: default
        source:
          repoURL: https://github.com/${GITHUB_USERNAME}/app-project-env.git
          path: argocd-apps/namespaces
          targetRevision: HEAD
        destination:
          server: https://kubernetes.default.svc
          namespace: default
        syncPolicy:
          automated:
            prune: true
            selfHeal: true
        syncOptions:
          - CreateNamespace=true
EOF
- Create an ArgoCD Application directory:
mkdir -p argocd-apps/{aks-store,namespaces}
- Create the ArgoCD namespace
cat <<EOF> argocd-apps/namespaces/namespaces.yaml
apiVersion: v1
kind: Namespace
metadata:
  name: pets
EOF
- Create the ArgoCD Application for the namespaces
cat <<EOF> argocd-apps/namespaces/cluster-namespaces-app.yaml
apiVersion: argoproj.io/v1alpha1
kind: Application
metadata:
  name: cluster-namespaces
  namespace: argocd
spec:
  project: default
  source:
    repoURL: https://github.com/${GITHUB_USERNAME}/app-project-env.git
    targetRevision: HEAD
    path: argocd-apps/namespaces
  destination:
    server: https://kubernetes.default.svc
    namespace: default
  syncPolicy:
    automated:
      prune: true
      selfHeal: true
  syncOptions:
    - CreateNamespace=true
EOF
- Create an ArgoCD Application to be deployed to our Dev cluster:
cat <<EOF> argocd-apps/aks-store/aks-store-argocd-app.yaml
apiVersion: argoproj.io/v1alpha1
kind: Application
metadata:
  name: aks-store-demo
  namespace: argocd
spec:
  project: default
  source:
    repoURL: https://github.com/Azure-Samples/aks-store-demo.git
    targetRevision: HEAD
    path: kustomize/overlays/dev
  destination:
    server: https://kubernetes.default.svc
    namespace: pets
  syncPolicy:
    automated:
      prune: true
      selfHeal: true
  syncOptions:
    - CreateNamespace=true
EOF
- Commit the files to GitHub
git add .
git commit -m 'Sample-1: Expanding our AKS Cluster with the App of Apps Pattern'
Expect:
[main 5b8f70c] Sample-1: Expanding our AKS Cluster with the App of Apps Pattern
 4 files changed, 110 insertions(+)
 create mode 100644 argocd-apps/aks-store/aks-store-argocd-app.yaml
 create mode 100644 github-app-project-argo-cd-app.yaml
 create mode 100644 rg-dev-app-aso-credentials.yaml
 create mode 100644 samples/sample-1/argo-helmchartproxy.yaml
- Push them to GitHub
git push
Expect:
Enumerating objects: 13, done.
Counting objects: 100% (13/13), done.
Delta compression using up to 12 threads
Compressing objects: 100% (9/9), done.
Writing objects: 10/10, 1.96 KiB | 501.00 KiB/s, done.
Total 10 (delta 0), reused 0 (delta 0)
To github.com:dcasati/app-project-env.git
   3adefb8..5b8f70c  main -> main
Verifying ArgoCD Deployment and Self-Healing
After pushing to GitHub, the HelmChartProxy controller will detect your changes and deploy Argo CD to the dev cluster. This process includes:
- HelmChartProxy finds the dev cluster using the
deploy-argocd: "true"label - Deploys Argo CD via the
argo-cdHelm chart to theargocdnamespace - Creates Argo CD Applications via the
argocd-appsHelm chart, which includes:cluster-namespaces: Creates thepetsnamespaceshared-team-cluster-apps: Parent application that discovers child apps from Gitaks-store-demo: Deploys aks-store to thepetsnamespace
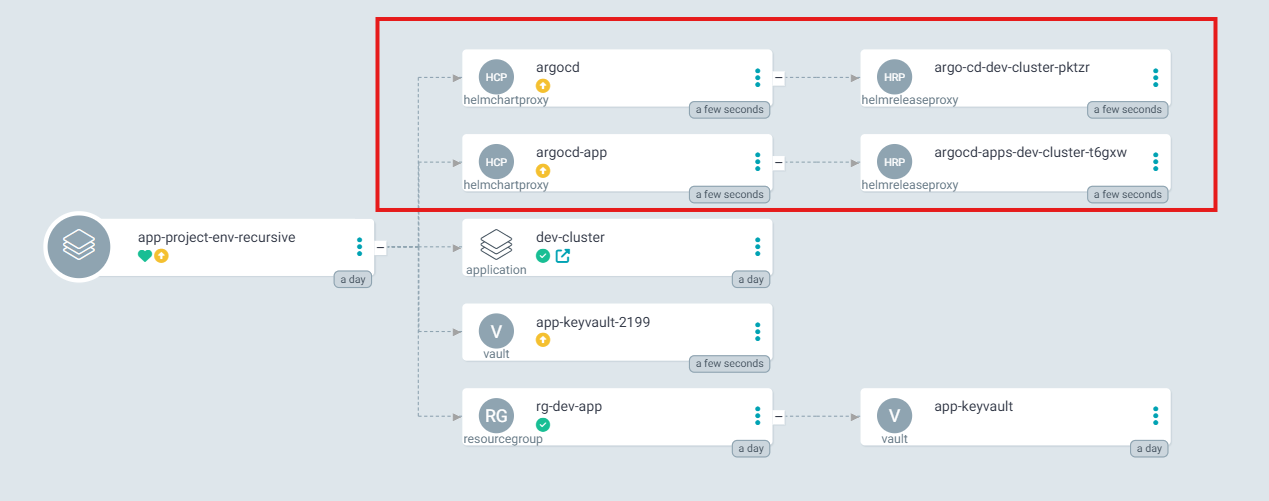
In the Management Cluster, you should now see the new HelmChartProxy objects. The HelmChartProxy will deploy Argo CD and the AKS-Store demo directly to the Dev Cluster:
Now, assuming the role of the Dev Lead, you should be able to connect to the Dev Cluster and see the new application deployed to that cluster.
Tracking Multiple Clusters
Since you're switching between the Dev Lead and Platform Engineer roles, it's easy to lose track of which cluster you're currently working with. To avoid accidental operations on the wrong cluster, add your current Kubernetes context to your bash prompt.
Add this to the bottom of your ~/.bashrc file:
# Add kubectl current context to prompt
export PS1='\[\033[01;34m\]\w\[\033[00m\] \[\033[01;36m\][$(kubectl config current-context 2>/dev/null || echo "no-cluster")]\[\033[00m\]\n\$ '
Then reload your shell:
source ~/.bashrc
Your prompt will now display the current cluster name, like this:
~/aks-labs/platform-engineering/aks-capz-aso [aks-labs]
Accessing the Dev Cluster
- Switch to the
app-of-appsdirectory:
cd ~/aks-labs/platform-engineering/app-of-apps
- Create a
.envrcfile to manage the dev cluster context. This separates your dev cluster configuration from the management cluster:
cp ~/aks-labs/platform-engineering/aks-capz-aso/dev-cluster.config .envrc
echo export KUBECONFIG=${HOME}/aks-labs/platform-engineering/app-of-apps/dev-cluster.config >> .envrc
source .envrc
Your .envrc file should now contain:
export DEV_CLUSTER_NAME=dev-cluster
export DEV_CLUSTER_LOCATION=eastus
export CHART_REVISION="0.4.3"
export KUBERNETES_VERSION="1.32.7"
export KUBECONFIG=${HOME}/aks-labs/platform-engineering/app-of-apps/dev-cluster.config
- Get the credentials for the Dev Cluster:
az aks get-credentials -n ${DEV_CLUSTER_NAME} -g ${DEV_CLUSTER_NAME} --file dev-cluster.config
- Your prompt should now show that you are using the
[dev-cluster]. If that is not the case, reload your.envrcfile withsource .envrcand your prompt should look like this:
~/aks-labs/platform-engineering/app-of-apps [dev-cluster]
- Retrieve the Argo CD admin password:
kubectl get secrets argocd-initial-admin-secret -n argocd --template="{{index .data.password | base64decode}}" ; echo
- Create a port-forward to access Argo CD:
kubectl port-forward svc/argocd-server -n argocd 18080:443
- Open your browser and navigate to https://localhost:18080/. Log in with username
adminand the password from step 5.
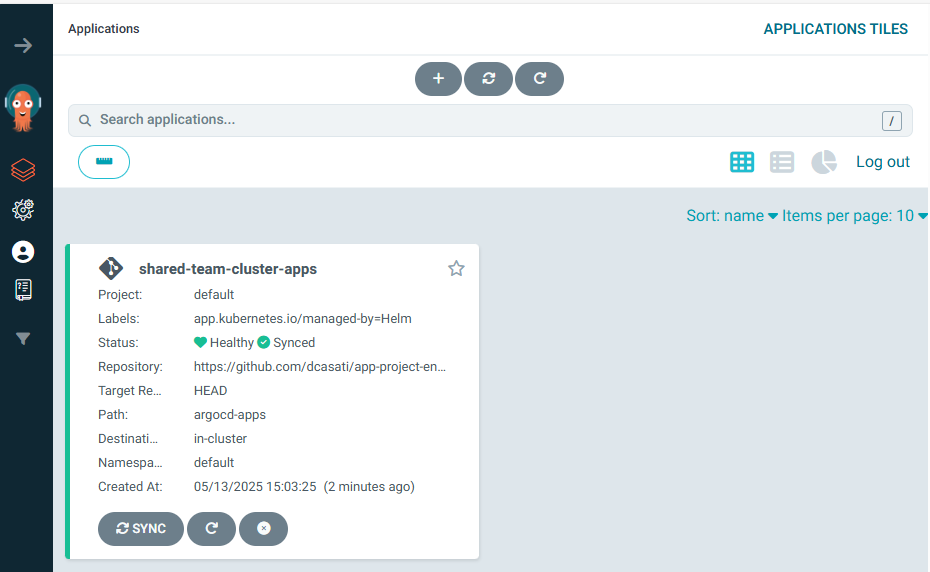
You should see Argo CD running with the deployed applications:
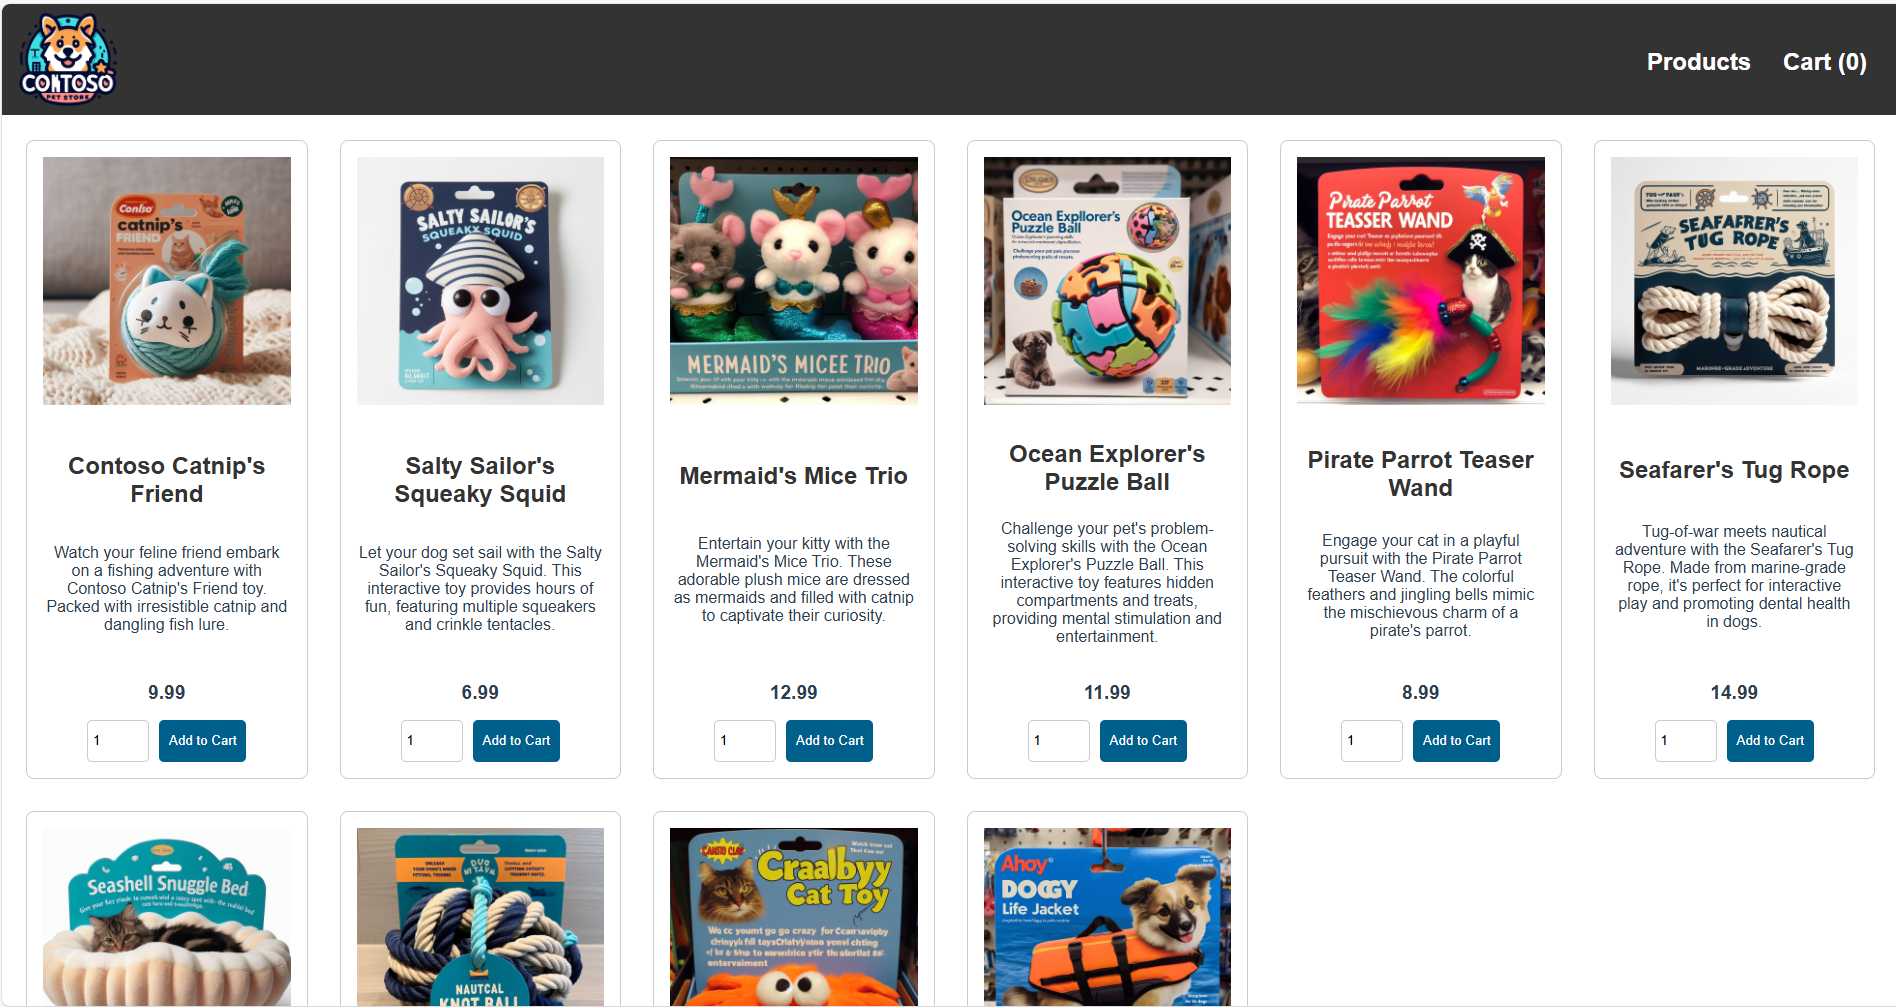
You should also see the AKS Store application deployed to the pets namespace:
Accessing the AKS Store Application
- Retrieve the public IP of the AKS Store LoadBalancer service:
kubectl get svc -n pets store-front
- Open your browser and navigate to the public IP address. You should see the AKS Store frontend:
Next Steps
If you’re familiar with Infrastructure as Code tools like Terraform, explore how you can streamline your Azure resource management by converting existing resources into ASO manifests using the asoctl tool.
To learn how to extend your platform engineering capabilities even further by using Kube Resource Orchestrator (kro) for advanced resource composition and automation take a look at the Expanding the platform capabilities with Kube Resource Orchestrator (kro) lab.
Summary
In this module, you:
- Applied the App of Apps and GitOps Bridge patterns for scalable platform operations.
- Bootstrapped a GitOps management plane using Argo CD and ApplicationSets.
- Provisioned AKS clusters declaratively with CAPZ.
- Deployed workloads to managed clusters via GitOps.
Troubleshooting Guide
HelmChartProxy not finding clusters
Symptom: HelmReleaseProxy shows "No matching clusters" or remains in Ready: False state.
Causes & Solutions:
-
Cluster label missing: The HelmChartProxy uses
clusterSelector.matchLabelsto find clusters. Verify your cluster has the required label:kubectl get cluster dev-cluster -o jsonpath='{.metadata.labels}'# Should show: deploy-argocd: "true"If missing, add it:
kubectl label cluster dev-cluster deploy-argocd="true" -
HelmChartProxy in wrong namespace: The HelmChartProxy must be in the same namespace as the clusters it's trying to target (typically
default). Verify:kubectl get helmchartproxy -A# Should show HelmChartProxy in the same namespace as your clusters -
Addon provider not installed: The HelmChartProxy CRD is provided by the CAPI Addon Provider (Helm). Verify it's installed:
kubectl get crd helmchartproxies.addons.cluster.x-k8s.io
Argo CD CRD Ownership Conflicts
Symptom: HelmReleaseProxy shows error: meta.helm.sh/release-namespace must equal "argocd": current value is "default"
Cause: This occurs when moving an Argo CD installation from one namespace to another. Old CRD annotations claim a different namespace as the owner.
Solution: Clean the Helm annotations from affected CRDs on the target cluster:
# On the dev cluster
kubectl annotate crd applications.argoproj.io \
  helm.sh/resource-policy- \
  meta.helm.sh/release-name- \
  meta.helm.sh/release-namespace- \
  --overwrite

# Delete any stuck HelmReleaseProxy resources
kubectl delete helmreleaseproxy -n default --all
Then trigger the HelmChartProxy to retry:
# On management cluster
kubectl patch helmchartproxy argocd -n default --type merge \
  -p '{"spec":{"releaseName":"argocd"}}'
Applications not syncing to correct namespace
Symptom: Applications deployed to default namespace instead of target namespace (e.g., pets).
Cause: The Application's destination.namespace field might not match the HelmChartProxy's namespace field.
Solution: Ensure the Application definition has the correct namespace:
spec:
  destination:
    server: https://kubernetes.default.svc
    namespace: pets  # This must match your target namespace
CreateNamespace=true not working
Symptom: Application stays in "Missing" state because destination namespace doesn't exist.
Cause: When an Application is created before its destination namespace exists, there can be timing issues with automatic namespace creation.
Solution: Use the namespace management pattern by creating a dedicated cluster-namespaces Application that runs first:
- Create
argocd-apps/namespaces/namespaces.yamlwith all required namespaces - Create
cluster-namespacesApplication that syncs those namespaces - Ensure other applications sync AFTER namespace creation completes
This eliminates race conditions and provides explicit namespace management as code.