Platform Engineering on AKS with GitOps, CAPZ, and ASO
Welcome to the Platform Engineering on AKS workshop. This hands-on workshop will guide you through implementing a robust platform engineering environment using the Cloud Native pattern on Azure Kubernetes Service (AKS). The environment leverages GitOps practices and integrates tools such as ArgoCD, and the Cluster API Provider for Azure (CAPZ) along with Azure Service Operator (ASO). By the end of this workshop, participants will be able to deploy infrastructure and application environments using these tools.
Objectives
- Provide a foundational understanding of key tools in the platform engineering space
- Build a control plane AKS cluster using Azure CLI
- Bootstrap GitOps with ArgoCD
- Demonstrate how CAPZ and ASO can provision infrastructure and Kubernetes clusters
- Show how to deploy new resources in Azure, using CAPI/CAPZ to generate a new AKS cluster,
Prerequisites
- Azure Subscription
- Azure CLI version 2.60.0 or later
- kubectl version 1.28.9 or later
- helm version v.3.17.0 or later
- GitHub CLI version 2.45.0 or later
Components
For the initial release of this document we are going to focus on:
-
Cloud native Infrastructure as Code (IaC)
-
GitOps Continuous deployment tooling to deploy apps and infra.
You will also need a repository for configurations, we will use GitHub but not cover this.
Infrastructure as Code
There are multiple IaC choices that are available, for example: Cloud Native IaC - these are installed on Kubernetes “management” clusters and cloud resources are represented as custom resources in Kubernetes.
-
CAPI – The cluster API (CAPI) framework and language has 30+ providers (e.g. AWS, GCP, bare metal) enabling IaC in a similar language and common core code base. The cluster api provider for Azure (CAPZ) allows you to deploy self-managed Kubernetes on Azure and AKS clusters.
-
ASO v2 - Azure Service Operator, you can deploy many Azure resources, not just AKS. This is also now deployed by default along with and utilized as a dependency by CAPZ.
-
Crossplane - you can deploy resources into multiple clouds, this is the tool we will demonstrate due to it's multicloud capabilities, however you can swap this out for any of the above tools.
All of these tools require a Kubernetes cluster that will host them, typically, at a high level they will install Kubernetes Custom Resource Definitions and then use an identity to connect into Azure to perform infrastructure actions. Cloud infrastructure resources are represented as Kubernetes resources, and track the resource state.
What are the key advantages of cloud native IaC?
-
Automation & Drift Detection – Cloud native IaC options can be used with automation such as GitOps tools, this means you can get benefits of GitOps, such as automated resource drift detection out of the box. Kubernetes works very well as a continuous reconciliation loop versus other non-cloud based IaC options (such as Terraform) that have lock files, state, and drift is only detected on a redeployment of the IaC configuration, leading to delays in detecting drift and reconciliation errors.
-
Control Plane security – With cloud native tools the security of what is deployed is controlled through the Kubernetes control plane, therefore you can restrict people having direct access to cloud control planes and resources.
-
Custom resources – You can create a Kubernetes resource that represents multiple infra resources or represent a resource with a specific set of defaults and exposed properties. An example of these are Composite resources (Crossplane XRD's) and Cluster Classes in CAPI.
-
Heterogeneous cluster type common tooling – for instance, you can deploy a self-managed Kubernetes cluster, AKS cluster, and AKS cluster joined to a fleet management hub in the same manner along with the associated applications across all of them.
Cloud Native IaC considerations
-
Kubernetes cluster & experience – Ops teams need to grow skills in maintaining Kubernetes infrastructure management clusters.
-
Getting started – Ops teams will need to learn how to define resources in cloud native templates.
-
Existing investments – this document is not suggesting that you should scrap existing investments, you should review how the technical benefits provide business value and start small. You can perform self-service using existing deployment pipeline technologies such as GitHub Actions, DevOps and IaC tools such as Terraform, Bicep, ARM templates etc.
Continuous Deployment (CD) Pipelines
For this we are going to use GitOps based CD pipelines, popular tools examples, Argo, Tekton, Flux. These tools reconcile the infra or application configuration in a repository with the Kubernetes cluster.
We will use Argo in the example, but you can use other tools, the main benefit of GitOps is scale, configuration portability, drift detection, automation, auditing and approval etc. A key difference between GitOps and other CD pipelines such as Jenkins, GHA, DevOps is that they are push based pipelines that run outside of the Kubernetes cluster, requiring connectivity details for the cluster. Whereas with GitOps tools have an agent that is installed on the cluster and you add a configuration to the agent, it will then reach out to a configuration repo and 'pull' in the configuration. There is a lot more detail in this area, for more information take a look here as well as the project content.
Architecture Overview
This workshop uses the GitOps Bridge Pattern and the Building a Platform Engineering Environment on Azure Kubernetes Service (AKS) as a foundation:
- A control plane cluster is provisioned and bootstrapped with ArgoCD
- ArgoCD syncs platform addons via GitOps
- Cluster API Provider for Azure (CAPZ) is used for managing additional clusters
CAPZ or Crossplane? Before deploying this solution, take time to evaluate which control plane best fits your organization's needs. In this workshop, we’ll focus on CAPZ and ASO, but Crossplane is another viable option. To help you decide, we've outlined the key differences between them in this guide how to choose your control plane provider.
Step 1: Create the AKS cluster
Before we begin lets create a new directory that can be a placeholder for all of our files created during this lab:
mkdir -p ~/aks-labs/platform-engineering/aks-capz-aso
cd ~/aks-labs/platform-engineering/aks-capz-aso
Next, proceed by declaring the following environment variables:
cat <<EOF> .envrc
# Environment variables
export AZURE_SUBSCRIPTION_ID=$(az account show --query id -o tsv)
export AZURE_TENANT_ID=$(az account show --query tenantId -o tsv)

# AKS
export AKS_CLUSTER_NAME="aks-labs"
export RESOURCE_GROUP="rg-aks-labs"
export LOCATION="westus3"
export MANAGED_IDENTITY_NAME="akspe"
export KUBECONFIG=${HOME}/aks-labs/platform-engineering/aks-capz-aso/aks-labs.config
EOF
Load the environment variables:
source .envrc
Now that we have saved the environment variables, you can always reload these variables later if needed by running source .envrc on this directory.
- Create the resource group
az group create --name ${RESOURCE_GROUP} --location ${LOCATION}
- Create the AKS cluster:
az aks create \
  --name ${AKS_CLUSTER_NAME} \
  --resource-group ${RESOURCE_GROUP} \
  --enable-managed-identity \
  --node-count 3 \
  --generate-ssh-keys \
  --enable-oidc-issuer \
  --enable-workload-identity
- Get the credentials to access the cluster:
az aks get-credentials \
  --name ${AKS_CLUSTER_NAME} \
  --resource-group ${RESOURCE_GROUP} \
  --file aks-labs.config
Use the aks-labs.config file this as your KUBECONFIG
export KUBECONFIG=$PWD/aks-labs.config
Step 2: Create a user-assigned managed identity for CAPZ
In this step, we will do the following:
-
Create a user-assigned managed identity for CAPZ
-
Assign it the
Contributorrole -
Create two federated identity credentials:
aks-labs-capz-manager-credentialandserviceoperator
- Create a user-assigned identity:
az identity create \
  --name "${MANAGED_IDENTITY_NAME}" \
  --resource-group "${RESOURCE_GROUP}" \
  --location "${LOCATION}"
- Retrieve Azure Managed Identity Client, Principal IDs and the AKS cluster OIDC Issuer URL:
export AZURE_CLIENT_ID=$(az identity show \
  --name "${MANAGED_IDENTITY_NAME}" \
  --resource-group "${RESOURCE_GROUP}" \
  --query "clientId" -o tsv)

export PRINCIPAL_ID=$(az identity show \
  --name "${MANAGED_IDENTITY_NAME}" \
  --resource-group "${RESOURCE_GROUP}" \
  --query "principalId" -o tsv)

export AKS_OIDC_ISSUER_URL=$(az aks show \
  --resource-group ${RESOURCE_GROUP} \
  --name ${AKS_CLUSTER_NAME} \
  --query "oidcIssuerProfile.issuerUrl" \
  -o tsv)
Verify that these variables are not empty:
echo "AZURE_SUBSCRIPTION_ID: $AZURE_SUBSCRIPTION_ID"
echo "AZURE_TENANT_ID: $AZURE_TENANT_ID"
echo "AZURE_CLIENT_ID: $AZURE_CLIENT_ID"
echo "PRINCIPAL_ID: $PRINCIPAL_ID"
Add these new environment variables to your .envrc:
echo -e "\n# AKS OIDC Registration info" >> .envrc
echo export AKS_OIDC_ISSUER_URL=${AKS_OIDC_ISSUER_URL} >> .envrc
echo export AZURE_CLIENT_ID=${AZURE_CLIENT_ID} >> .envrc
echo export PRINCIPAL_ID=${PRINCIPAL_ID} >>  .envrc
- Assigning
ContributorandManaged Identity Operatorroles to the identity:
az role assignment create \
  --assignee "${PRINCIPAL_ID}" \
  --role "Contributor" \
  --scope "/subscriptions/${AZURE_SUBSCRIPTION_ID}"

az role assignment create \
  --assignee "${PRINCIPAL_ID}" \
  --role "Managed Identity Operator" \
  --scope "/subscriptions/${AZURE_SUBSCRIPTION_ID}/resourceGroups/${RESOURCE_GROUP}/providers/Microsoft.ManagedIdentity/userAssignedIdentities/${MANAGED_IDENTITY_NAME}"
- Creating federated identity credential: aks-labs-capz-manager-credential
az identity federated-credential create \
  --name "aks-labs-capz-manager-credential" \
  --identity-name "${MANAGED_IDENTITY_NAME}" \
  --resource-group "${RESOURCE_GROUP}" \
  --issuer "${AKS_OIDC_ISSUER_URL}" \
  --subject "system:serviceaccount:azure-infrastructure-system:capz-manager" \
  --audiences "api://AzureADTokenExchange"
- Creating federated identity credential: serviceoperator
az identity federated-credential create \
  --name "serviceoperator" \
  --identity-name "${MANAGED_IDENTITY_NAME}" \
  --resource-group "${RESOURCE_GROUP}" \
  --issuer "${AKS_OIDC_ISSUER_URL}" \
  --subject "system:serviceaccount:azure-infrastructure-system:azureserviceoperator-default" \
  --audiences "api://AzureADTokenExchange"
Step 3: Install ArgoCD
- Create a namespace for Argo CD and install it on the cluster:
kubectl create namespace argocd
kubectl apply -n argocd -f https://raw.githubusercontent.com/argoproj/argo-cd/stable/manifests/install.yaml
- Verify that the Argo CD pods are up and running:
kubectl get pods -n argocd -w
Expected output:
NAME                                    READY   STATUS
argocd-application-controller-0         1/1     Running
argocd-applicationset-controller-xxxxx  1/1     Running
argocd-dex-server-xxxxx                 1/1     Running
argocd-notifications-controller-xxxxx   1/1     Running
argocd-redis-xxxxx                      1/1     Running
argocd-repo-server-xxxxx                1/1     Running
argocd-server-xxxxx                     1/1     Running
Step 4: Access ArgoCD UI
- Retrieve ArgoCD admin password
kubectl get secrets argocd-initial-admin-secret -n argocd --template="{{index .data.password | base64decode}}" ; echo
If no public IP is available:
kubectl port-forward svc/argocd-server -n argocd 8080:443
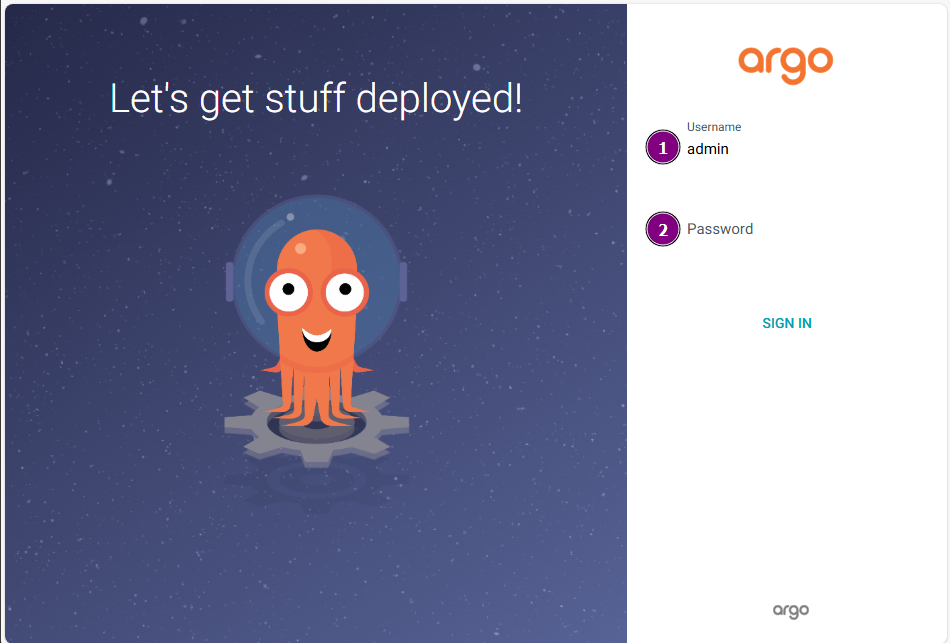
Access the UI at https://localhost:8080. The default username is admin.
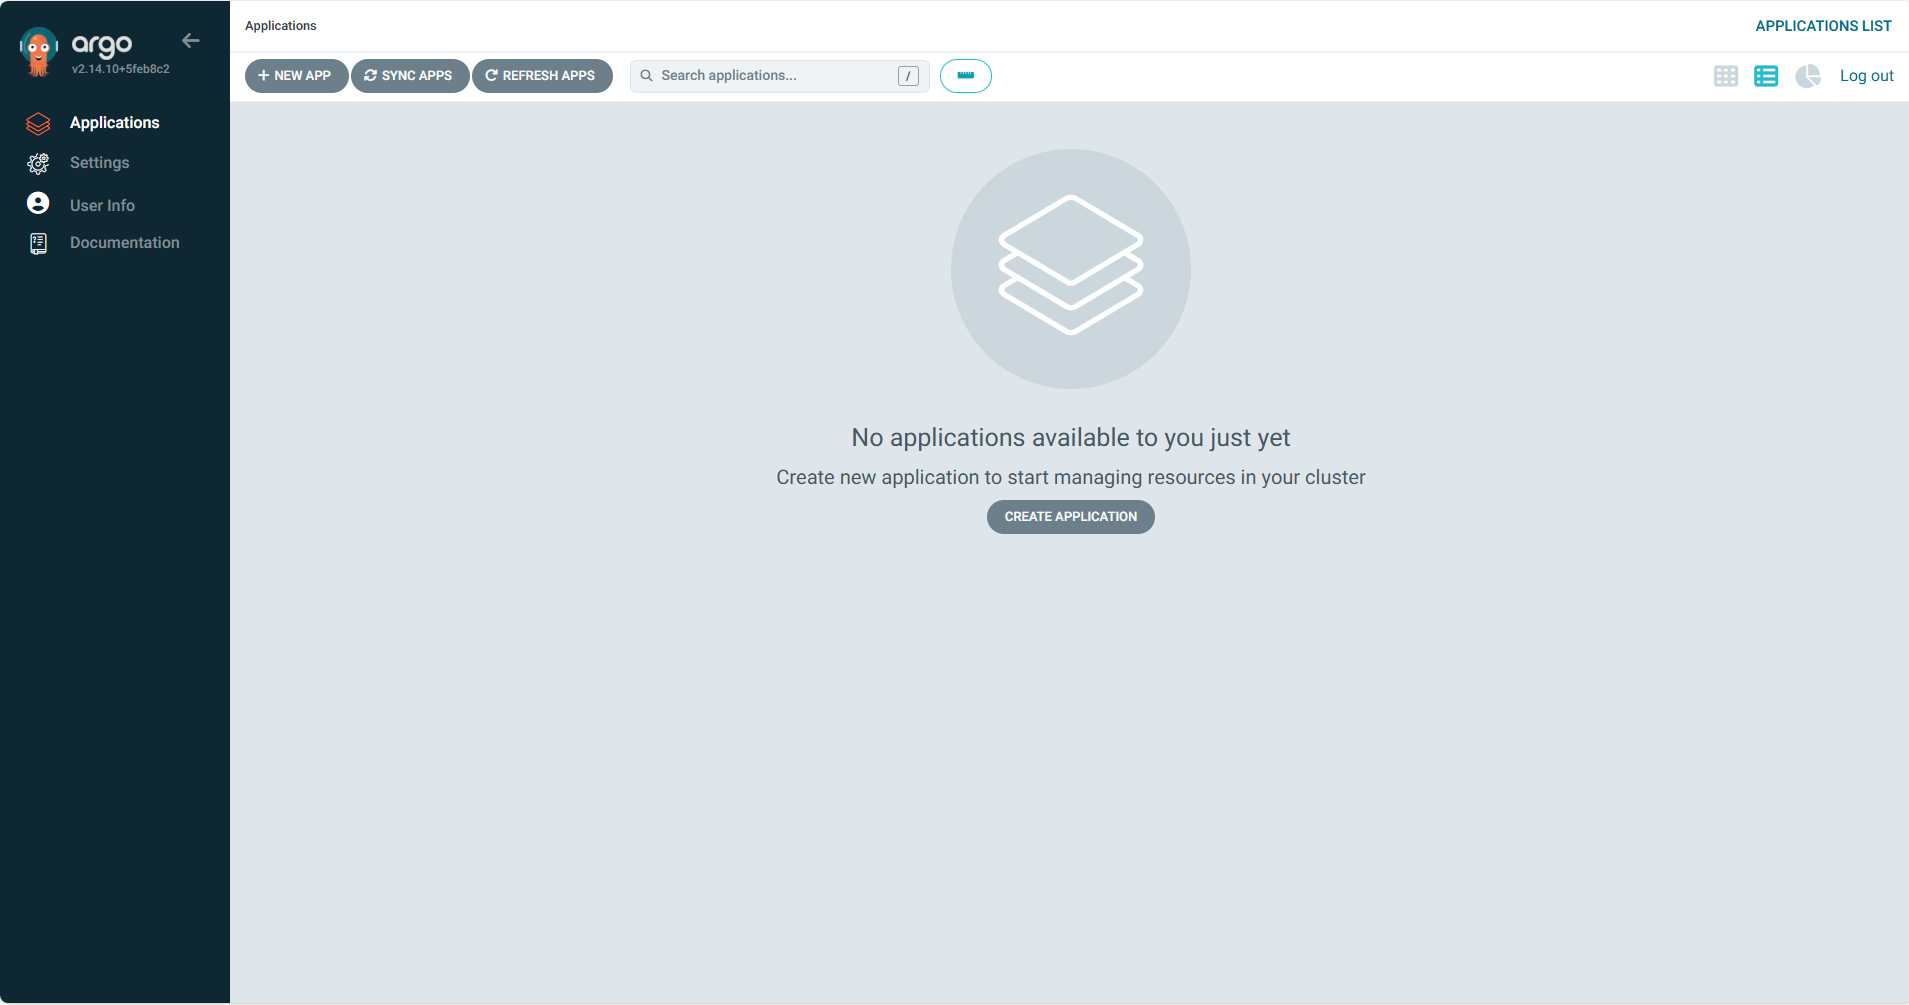
After you successfully login, you should see the Argo CD Applications - which at this point are empty.
Step 5: Install Cluster API Provider for Azure (CAPZ)
This section walks you through installing Cluster API Provider for Azure (CAPZ) through the Cluster API Operator (capi-operator). This step is needed in order to prepare your environment for provisioning AKS clusters using GitOps workflows.
Important: CAPI Provider Version Consistency
All core CAPI providers (core, bootstrap, controlPlane) MUST be installed with the same version. Installing mismatched versions (e.g., core v1.9.6 with bootstrap v1.11.2) will result in CRD API version incompatibilities and controller crashes.
Always ensure:
core.cluster-api.versionbootstrap.kubeadm.versioncontrolPlane.kubeadm.version
...are set to the exact same version.
The infrastructure provider (CAPZ/Azure) and addon provider (Helm) can use different versions.
For detailed troubleshooting of version mismatches, see the Troubleshooting Guide at the end of this document.
Prerequisite: cert-manager
cert-manager is required for capi/capz/aso and it plays a critical role in automating the lifecycle of TLS certificates required for the communications between controllers, validating and mutating webhooks and the Kubernetes API server. Without cert-manager, a kubernetes operator would have to manually create, distribute and rotate these certificates, making for a very complex day-2 operations.
To install cert-manager:
# Add the Jetstack Helm repository
helm repo add jetstack https://charts.jetstack.io
helm repo update

# Install cert-manager with CRDs (adjust the namespace if needed)
helm install cert-manager jetstack/cert-manager \
  --namespace cert-manager \
  --create-namespace \
  --set crds.enabled=true \
  --version v1.15.3  # Use the latest stable version
Verify that cert-manager was installed:
kubectl get pods -n cert-manager
Expect:
NAME                                     READY   STATUS
cert-manager-7b9875fbcc-n2754            1/1     Running
cert-manager-cainjector-948d47c6-5z5fz   1/1     Running
cert-manager-webhook-78bd84d46b-969lk    1/1     Running
You are now ready to install the capi-operator.
- Generate a
valuesfile for the capi-operator:
cat <<EOF> capi-operator-values.yaml
core:
  cluster-api:
    version: v1.9.6
bootstrap:
  kubeadm:
    version: v1.9.6
controlPlane:
  kubeadm:
    version: v1.9.6
infrastructure:
  azure:
    version: v1.19.2
addon:
  helm:
    version: v0.3.1
manager:
  featureGates:
    core:
      ClusterTopology: true
      MachinePool: true
additionalDeployments:
  azureserviceoperator-controller-manager:
    deployment:
      containers:
        - name: manager
          args:
            --crd-pattern: "resources.azure.com/*;containerservice.azure.com/*;keyvault.azure.com/*;managedidentity.azure.com/*;eventhub.azure.com/*;storage.azure.com/*"
EOF
- Install the Cluster API Operator
helm repo add capi-operator https://kubernetes-sigs.github.io/cluster-api-operator
helm repo update
helm install capi-operator capi-operator/cluster-api-operator \
  --create-namespace -n capi-operator-system \
  --wait \
  --timeout=300s \
  -f capi-operator-values.yaml
If you need to modify or reinstall the cluster-api-operator, you can do it so by running this command:
to upgrade/update the chart (e.g.: after modifying the capi-operator-values.yaml file):
  helm upgrade --install capi-operator capi-operator/cluster-api-operator \
  --create-namespace -n capi-operator-system \
  --wait \
  --timeout=300s \
  -f capi-operator-values.yaml
to uninstall the chart:
helm uninstall capi-operator -n capi-operator-system
Helm doesn't remove all of the CRDs from the cluster and those would have to be removed manually.
- Verify the
CAPZInstallation (you may need to wait a few extra seconds and run the command again)
kubectl get pods -n azure-infrastructure-system
Expected output:
azureserviceoperator-controller-manager-xxxxx   1/1   Running
capz-controller-manager-xxxxx                   1/1   Running
It might take 2 minutes for the azureserviceoperator-controller-manager and capz-controller-manager pods to be in the Running state.
- Generating a CAPZ
AzureClusterIdentity
cat <<EOF> identity.yaml
apiVersion: infrastructure.cluster.x-k8s.io/v1beta1
kind: AzureClusterIdentity
metadata:
  annotations:
    argocd.argoproj.io/hook: PostSync
    argocd.argoproj.io/sync-wave: "5"
    argocd.argoproj.io/sync-options: SkipDryRunOnMissingResource=true
  labels:
    clusterctl.cluster.x-k8s.io/move-hierarchy: "true"
  name: cluster-identity
  namespace: azure-infrastructure-system
spec:
  allowedNamespaces: {}
  clientID: ${AZURE_CLIENT_ID}
  tenantID: ${AZURE_TENANT_ID}
  type: WorkloadIdentity
EOF
- Applying
identity.yamlto the cluster
kubectl apply -f identity.yaml
At this stage, the Management Cluster is fully prepared to provision new Azure resources. You can use CAPI/CAPZ to create AKS clusters or leverage Azure Service Operator (ASOv2) to manage other Azure resources.
Setting up your Dev environment
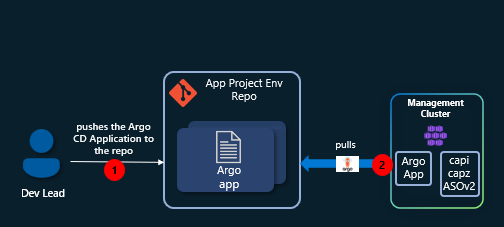
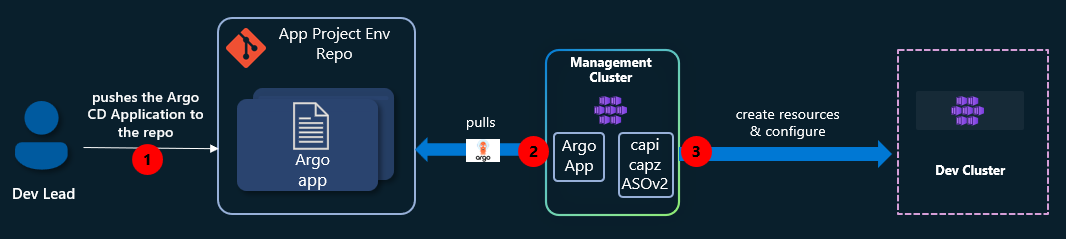
With the Management Cluster operational, we’ll act as a Dev Lead and create a new AKS cluster using a self-service approach. By defining the cluster as an Argo CD Application and storing it in a GitHub repository, Argo CD will automatically provision resources in Azure whenever new files are committed.
The final workflow will look like this:
Steps for setting up a new GitHub repo:
- Create a new repository:
gh repo create "app-project-env" --public
Before you can use the GitHub CLI (gh), you might have to login using gh auth login.
We will be using SSH authentication throughout this workshop. If you haven't already added your SSH key to GitHub, here's how you can do it:
Steps:
gh ssh-key add ~/.ssh/id_ed25519.pub --title "My Personal Laptop Key"
You can list your keys with:
gh ssh-key list
if you need a new key:
ssh-keygen
For more information take a look at Connecting to GitHub with SSH
- Clone the repository locally:
export GITHUB_USERNAME=$(gh api user --jq .login) # Retrieves the GitHub username
git clone git@github.com:$GITHUB_USERNAME/app-project-env.git
cd app-project-env
- Create the necessary directories for these next samples
mkdir -p samples/sample-1
mkdir -p samples/sample-2
- Create a new Argo CD application in the
Management Clusterthat watches this GitHub Repository for any changes.
cat <<EOF> github-app-project-argo-cd-app.yaml
apiVersion: argoproj.io/v1alpha1
kind: Application
metadata:
  name: app-project-env-recursive
  namespace: argocd
spec:
  project: default
  source:
    repoURL: 'https://github.com/${GITHUB_USERNAME}/app-project-env.git'
    targetRevision: main
    path: samples
    directory:
      recurse: true
  destination:
    server: 'https://kubernetes.default.svc'
    namespace: argocd
  syncPolicy:
    automated:
      prune: true
      selfHeal: true
    syncOptions:
      - CreateNamespace=true
EOF
Apply it:
kubectl apply -f github-app-project-argo-cd-app.yaml
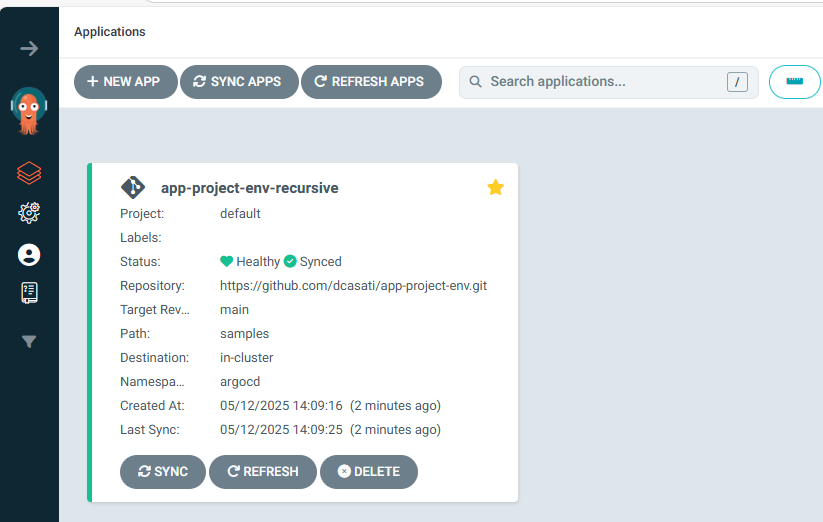
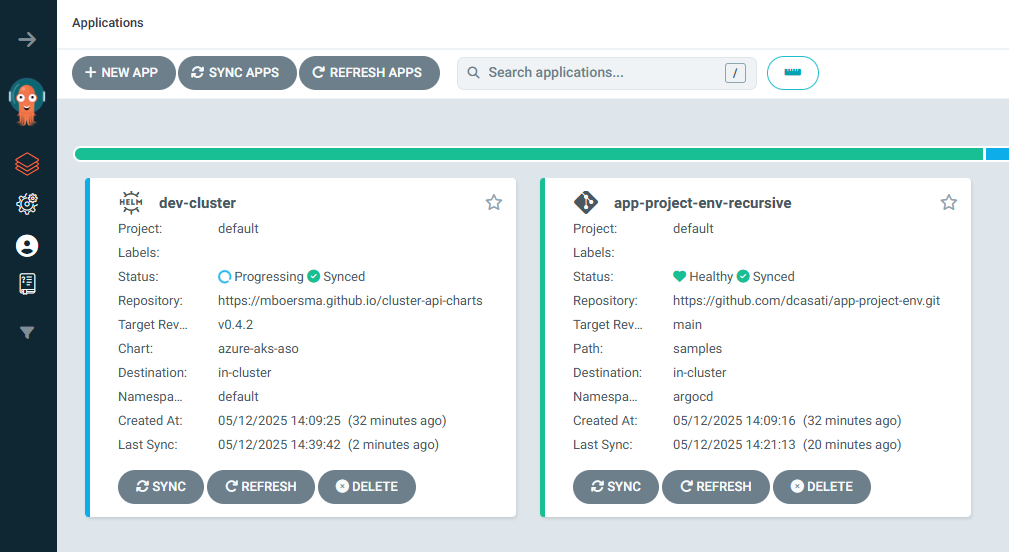
In the Argo CD Web UI, you should now see the new Application:
With this new repo in place, and Argo CD in the Management Cluster watching it for any changes, you are now ready to proceed and to try the samples 1 and 2.
Sample 1: Create a new AKS cluster as an Argo CD Application
This first sample demonstrates how to declaratively provision a new Azure Kubernetes Service (AKS) cluster using Argo CD and Helm, integrating directly with Azure via the Cluster API for Azure.
By treating the AKS cluster itself as an Argo CD Application, we enable full GitOps-based lifecycle management for both infrastructure and applications. This approach simplifies cluster creation, standardizes configurations, and ensures changes are continuously reconciled from a Git repository.
This method allows platform teams to bootstrap new environments on demand, using Argo CD’s synchronization and automation capabilities to handle deployment, scaling, and governance seamlessly.
- Setup the environment variables for the new AKS cluster:
cat <<EOF>dev-cluster.env
export DEV_CLUSTER_NAME=dev-cluster
export DEV_CLUSTER_LOCATION=eastus
export CHART_REVISION="0.4.3"
export KUBERNETES_VERSION="1.32.7"
EOF
- Load the environment variables for the dev-cluster
source dev-cluster.env
- Create the Argo CD Application that declares the cluster:
Note that this Argo CD Application manifest references a Helm chart. The Cluster API Provider Azure Managed Cluster Helm Chart that manages the underlying Azure resources required to provision and configure the AKS cluster. This chart allows for the configuration of various AKS parameters such as the kubernetesVersion, clusterNetwork and node pool options like vmSize and osSKU.
cat <<EOF> samples/sample-1/aks-argo-application.yaml
apiVersion: argoproj.io/v1alpha1
kind: Application
metadata:
  name: "${DEV_CLUSTER_NAME}"
  namespace: argocd
spec:
  project: default
  destination:
    namespace: default
    server: https://kubernetes.default.svc
  source:
    repoURL: 'https://mboersma.github.io/cluster-api-charts'
    chart: azure-aks-aso
    targetRevision: v${CHART_REVISION}
    helm:
      valuesObject:
        clusterName: "${DEV_CLUSTER_NAME}"
        location: "${DEV_CLUSTER_LOCATION}"
        subscriptionID: "${AZURE_SUBSCRIPTION_ID}"
        clientID: "${AZURE_CLIENT_ID}"
        tenantID: "${AZURE_TENANT_ID}"
        authMode: "workloadidentity"
        kubernetesVersion: v${KUBERNETES_VERSION}
        clusterNetwork: "overlay"
        withClusterClass: true
        withClusterTopology: true
        managedMachinePoolSpecs:
          pool0:
            count: 1
            enableAutoScaling: true
            enableEncryptionAtHost: false
            enableFIPS: false
            enableNodePublicIP: false
            enableUltraSSD: false
            maxCount: 3
            minCount: 1
            mode: System
            osSKU: AzureLinux
            vmSize: Standard_DS2_v2
            type: VirtualMachineScaleSets
  syncPolicy:
    automated:
      prune: true
      selfHeal: true
    syncOptions:
      - CreateNamespace=true
    retry:
      limit: -1
      backoff:
        duration: 5s
        factor: 2
        maxDuration: 10m
EOF
Commit and push the changes back to GitHub:
git add .
git commit -m "Sample 1: Create a new AKS cluster as an Argo CD Application"
git push origin main
You can follow the deployment of the new dev cluster in the Argo CD UI
Sample 2: Create new ASOv2 resources
In this second sample, we will look into how to use ASOv2 to create resources in Azure. For this example, we will create a Resource Group and a Key Vault instance. The concepts here apply for other resources in Azure too.
To create other resources using ASOv2, you can follow the structure of the Git repo for this sample:
samples/
└──> sample-2/
    └──> kv-argo-application.yaml  <-- contains your ASOv2 ResourceGroup and KeyVault manifest
From now on, when creating resources with ASOv2, we need to include the following annotation:
  annotations:
    serviceoperator.azure.com/credential-from: aso-credentials
To illustrate this concept, lets create a new resource group and a Key Vault instance:
- Create a new
namespace
kubectl create ns rg-dev-app
- Create a new
secretscoped to the namespace
cat <<EOF> rg-dev-app-aso-credentials.yaml
apiVersion: v1
kind: Secret
metadata:
 name: rg-dev-app-aso-credentials
 namespace: rg-dev-app
stringData:
 AZURE_SUBSCRIPTION_ID: "$AZURE_SUBSCRIPTION_ID"
 AZURE_TENANT_ID: "$AZURE_TENANT_ID"
 AZURE_CLIENT_ID: "$AZURE_CLIENT_ID"
 USE_WORKLOAD_IDENTITY_AUTH: "true"
EOF
Apply it:
kubectl apply -f rg-dev-app-aso-credentials.yaml
- Create the ASOv2 manifest
cat <<EOF > samples/sample-2/kv-argo-application.yaml
apiVersion: resources.azure.com/v1api20200601
kind: ResourceGroup
metadata:
  name: rg-dev-app
  namespace: rg-dev-app
  annotations:
    serviceoperator.azure.com/credential-from: rg-dev-app-aso-credentials
spec:
  location: ${DEV_CLUSTER_LOCATION}
---
apiVersion: keyvault.azure.com/v1api20210401preview
kind: Vault
metadata:
  name: app-keyvault-${RANDOM}
  namespace: rg-dev-app
  annotations:
    serviceoperator.azure.com/credential-from: rg-dev-app-aso-credentials
spec:
  location: ${DEV_CLUSTER_LOCATION}
  owner:
    name: rg-dev-app
    kind: ResourceGroup
  properties:
    tenantId: ${AZURE_TENANT_ID}
    sku:
      family: "A"
      name: "standard"
    accessPolicies:
      - tenantId: ${AZURE_TENANT_ID}
        objectId: ${PRINCIPAL_ID}  # User or Service Principal Object ID
        permissions:
          secrets:
            - get
            - list
            - set
    enableSoftDelete: true
EOF
- Push this back to GitHub
git add samples/sample-2/kv-argo-application.yaml
git commit -m "Sample-2: Create new ASOv2 resources"
git push
You should now see the new resources in the Argo CD UI
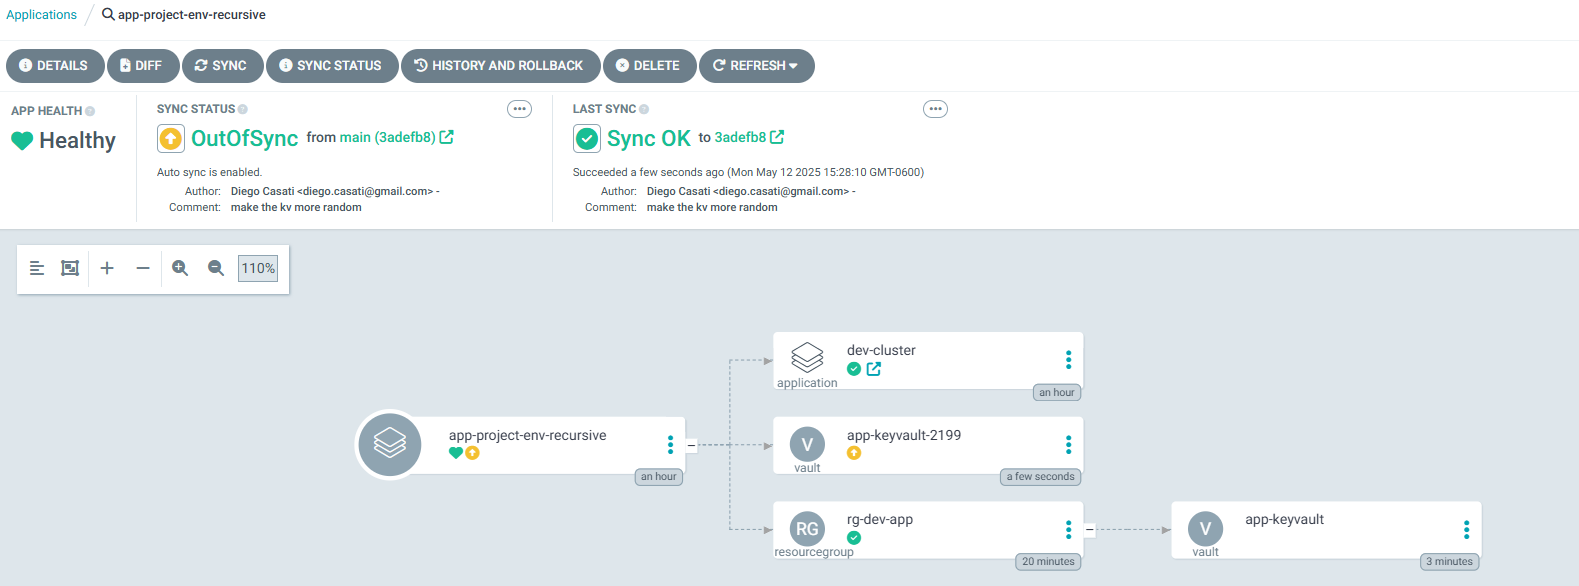
Verify that it was created:
az keyvault list -o table
Expect:
Location    Name               ResourceGroup
----------  -----------------  ---------------
westus3     app-keyvault-2199  rg-dev-app
Congratulations ! You have successfully created Azure resources using ASOv2. Next, lets look into how to Build a GitOps-Driven Platform on AKS with the App of Apps Pattern.
Troubleshooting Guide
CAPI Provider Version Mismatches
Symptom: Bootstrap provider controller pod is crashing with errors like:
no matches for kind "Cluster" in version "cluster.x-k8s.io/v1beta2"
Cause: This occurs when CAPI providers are installed with different versions. For example, core provider v1.9.6 with bootstrap provider v1.11.2 create API version incompatibilities because different provider versions may have different CRD schemas.
Solution: Ensure ALL CAPI providers are installed with the same version. In the capi-operator-values.yaml, all provider versions should match:
core:
  cluster-api:
    version: v1.9.6  # Core version
bootstrap:
  kubeadm:
    version: v1.9.6  # Must match core version
controlPlane:
  kubeadm:
    version: v1.9.6  # Must match core version
infrastructure:
  azure:
    version: v1.19.2  # Infrastructure provider can differ
addon:
  helm:
    version: v0.3.1  # Addon provider can differ
Recovery steps if you hit this issue:
-
Delete the incompatible providers:
kubectl delete namespace capi-kubeadm-bootstrap-systemkubectl delete namespace capi-kubeadm-control-plane-systemkubectl delete namespace capi-system -
Delete the old CRDs:
kubectl delete crd --all -l cluster.x-k8s.io/v1=v1 -
Update
capi-operator-values.yamlto use consistent versions -
Reinstall via helm:
helm upgrade --install capi-operator capi-operator/cluster-api-operator \--create-namespace -n capi-operator-system \--wait \--timeout=300s \-f capi-operator-values.yaml -
Verify all providers are running:
kubectl get pods -n azure-infrastructure-system
CRD Conflicts During Reinstallation
Symptom: Helm install/upgrade fails with messages about CRD ownership or validation errors.
Cause: Old CRD instances from previous installations persist with Helm metadata that conflicts with new installations.
Solution:
-
Identify problematic CRDs:
kubectl get crd -o jsonpath='{range .items[*]}{.metadata.name}{"\t"}{.metadata.annotations.meta\.helm\.sh/release-namespace}{"\n"}{end}' -
Remove Helm annotations from CRDs:
kubectl annotate crd <crd-name> \helm.sh/resource-policy- \meta.helm.sh/release-name- \meta.helm.sh/release-namespace- \--overwrite -
For cluster-scoped CRDs causing issues on workload clusters:
kubectl delete crd applications.argoproj.io appprojects.argoproj.io
Cluster Creation Stuck in Provisioning
Symptom: Dev cluster stays in Provisioning phase indefinitely.
Cause: CAPZ controller may be waiting for dependencies or Azure API quota limits.
Solution:
-
Check CAPZ controller logs:
kubectl logs -n azure-infrastructure-system -l control-plane=capz-controller-manager --tail=50 -
Verify cluster status:
kubectl describe cluster dev-cluster -
Check Azure resources are being created:
az resource list --resource-group <resource-group> --output table -
If stuck, delete and recreate:
kubectl delete cluster dev-cluster# Fix any configuration issueskubectl apply -f your-cluster-manifest.yaml
CAPZ Provider Not Installing
Symptom: capz-controller-manager pod never starts or shows as pending.
Cause: Often due to missing Azure credentials or cert-manager not ready.
Solution:
-
Verify cert-manager is ready:
kubectl get pods -n cert-manager -
Verify Azure credentials are set:
kubectl get secret -n azure-infrastructure-system -
Check CAPZ pod events:
kubectl describe pod -n azure-infrastructure-system -l control-plane=capz-controller-manager -
Ensure the AzureClusterIdentity is applied:
kubectl get azureclusteridentity -n azure-infrastructure-system
Summary
In this lab, we accomplished the following:
- Created the AKS control plane cluster using the Azure CLI.
- Installed Argo CD and accessed its web UI.
- Bootstrapped the environment using GitOps principles.
- Installed Cluster API Provider for Azure (CAPZ) and Azure Service Operator (ASO) to enable infrastructure provisioning.
- Provisioned Azure resources using ASOv2.