Scaling Kubernetes Workloads with KEDA and Karpenter
Overview
In this workshop you'll learn about the Kubernetes Event-driven Autoscaler (aka KEDA), as well as Azure Kubernetes Service (AKS) Node Auto Provisioning (NAP). We'll deploy a sample application, and demonstrate how KEDA allows you to scale Kubernetes workloads based on a vast list of potential scale trigger sources. We'll then learn about how Node Auto Provisioning leverages the capabilities established by the Karpenter open source project, via the Karpenter Provider for Azure, to improve the node scaling behavior and flexibility of your AKS cluster.
Objectives
After completing this workshop, you'll be able to:
- Deploy an AKS cluster with KEDA and Node Auto Provisioning (Karpenter) managed add-ons enabled
- Configure a KEDA ScaledObject to drive application deployment autoscaling
- Monitor KEDA scaling operations
- Configure a NodeClass and Nodepool to control node auto provisioning
- Monitor Node Auto Provisioning scaling operations
Prerequisites
In this lab we'll be creating an AKS cluster that has both the Kubernetes Event Driven Autoscaler (KEDA) and Node Autoprovisioning (NAP/Karpenter) enabled. To use these features you'll need the following:
- Azure subscription
- Azure CLI
- kubectl
- Bash shell (e.g. Windows Terminal with WSL or Azure Cloud Shell)
- Optional bash tools: watch and jq
-
Select the target subscription
# Set your subscription IDSUBSCRIPTION_ID=xxxxxxxx-xxxx-xxxx-xxxx-xxxxxxxxxxxxaz account set -s $SUBSCRIPTION_ID# Confirm you've selected the right subscriptionaz account show -o table
Environment Preparation
For this workshop, we'll need an AKS cluster with both the KEDA and Node Auto Provisioning (NAP) managed add-ons enabled. We'll also enable Azure CNI in overlay mode with the Cilium dataplane, however those are not technically required. You can review the NAP requirements here.
# Prepare Environment Variables
RESOURCE_GROUP=WorkshopRG
LOCATION=eastus2
CLUSTER_NAME=workshopcluster

# Create the Azure Resource Group
az group create -n $RESOURCE_GROUP -l $LOCATION

# Create the AKS cluster with KEDA and NAP enabled
# This operation will take several minutes
az aks create \
--name $CLUSTER_NAME \
--resource-group $RESOURCE_GROUP \
--enable-keda \
--node-provisioning-mode Auto \
--network-plugin azure \
--network-plugin-mode overlay \
--network-dataplane cilium \
--generate-ssh-keys

# Now let's get the cluster access credentials
az aks get-credentials -g $RESOURCE_GROUP -n $CLUSTER_NAME
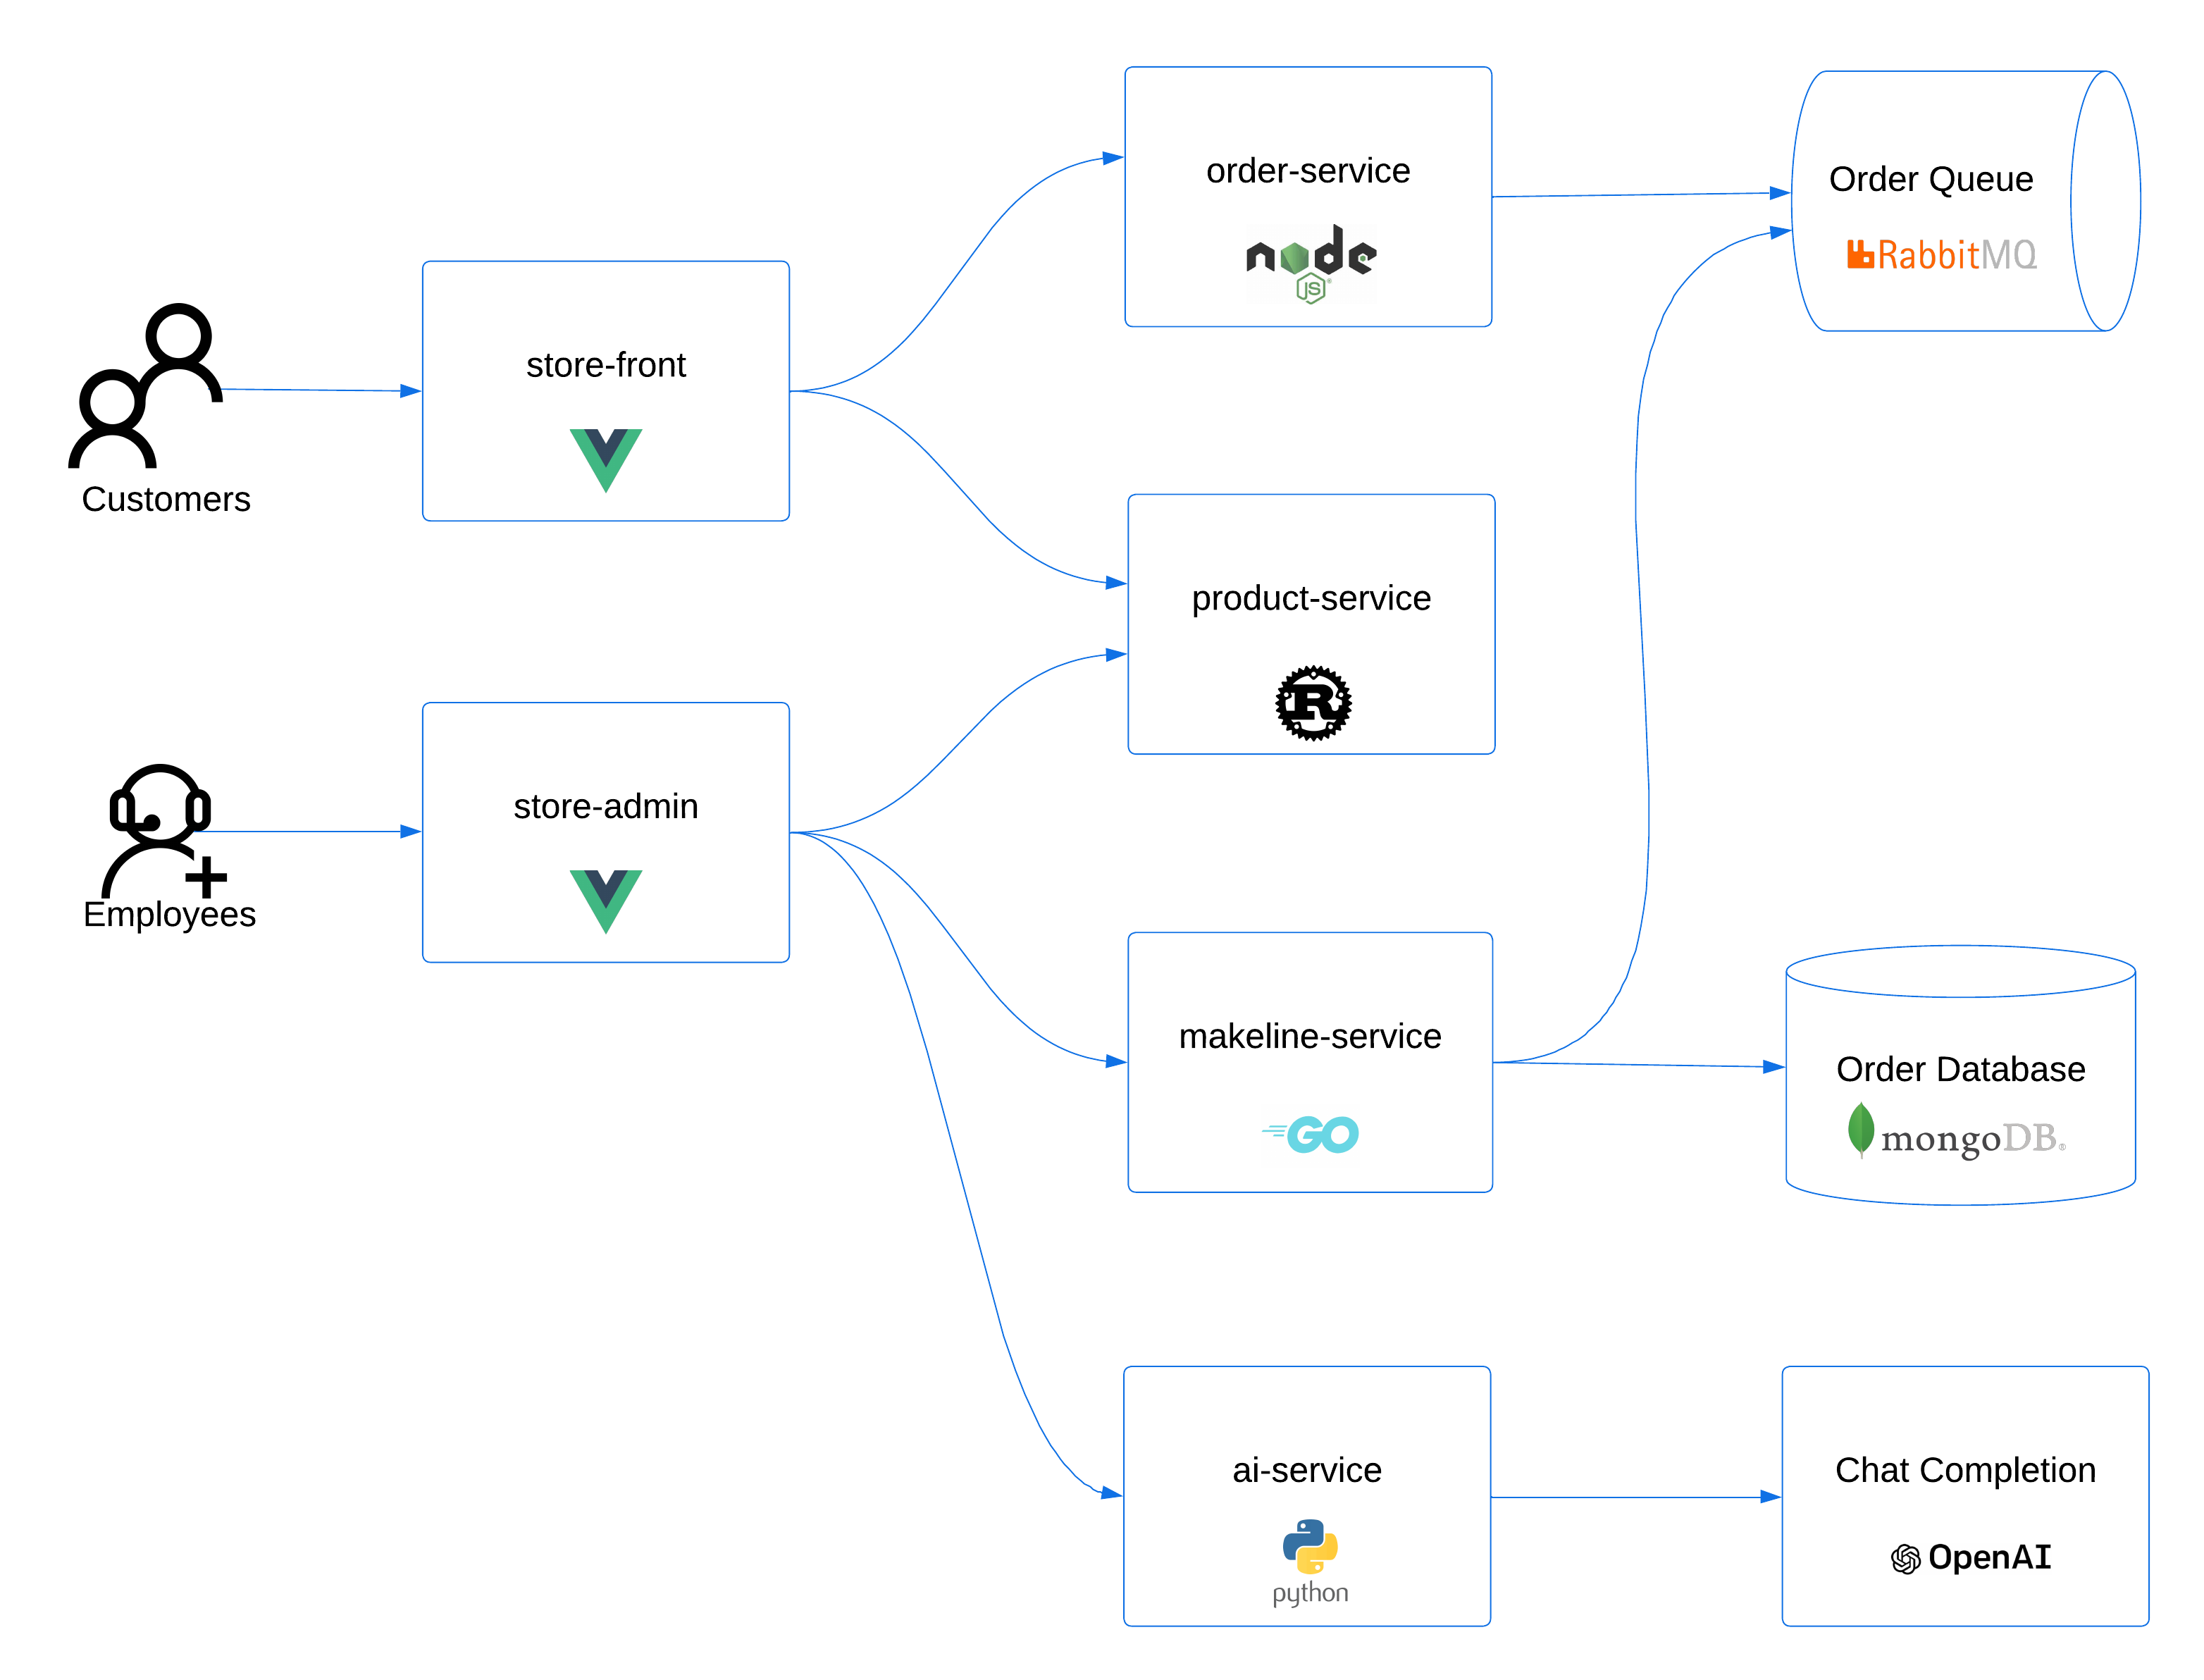
We'll also need an application we can use for scaling operations. For this we'll use the AKS Store sample application. This application provides a several moving parts that are excellent targets for autoscaling. The store also includes an 'All-in-One' deployment option, which makes installation simple.
# Create the pet store namespace
kubectl create ns pets

# Deploy the pet store components to the pets namespace
kubectl apply -f https://raw.githubusercontent.com/Azure-Samples/aks-store-demo/main/aks-store-all-in-one.yaml -n pets

# Check the deployment status
kubectl get all -n pets
Once all of the pods are in 'Running' state (1/1 Ready), and the Services are populated with their 'External-IP', you should be ready to move on to the next step.
You may see some restarts and errors while the pods come online. This is due to cross deployment dependencies and health checks. Just wait for all pods to be in a 'Running' state with 1/1 Ready containers in the pod, which may take a few minutes.
# Get the store URL
echo "Pet Store URL: http://$(kubectl get svc store-front -n pets -o jsonpath='{.status.loadBalancer.ingress[0].ip}')"
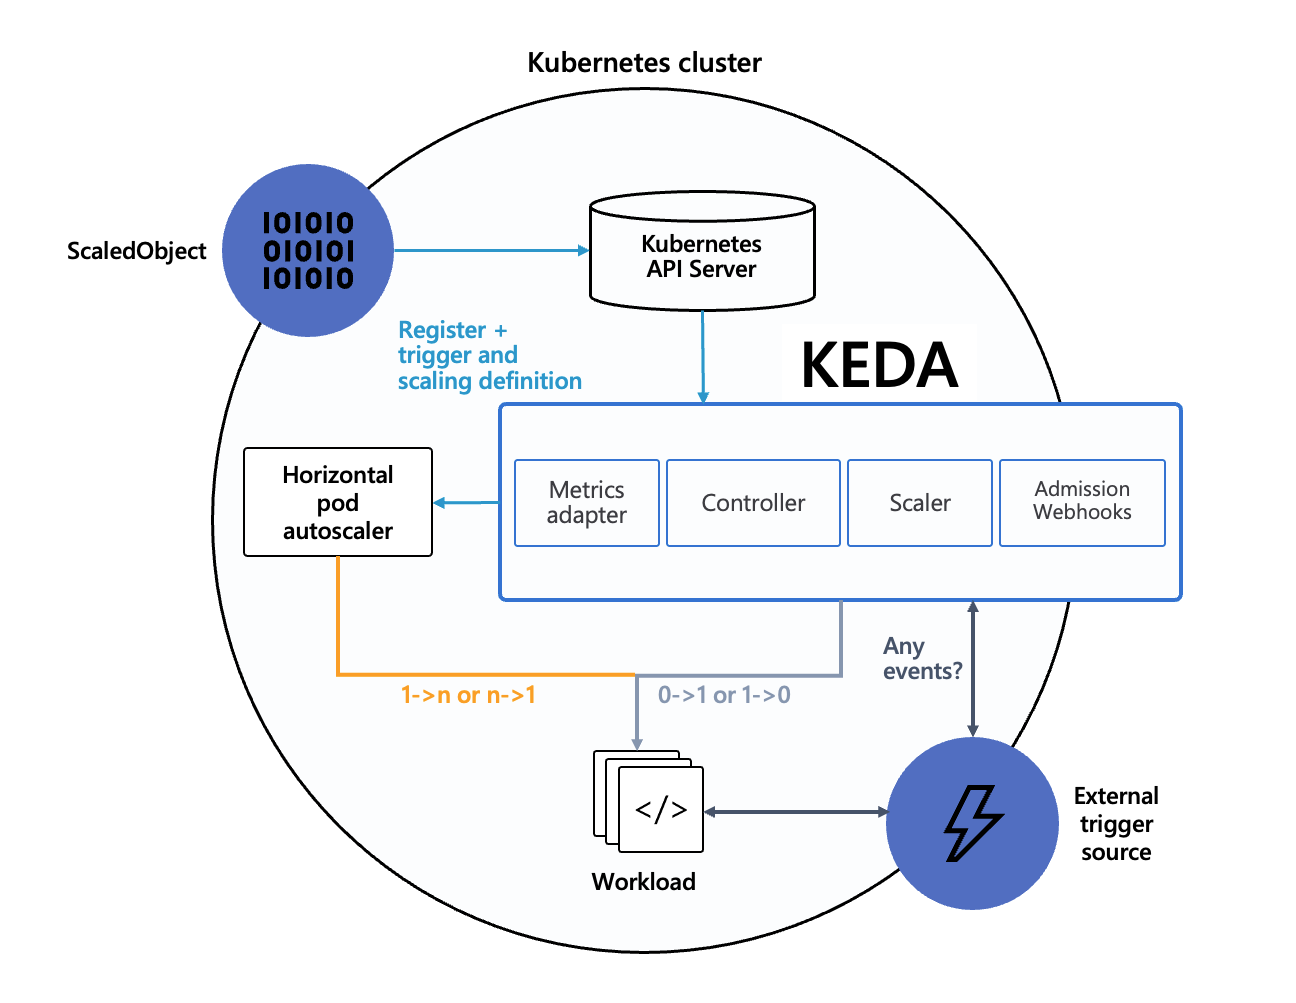
What is KEDA?
KEDA is the 'Kubernetes Event-Driven Autoscaler. Traditionally, in Kubernetes, you would manage deployment scaling with a Horizontal Pod Autoscaler (aka HPA). HPA is somewhat limited in their scaling triggers. The KEDA open source project was created to introduce a pluggable approach for scale triggers. This means that anyone can create a scaler and use that scaler in KEDA, and fortunately, the open source community has done just that. KEDA has more than 50 scalers enabled out of the box! This means that you can scale your workload based on info from MongoDB, RabbitMQ, MySQL, etc, etc.
KEDA works by watching the external triggers, identified in the scaler configuration via the ScaledObject definition, and then by driving a Horizontal Pod Autoscaler attached to the target deployment.
Setup the KEDA Scaler
When a customer submits an order that order is sent to the order service. This initial order creation is a pretty light weight activity, as it just creates a message in RabbitMQ for the order that needs to be processed. However, those orders will sit in the queue until a virtual worker picks them up. It makes sense for us to automatically scale the virtual worker based on the depth of the queue in RabbitMQ.
Fortunately, KEDA provides a scaler for RabbitMQ that we can use. Let's configure a KEDA scaled object that will increase the number of virtual worker pods based on the depth of the orders queue in RabbitMQ. For this, we'll need a KEDA ScaledObject, but also the authentication configuration for that RabbitMQ instance.
You'll notice that in the below setup we need to base64 encode the RabbitMQ connection string. This is common to help minimize the risk or escape characters causing configuration issues. It IS NOT a security feature, as base64 encoding is not encryption.
RABBITMQ_HOST="rabbitmq.pets.svc.cluster.local:15672"
RABBITMQ_USERNAME="username"
RABBITMQ_PASSWORD="password"
RABBITMQ_CONNECTION_STRING="http://${RABBITMQ_USERNAME}:${RABBITMQ_PASSWORD}@${RABBITMQ_HOST}"

RABBITMQ_CONNECTION_STRING_BASE64=$(echo -n "${RABBITMQ_CONNECTION_STRING}"|base64 -w 0)

cat << EOF > virtual-worker-scaler.yaml
apiVersion: v1
kind: Secret
metadata:
  name: rabbitmq-scaler-secret
  namespace: pets
data:
  host: ${RABBITMQ_CONNECTION_STRING_BASE64}
---
apiVersion: keda.sh/v1alpha1
kind: TriggerAuthentication
metadata:
  name: trigger-auth-rabbitmq-conn
  namespace: pets
spec:
  secretTargetRef:
    - parameter: host
      name: rabbitmq-scaler-secret
      key: host
---
apiVersion: keda.sh/v1alpha1
kind: ScaledObject
metadata:
  name: virtual-worker-rabbitmq-scaledobject
  namespace: pets
spec:
  scaleTargetRef:
    name: virtual-worker
  minReplicaCount: 1
  pollingInterval: 60
  triggers:
  - type: rabbitmq
    metadata:
      protocol: http
      queueName: orders
      mode: QueueLength
      value: "10"
    authenticationRef:
      name: trigger-auth-rabbitmq-conn
EOF

# Apply the scaled object configuration
kubectl apply -f virtual-worker-scaler.yaml
Test Scaling
Now that we have our scaled object, lets increase the number of virtual customers and see if KEDA responds to the increased order queue depth by adding replicas to the virtual worker deployment.
# Increase the virtual customer replica count
kubectl scale deployment virtual-customer -n pets --replicas=4

# You can keep an eye on the deployment with either of the following commands
kubectl get deployment,pods -n pets
kubectl get deploy -n pets -w
In this lab we will sometimes use the watch command. This is a great tool for re-running a command repeatedly, and typically provides more clear output than the built in kubectl watch flag (-w).
# To watch the deployment update
watch kubectl get deployment,pods -n pets
In addition to the commands above, we can check out the Horizontal Pod Autoscaler(HPA) events. Since KEDA drives the HPA to managed scaling, we can tap into the event stream. We also may want to take a look at the RabbitMQ depth itself, which we can do using the following.
# Watch the HPA events
kubectl events -w -n pets --for hpa/keda-hpa-virtual-worker-rabbitmq-scaledobject

# Check the queue depth
kubectl exec rabbitmq-0 -n pets -- rabbitmqctl list_queues
Alternatively, if you prefer to use curl, in one terminal port forward to the rabbitmq service. In another terminal, curl the rabbitmq http endpoint. We'll pipe the output to jq to filter out the queue length, but you can just skip that if you don't have jq installed.
# port-forward to the rabbitmq http endpoint
kubectl port-forward svc/rabbitmq -n pets 15672:15672

# curl the rabbitmq http endpoint and filter the output with jq
curl -u username:password http://localhost:15672/api/queues/%2f/orders|jq '.backing_queue_status.len'
Great! You should now be seeing the virtual worker count adjusting based on the queue depth. The virtual worker count will likely be pretty close to the virtual customer count, as they process at pretty close to the same speed. Feel free to play around with the deployment replica count to see how the scaler responds.
Node Auto Provisioning (NAP)/Karpenter
Now that we have a good sense of how KEDA works, let's have a look at Node Auto Provisioning (NAP) and what it is.
The Karpenter project was developed to address some limitations in traditional Kubernetes infrastructure scaling. We now know that KEDA and the Horizontal Pod Autoscaler can be used to scale deployments in Kubernetes, but what happens if you don't have enough compute capacity to run those pods? Up until this point we relied on the Cluster Autoscaler and its implementations for the various compute hosting providers.
While the cluster autoscaler has served us well for years, it doesn't provide much fine grained control in scaling behavior, in particular what machine types are selected. For example, what if you want to autoscale targeting the most cost effective machine types possible. Cluster autoscaler had no way to handle that.
The Karpenter project introduced new mechanisms for creating node configuration definitions (NodeClasses) and node pool definitions (NodePools). These are combined with new capabilities around scheduling (ex. affinity and topology spread), provisioning best-fit compute, and Disruption (how nodes are terminated when they aren't needed).
Karpenter was developed as an open-source project, allowing development of compute provider specific implementations of this open-source project, like the open-source Karpenter Provider for Azure which you can host in your AKS cluster. This made it easy for AKS to offer a managed experience for Karpenter via what AKS calls 'Node Auto Provisioning'.
Self-hosted Karpenter vs. managed node auto provisioning
Karpenter is available on Azure in two modes:
Node Auto Provisioning (NAP) mode: a managed Karpenter experience on AKS. This is the recommended mode for most users as it has more test coverage, improved scale-up speed, automatic maintenance window integration, support for some additional SKUs, and various other improvements over self-hosted Karpenter. NAP also leverages Node Provisioning Service and the Machine API for optimized performance and scalability. NAP manages:
- Token rotation
- Helm charts
- Karpenter version updates
- VM OS disk updates
- node image upgrades (Linux)
Self-hosted mode: Karpenter is run as a standalone deployment in the cluster. This mode is useful for advanced users who want to customize or experiment with Karpenter's deployment, use custom Helm charts, or integrate non-standard workflows. Self-hosted mode requires users to directly manage upgrades, token rotation, and helm charts.
How NAP works
NAP uses the following levers to control node provisioning:
- Workload spec / deployment file - The Kubernetes manifest that defines your workload's resource requirements and scheduling constraints (node affinity, tolerations, and topology spread constraints)
- NodePool CRD (policies / constraints) - Node settings like (SKU selection, capacity type, zones, labels, node-level resource limits)
- AKSNodeClass CRD (policies / constraints) - Azure-specific node settings like subnet behavior, image/OS disk/kubelet configuration, etc
- NodeOverlay CRD (optional) - used to detail custom pricing that NAP will consider in VM selection logic
Instead of using the az aks commands with node pools, these CRDs and specs are used to set node behavior. For more information on comparing Azure CLI commands for NAP vs cluster autoscaler settings, see our CAS vs NAP documentation.
Using NAP
First, so far we've been running on nodes based on the default NodePool CRD that was created for us when we created the cluster. While this should be generally enough for most user cases, it's not always ideal if you have more custom or unique workload requirements. Let's create our own NodePool CRD for ARM. We'll use the weight parameter to give ours a higher priority than the default. You can also have a look at the well-known labels and SKU selectors.
cat <<EOF > arm-nodepool-profile.yaml
apiVersion: karpenter.sh/v1
kind: NodePool
metadata:
  name: arm-nodepool
spec:
  weight: 10
  disruption:
    consolidationPolicy: WhenEmptyOrUnderutilized
    consolidateAfter: 1s
  template:
    spec:
      nodeClassRef:
        group: karpenter.azure.com
        kind: AKSNodeClass
        name: default
      requirements:
      - key: kubernetes.io/arch
        operator: In
        values:
        - arm64
      - key: kubernetes.io/os
        operator: In
        values:
        - linux
      - key: karpenter.sh/capacity-type
        operator: In
        values:
        - on-demand
      - key: karpenter.azure.com/sku-family
        operator: In
        values:
        - D
EOF

# Now apply the new arm NodePool CRD and watch the shift
kubectl apply -f arm-nodepool-profile.yaml
Within a couple minutes, you should see the following:
- New ARM node comes online with a name prefix of 'aks-arm'
- Pet store pod is moved from the 'aks-default' node to the 'aks-arm' node
- The 'aks-default' node is removed from the cluster
Again, you can watch this process with the following commands.
# Watch the events raised by karpenter
kubectl get events -A --field-selector source=karpenter -w

# You can also watch the new node start and pods get scheduled
watch kubectl get nodes,pods -n pets -o wide
You may see a second 'aks-arm' node come online and then get removed, as NAP figures out how much capacity is needed.
That was pretty cool, but what about that 'nodeClassRef' section of the nodepool CRD. What can we do with that?
The nodeClassRef is a reference to an AKSNodeClass definition, where we can define settings about the node, like the OS disk size or the OS version. Let's create our own AKSNodeClass CRD and update the Nodepool CRD to reference this custom AKSNodeClass.
You can have multiple NodePool and AKSNodeClass CRDs in the same cluster. NAP will choose the combination of NodePool/AKSNodeClass that meets your workload requirements.
cat <<EOF > arm-nodepool-profile_v2.yaml
apiVersion: karpenter.azure.com/v1beta1
kind: AKSNodeClass
metadata:
  name: default-azurelinux
  annotations:
    kubernetes.io/description: "General purpose AKSNodeClass for running Azure Linux nodes"
spec:
  imageFamily: AzureLinux
---
apiVersion: karpenter.sh/v1
kind: NodePool
metadata:
  name: arm-nodepool
spec:
  weight: 10
  disruption:
    consolidationPolicy: WhenEmptyOrUnderutilized
    consolidateAfter: 1s
  template:
    spec:
      nodeClassRef:
        group: karpenter.azure.com
        kind: AKSNodeClass
        name: default-azurelinux
      requirements:
      - key: kubernetes.io/arch
        operator: In
        values:
        - arm64
      - key: kubernetes.io/os
        operator: In
        values:
        - linux
      - key: karpenter.sh/capacity-type
        operator: In
        values:
        - on-demand
      - key: karpenter.azure.com/sku-family
        operator: In
        values:
        - D
EOF

# Apply the updated NodePool and AKSNodeClass definitions
kubectl apply -f arm-nodepool-profile_v2.yaml
As we watch the nodes and pods, you should see the following:
- New node comes online with the name prefix 'aks-arm', but this one has an 'OS-IMAGE' set to 'CBL-Mariner/Linux' (aka. Azure Linux)
- Pods are moved from the old node to the new Azure Linux node
- The old 'aks-arm' node on Ubuntu is removed.
# Watch the events raised by karpenter
kubectl get events -A --field-selector source=karpenter -w

# You can also watch the new node start and pods get scheduled
watch kubectl get nodes,pods -n pets -o wide
For more info on Karpenter logs and metrics with NAP, visit our NAP monitoring documentation.
Conclusion
In this lab we walked through using the Kubernetes Event Driven Autoscaler to drive the replica count of an application based on an external trigger. In our case, we used the queue depth of a RabbitMQ queue to increase an application's replica count. This is an extremely powerful tool in managing how your application can scale, and KEDA provides an amazing list of scalers that you can tap into. It's also open source, so you can add your own!
Next, we took a look at the Karpenter project, and the OSS Azure Provider for Karpenter, which is provided in AKS as the managed addon Node Auto Provisioning. We saw how you can use the default AKSNodeClass and NodePool CRD to enable autoscaling, but also how you can create your own custom Nodepool and AKSNodeClass CRD based on your own requirements, or even deploy multiple of these CRDs based on your workload needs. In our example, we wanted to run an Azure Linux pool that used ARM based nodes.
Using these two tools together can give you amazing control over the way your application and your cluster handle scaling, and we only scratched the surface of the potential of these solutions!