Istio Service Mesh on AKS
Overview
Istio is an open-source service mesh that layers transparently onto existing distributed applications. Istio’s powerful features provide a uniform and more efficient way to secure, connect, and monitor services. Istio enables load balancing, service-to-service authentication, and monitoring – with few or no service code changes.
Its powerful control plane brings vital features, including:
-
Secure service-to-service communication in a cluster with TLS (Transport Layer Security) encryption, strong identity-based authentication, and authorization.
-
Automatic load balancing for HTTP, gRPC, WebSocket, and TCP traffic.
-
Fine-grained control of traffic behavior with rich routing rules, retries, failovers, and fault injection.
-
A pluggable policy layer and configuration API supporting access controls, rate limits, and quotas.
-
Automatic metrics, logs, and traces for all traffic within a cluster, including cluster ingress and egress.
The AKS Istio add-on simplifies Istio deployment and management, removing the need for manual installation and configuration.
Objectives
In this workshop, you will learn how to use the Istio service mesh with Azure Kubernetes Service (AKS).
-
Enable the Istio add-on in AKS.
-
Deploy services into the mesh, and configure mutual TLS (mTLS) to secure service-to-service communication.
-
Expose an application to the Internet using the Istio Ingress Gateway.
Please be aware that the Istio addon for AKS does not provide the full functionality of the Istio upstream project. You can view the current limitations for this AKS Istio addon here and what is currently Allowed, supported, and blocked MeshConfig values
Prerequisites
Before starting this lab, make sure your environment is set up correctly. Follow the guide here:
- Azure Subscription
- Azure CLI version 2.60.0 or later with the aks-preview Azure CLI extension installed
- kubectl version 1.28.9 or later
- A terminal with
bash(e.g.: Windows Terminal with WSL or Azure Cloud Shell)
Setup your environment
Step 1: Define your environment variables and placeholders
In these next steps, we will setup a new AKS cluster, an Azure Managed Grafana instance and a Azure Monitor Workspace.
- Create a placeholder directory
Before we begin lets create a new directory that can be a placeholder for all of our files created during this lab:
mkdir -p aks-labs/networking/istio-lab/
cd aks-labs/networking/istio-lab/
- Next, proceed by declaring the following environment variables:
cat <<EOF> .envrc
export RG_NAME="rg-aks-labs"
export LOCATION="westus3"

# Azure Kubernetes Service Cluster
export AKS_CLUSTER_NAME="aks-labs"
EOF
Load the environment variables:
source .envrc
Now that we have saved the environment variables, you can always reload these variables later if needed by running source .envrc on this directory.
Step 2: Create a new resource group
- Run the following command to create a resource group using the environment variables you just created.
az group create \
  --name ${RG_NAME} \
  --location ${LOCATION}
- Create a new AKS cluster with the Istio add-on
az aks create \
  --name ${AKS_CLUSTER_NAME}  \
  --resource-group ${RG_NAME} \
  --node-count 1 \
  --enable-asm
- Get the credentials to access the cluster:
az aks get-credentials \
  --name ${AKS_CLUSTER_NAME} \
  --resource-group ${RG_NAME} \
  --file aks-labs.config
- Use the retrieved aks-labs.config file as your KUBECONFIG and add it to your environment
echo export KUBECONFIG=$PWD/aks-labs.config >> .envrc
source .envrc
In this example, the source command in bash opens the .envrc file and adds the environment variables from that file to your current terminal, so you can use them right away.
- Check that the credential is working:
kubectl cluster-info
kubectl get nodes
- Check if Istio components are running:
kubectl get pods -n aks-istio-system
Expected output:
NAME                               READY   STATUS    RESTARTS   AGE
istiod-asm-1-26-76758588d8-j4dqw   1/1     Running   0          3m5s
istiod-asm-1-26-76758588d8-s2nfm   1/1     Running   0          2m50s
If Istio pods are in a Running state, the installation is complete. If they are Pending or CrashLoopBackOff, wait a few minutes and check again.
If pods stay in CrashLoopBackOff, there's likely a configuration or resource issue—check logs with kubectl logs and describe the pod with kubectl describe pod <pod-name> to troubleshoot.
Deploy a Sample Application
We'll deploy the AKS Store Demo application. The store also includes an 'All-in-One' deployment option, which makes installation simple.
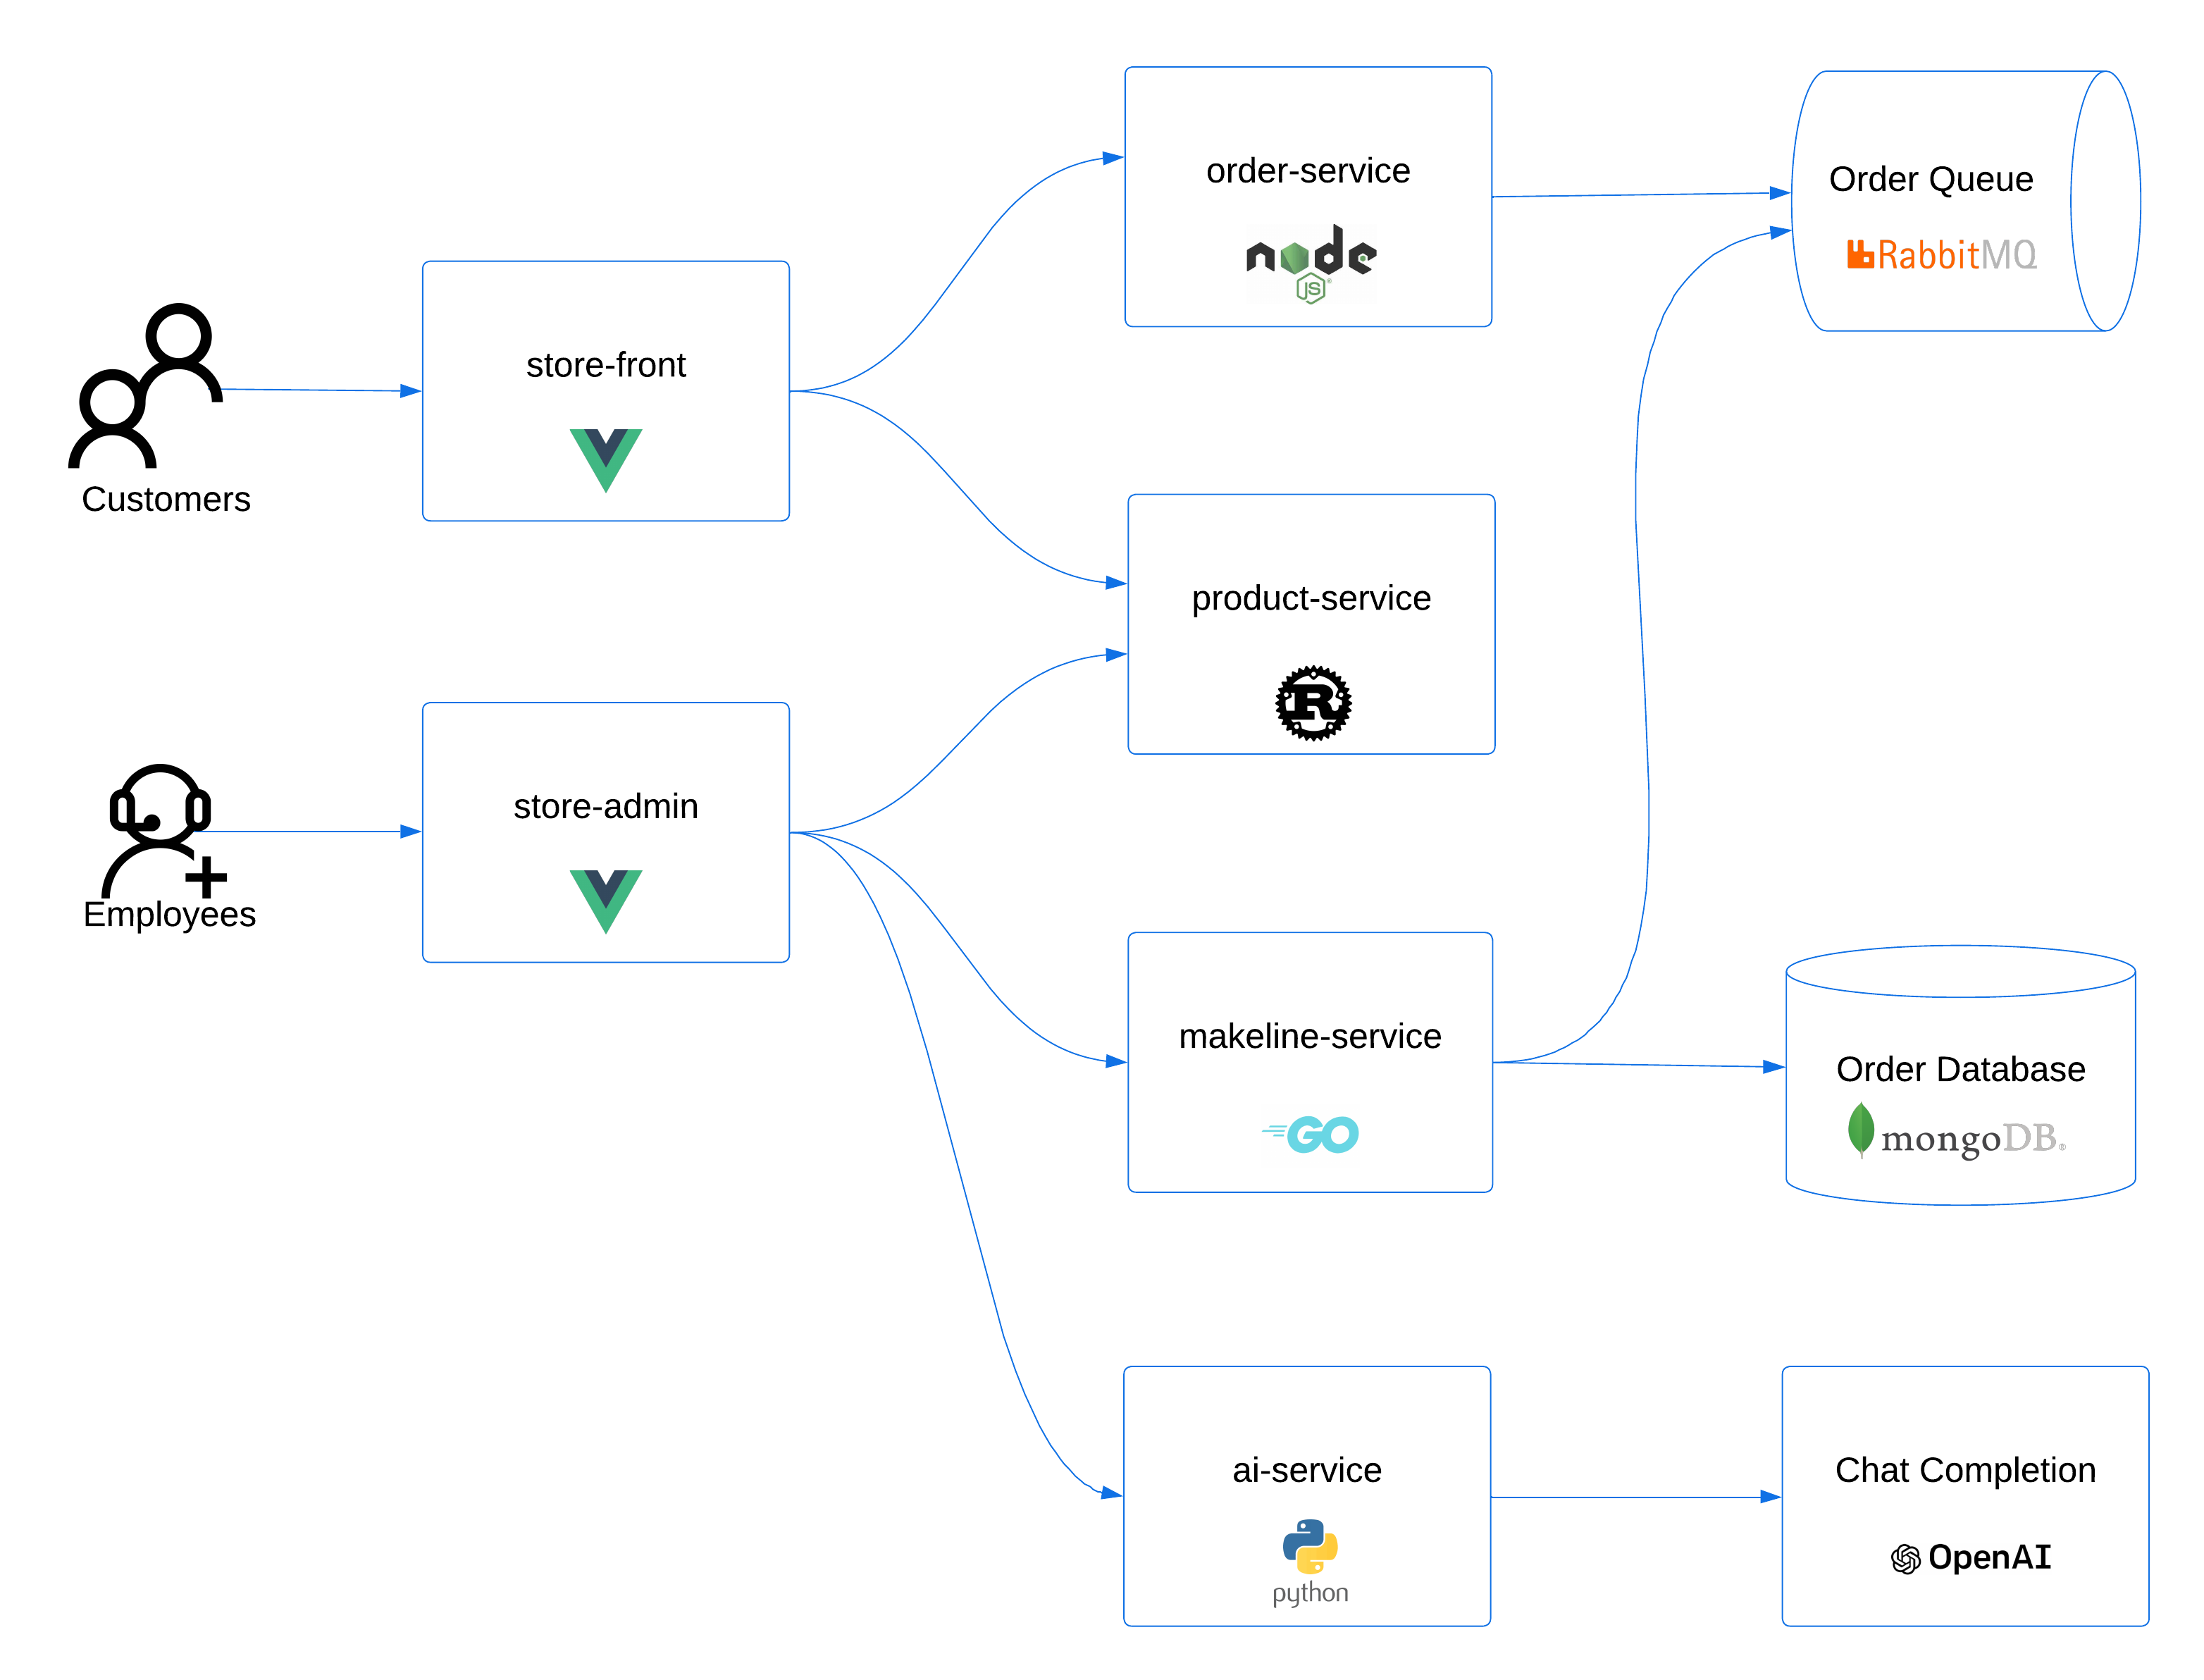 Click here for more information on the architecture of the AKS Store application.
Steps to deploy the AKS Store application on the cluster:
- Deploy the Application
# Create the pet store namespace
kubectl create ns pets

# Deploy the pet store components to the pets namespace
kubectl apply -f https://raw.githubusercontent.com/Azure-Samples/aks-store-demo/main/aks-store-all-in-one.yaml -n pets
- Check the deployment status
kubectl get all -n pets
Expected output
NAME                                    READY   STATUS    RESTARTS   AGE
pod/makeline-service-6c8ffb5857-gnrv7   1/1     Running   0          76s
pod/mongodb-0                           1/1     Running   0          77s
pod/order-service-595b65df56-xjtrr      1/1     Running   0          76s
pod/product-service-5b8794b597-trbvn    1/1     Running   0          75s
pod/rabbitmq-0                          1/1     Running   0          76s
pod/store-admin-5588c957-hc4qw          1/1     Running   0          74s
pod/store-front-6ff78d4f79-6mwx9        1/1     Running   0          75s
pod/virtual-customer-f5d4cd9f7-2sb7w    1/1     Running   0          74s
pod/virtual-worker-865bcdf78f-jp9vk     1/1     Running   0          74s

NAME                       TYPE           CLUSTER-IP     EXTERNAL-IP    PORT(S)              AGE
service/makeline-service   ClusterIP      10.0.27.22     <none>         3001/TCP             75s
service/mongodb            ClusterIP      10.0.130.98    <none>         27017/TCP            77s
service/order-service      ClusterIP      10.0.214.251   <none>         3000/TCP             76s
service/product-service    ClusterIP      10.0.247.208   <none>         3002/TCP             75s
service/rabbitmq           ClusterIP      10.0.147.116   <none>         5672/TCP,15672/TCP   76s
service/store-admin        LoadBalancer   10.0.75.248    4.236.80.75    80:32294/TCP         74s
service/store-front        LoadBalancer   10.0.9.16      4.236.29.186   80:31705/TCP         75s

NAME                               READY   UP-TO-DATE   AVAILABLE   AGE
deployment.apps/makeline-service   1/1     1            1           77s
deployment.apps/order-service      1/1     1            1           77s
deployment.apps/product-service    1/1     1            1           76s
deployment.apps/store-admin        1/1     1            1           75s
deployment.apps/store-front        1/1     1            1           76s
deployment.apps/virtual-customer   1/1     1            1           75s
deployment.apps/virtual-worker     1/1     1            1           75s

NAME                                          DESIRED   CURRENT   READY   AGE
replicaset.apps/makeline-service-6c8ffb5857   1         1         1       77s
replicaset.apps/order-service-595b65df56      1         1         1       77s
replicaset.apps/product-service-5b8794b597    1         1         1       76s
replicaset.apps/store-admin-5588c957          1         1         1       75s
replicaset.apps/store-front-6ff78d4f79        1         1         1       76s
replicaset.apps/virtual-customer-f5d4cd9f7    1         1         1       75s
replicaset.apps/virtual-worker-865bcdf78f     1         1         1       75s

NAME                        READY   AGE
statefulset.apps/mongodb    1/1     78s
statefulset.apps/rabbitmq   1/1     77s
When deploying the AKS Store Demo application using the aks-store-all-in-one.yaml manifest, it actually deploys the store-front and store-admin services as LoadBalancer. Before proceeding, we need to change these two services from LoadBalancer to ClusterIP. After that's done, you can check whether the changes were applied successfully:
 kubectl get svc store-front store-admin -n pets
NAME          TYPE        CLUSTER-IP     EXTERNAL-IP   PORT(S)   AGE
store-front   ClusterIP   10.0.146.103   <none>        80/TCP    28m
store-admin   ClusterIP   10.0.61.151    <none>        80/TCP    28m
Note that at this point, the application is running without Istio sidecars.
Enable Sidecar Injection
Service meshes traditionally work by deploying an additional container within the same pod as your application container. These additional containers are referred to as a sidecar or a sidecar proxy. These sidecar proxies receive policy and configuration from the service mesh control plane, and insert themselves in the communication path of your application to control the traffic to and from your application container.
The first step to onboarding your application into a service mesh, is to enable sidecar injection for your application pods. To control which applications are onboarded to the service mesh, we can target specific Kubernetes namespaces where applications are deployed.
For upgrade scenarios, it is possible to run multiple Istio add-on control planes with different versions. The following command enables sidecar injection for the Istio revision asm-1-26. If you are not sure which revision is installed on the cluster, you can run the following command:
az aks show \
  --resource-group ${RG_NAME} \
  --name ${AKS_CLUSTER_NAME} \
  --query "serviceMeshProfile.istio.revisions"
Expected output:
[
  "asm-1-26"
]
The following command will enable the AKS Istio add-on sidecar injection for the pets namespace for the Istio revision 1.24.
kubectl label namespace pets istio.io/rev=asm-1-26
At this point, we have simply just labeled the namespace, instructing the Istio control plane to enable sidecar injection on new deployments into the namespace. Since we have existing deployments in the namespace already, we will need to restart the deployments to trigger the sidecar injection.
Get a list of all the current pods running in the pets namespace.
kubectl get pods -n pets
You'll notice that each pod listed has a READY state of 1/1. This means there is one container (the application container) per pod. We will restart the deployments to have the Istio sidecar proxies injected into each pod.
Restart all of the deployments in the pets namespace:
kubectl rollout restart deployment -n pets
Expected output:
deployment.apps/makeline-service restarted
deployment.apps/order-service restarted
deployment.apps/product-service restarted
deployment.apps/store-admin restarted
deployment.apps/store-front restarted
deployment.apps/virtual-customer restarted
deployment.apps/virtual-worker restarted
If we re-run the get pods command for the pets namespace, you will notice all of the pods now have a READY state of 2/2, meaning the pods now include the sidecar proxy for Istio. The RabbitMQ and MongoDB for the AKS Store application is not a Kubernetes deployment, but is a Stateful Set. We will need to redeploy the RabbitMQ stateful set to get the sidecar proxy injection.
kubectl rollout restart statefulset -n pets
Expected output:
statefulset.apps/mongodb restarted
statefulset.apps/rabbitmq restarted
If you again re-run the get pods command for the pets namespace, we'll see all the pods with a READY state of 2/2
kubectl get pods,statefulsets -n pets
Expected output:
NAME                                    READY   STATUS    RESTARTS      AGE
pod/makeline-service-bc76675c6-4rb9m    2/2     Running   0             2m26s
pod/mongodb-0                           2/2     Running   0             52s
pod/order-service-b4c97d7bc-dfs55       2/2     Running   0             2m25s
pod/product-service-5b69d9fccd-lm7v4    2/2     Running   0             2m25s
pod/rabbitmq-0                          2/2     Running   0             27s
pod/store-admin-69b658dfd8-mkbx6        2/2     Running   0             2m25s
pod/store-front-6f54cf57f4-7zdrf        2/2     Running   0             2m25s
pod/virtual-customer-6874864bf4-hvk27   2/2     Running   0             2m25s
pod/virtual-worker-5c88bf45b4-96s5b     1/2     Error     2 (24s ago)   2m25s

NAME                        READY   AGE
statefulset.apps/mongodb    1/1     11m
statefulset.apps/rabbitmq   1/1     11m
The applications are now part of the Istio mesh and can use its features like traffic management, security, and observability. You can verify that by running a kubectl describe against one of the pods on the pets namespace:
kubectl describe po -l app=store-front -n pets
Expected output:
[...]

Events:
  Type    Reason     Age    From               Message
  ----    ------     ----   ----               -------
  Normal  Scheduled  5m19s  default-scheduler  Successfully assigned pets/store-front-55fd7cc986-7js2v to aks-nodepool1-99548459-vmss000000
  Normal  Pulling    5m19s  kubelet            Pulling image "mcr.microsoft.com/oss/istio/proxyv2:1.24.6-distroless"
  Normal  Pulled     5m18s  kubelet            Successfully pulled image "mcr.microsoft.com/oss/istio/proxyv2:1.24.6-distroless" in 591ms (591ms including waiting). Image size: 44415061 bytes.
  Normal  Created    5m18s  kubelet            Created container: istio-init
  Normal  Started    5m18s  kubelet            Started container istio-init
  Normal  Pulling    5m17s  kubelet            Pulling image "ghcr.io/azure-samples/aks-store-demo/store-front:latest"
  Normal  Pulled     5m17s  kubelet            Successfully pulled image "ghcr.io/azure-samples/aks-store-demo/store-front:latest" in 482ms (482ms including waiting). Image size: 9569083 bytes.
  Normal  Created    5m17s  kubelet            Created container: store-front
  Normal  Started    5m17s  kubelet            Started container store-front
  Normal  Pulled     5m17s  kubelet            Container image "mcr.microsoft.com/oss/istio/proxyv2:1.24.6-distroless" already present on machine
  Normal  Created    5m17s  kubelet            Created container: istio-proxy
  Normal  Started    5m16s  kubelet            Started container istio-proxy
Secure Service Communication with mTLS
Istio allows services to communicate securely using mutual TLS (mTLS). This ensures that:
-
Encryption: All service-to-service traffic is encrypted.
-
Authentication: Services verify each other’s identity before communicating.
-
Zero Trust Security: Even if a service inside the cluster is compromised, it can’t talk to other services unless it’s part of the mesh.
By default, Istio allows both plaintext (unencrypted) and mTLS traffic (encrypted). We’ll enforce strict mTLS, so all communication inside the pets namespace is encrypted and authenticated.
What is PeerAuthentication?
A PeerAuthentication policy in Istio controls how services accept traffic. It lets you:
-
Require mTLS for all services in a namespace.
-
Allow both plaintext and mTLS (permissive mode).
-
Disable mTLS if needed.
We’ll apply a PeerAuthentication policy to require mTLS for all services in the pets namespace.
Test Communication Before Enforcing mTLS
First, deploy a test pod outside the mesh, in the default namespace, to simulate an external client:
- Create the deployment file:
cat <<EOF> curl-outside.yaml
apiVersion: apps/v1
kind: Deployment
metadata:
  name: curl-outside
spec:
  replicas: 1
  selector:
    matchLabels:
      app: curl
  template:
    metadata:
      labels:
        app: curl
    spec:
      containers:
      - name: curl
        image: docker.io/curlimages/curl
        command: ["sleep", "3600"]
EOF
- Apply it:
kubectl apply -f curl-outside.yaml
Once the pod is running, try sending a request to the store-front service:
- Run the following command to get the name of the test pod.
CURL_OUTSIDE_POD="$(kubectl get pod -l app=curl -o jsonpath="{.items[0].metadata.name}")"
kubectl exec -it ${CURL_OUTSIDE_POD} -- curl -IL store-front.pets.svc.cluster.local:80
Expected output:
HTTP/1.1 200 OK
server: istio-envoy
date: Thu, 10 Jul 2025 17:20:12 GMT
content-type: text/html
content-length: 443
last-modified: Wed, 09 Jul 2025 17:55:47 GMT
etag: "686ead23-1bb"
accept-ranges: bytes
x-envoy-upstream-service-time: 0
x-envoy-decorator-operation: store-front.pets.svc.cluster.local:80/*
You should see a HTTP/1.1 200 OK response, meaning the service is accepting unencrypted traffic.
Apply PeerAuthentication to Enforce mTLS
Now, enforce strict mTLS for all services in the pets namespace:
- Create the PeerAuthentication file:
cat <<EOF> peer-authentication.yaml
apiVersion: security.istio.io/v1
kind: PeerAuthentication
metadata:
  name: pets-mtls
  namespace: pets
spec:
  mtls:
    mode: STRICT
EOF
- Apply it:
kubectl apply -n pets -f peer-authentication.yaml
What this does:
-
Forces all services in the
petsnamespace to only accept encrypted mTLS traffic. -
Blocks any plaintext communication.
Test Communication Again
Try sending the same request from the outside test pod:
kubectl exec -it ${CURL_OUTSIDE_POD} -- curl -IL store-front.pets.svc.cluster.local:80
Expected output:
curl: (56) Recv failure: Connection reset by peer
command terminated with exit code 56
This time, the request fails because the store-front service now rejects plaintext connections.
To verify that services inside the mesh can still communicate, deploy a test pod inside the pets namespace:
cat <<EOF> curl-inside.yaml
apiVersion: apps/v1
kind: Deployment
metadata:
  name: curl-inside
  namespace: pets
spec:
  replicas: 1
  selector:
    matchLabels:
      app: curl
  template:
    metadata:
      labels:
        app: curl
    spec:
      containers:
      - name: curl
        image: curlimages/curl
        command: ["sleep", "3600"]
EOF
Apply it:
kubectl apply -f curl-inside.yaml -n pets
Once it’s running, get its name:
CURL_INSIDE_POD="$(kubectl get pod -n pets -l app=curl -o jsonpath="{.items[0].metadata.name}")"
Then, try the request again:
kubectl exec -it ${CURL_INSIDE_POD} -n pets -- curl -IL store-front.pets.svc.cluster.local:80
Expected output:
HTTP/1.1 200 OK
server: envoy
date: Thu, 10 Jul 2025 17:26:57 GMT
content-type: text/html
content-length: 443
last-modified: Wed, 09 Jul 2025 17:55:47 GMT
etag: "686ead23-1bb"
accept-ranges: bytes
x-envoy-upstream-service-time: 12
This succeeds, proving that only Istio-managed services inside the mesh can talk to each other.
So far, the store-front service is only accessible inside the cluster. To allow external users to access it we need an Istio Ingress Gateway.
Expose Services with Istio Ingress Gateway
What is an Istio Ingress Gateway?
An Ingress Gateway is an Istio-managed entry point that:
-
Controls incoming traffic from the Internet.
-
Can enforce security, rate limiting, and routing rules.
-
Works like a Kubernetes Ingress but provides more flexibility.
Enabling Istio Ingress Gateway
With the usage of the AKS Istio add-on we can easily enable the Istio Ingress Gateway controller, removing the need for manual steps.
Run the following command to enable Istio Ingress Gateway on your cluster:
- Enable the Ingress Gateway
az aks mesh enable-ingress-gateway  \
  --resource-group ${RG_NAME} \
  --name ${AKS_CLUSTER_NAME} \
  --ingress-gateway-type external
This enabled ingressgateway (external traffic management).
This step takes a few minutes. You won’t see immediate output, but you can check the progress in the next step.
Check if Istio components are running:
kubectl get pods -n aks-istio-ingress
Expected output:
NAME                                                          READY   STATUS    RESTARTS   AGE
aks-istio-ingressgateway-external-asm-1-26-5f5f66b65c-9gdm7   1/1     Running   0          54s
aks-istio-ingressgateway-external-asm-1-26-5f5f66b65c-vgwl6   1/1     Running   0          69s
If Istio pods are in a Running state, the installation is complete. If they are Pending or CrashLoopBackOff, wait a few minutes and check again.
Create an Istio Gateway
We’ll define a Gateway resource that listens on HTTP (port 80) and forwards traffic to our store-front service.
Apply the following Gateway resource:
cat <<EOF> pets-gateway.yaml
apiVersion: networking.istio.io/v1alpha3
kind: Gateway
metadata:
  name: pets-gateway
  namespace: pets
spec:
  selector:
    istio: aks-istio-ingressgateway-external
  servers:
  - port:
      number: 80
      name: http
      protocol: HTTP
    hosts:
    - "*"
EOF
Apply it:
kubectl apply -f pets-gateway.yaml -n pets
The selector used in the Gateway object (istio=aks-istio-ingressgateway-external) points to the Istio service aks-istio-ingressgateway-external in the aks-istio-ingress namespace.
kubectl describe svc aks-istio-ingressgateway-external -n aks-istio-ingress
Expected output:
Name:                     aks-istio-ingressgateway-external
Namespace:                aks-istio-ingress
Labels:                   app=aks-istio-ingressgateway-external

[...]
                          istio=aks-istio-ingressgateway-external

[...]
Create a VirtualService to Route Traffic
A Gateway only defines how traffic enters the cluster. We also need a VirtualService to route traffic from the gateway to store-front.
Apply the VirtualService inline to route traffic to store-front:
cat <<EOF> pets-route.yaml
apiVersion: networking.istio.io/v1alpha3
kind: VirtualService
metadata:
  name: pets-route
  namespace: pets
spec:
  hosts:
  - "*"
  gateways:
  - pets-gateway
  http:
  - match:
    - uri:
        prefix: /
    route:
    - destination:
        host: store-front
        port:
          number: 80
EOF
Apply it:
kubectl apply -f pets-route.yaml -n pets
Find the External IP
Check the Istio Ingress Gateway service to get the external IP:
kubectl get svc aks-istio-ingressgateway-external -n aks-istio-ingress
Expected output:
NAME                                TYPE           CLUSTER-IP     EXTERNAL-IP      PORT(S)                                      AGE
aks-istio-ingressgateway-external   LoadBalancer   172.16.0.128   131.145.32.126   15021:32312/TCP,80:30483/TCP,443:32303/TCP   5m5s
Test External Access
Copy the external IP and open it in a browser:
http://<EXTERNAL-IP>
or test with curl:
EXTERNAL_IP=$(kubectl get svc aks-istio-ingressgateway-external -n aks-istio-ingress -o jsonpath='{.status.loadBalancer.ingress[0].ip}')
curl http://${EXTERNAL_IP}/
Expected output:
curl http://${EXTERNAL_IP}/
<!doctype html>
<html lang="">
  <head>
    <meta charset="UTF-8" />
    <link rel="icon" href="/favicon.ico" />
    <meta name="viewport" content="width=device-width, initial-scale=1.0" />
    <title>Contoso Pet Store</title>
    <script type="module" crossorigin src="/assets/index-CKibTzSh.js"></script>
    <link rel="stylesheet" crossorigin href="/assets/index-Cv5jPQyk.css">
  </head>
  <body>
    <div id="app"></div>
  </body>
</html>
You should see the store-front service response.
Summary
Congratulations on completing this lab!
You now have hands-on experience with Istio on AKS, learning how to secure and manage microservices at scale.
In this lab, you:
-
Enabled the Istio add-on in AKS to simplify service mesh deployment.
-
Deployed the AKS Store demo and onboarded it into the Istio mesh.
-
Configured automatic sidecar injection.
-
Enforced strict mTLS to secure service-to-service communication.
-
Exposed services externally using an Istio Ingress Gateway.
Next Steps
This lab introduced core Istio on AKS concepts, but there's more you can explore:
-
Traffic Management: Implement canary deployments, A/B testing, or fault injection.
-
Advanced Security: Apply AuthorizationPolicies to restrict access based on user identity.
-
Performance Monitoring: Integrate Prometheus and Grafana to track service performance and error rates.
-
Scaling & Upgrades: Learn how to perform upgrade Istio and how the Istio service mesh add-on performs and scales on AKS.
If you want to dive deeper, check out:
For more hands-on workshops, explore:
Cleanup (Optional)
If you no longer need the resources from this lab, you can delete your AKS cluster:
az aks delete \
  --resource-group ${RG_NAME} \
  --name ${AKS_CLUSTER_NAME} \
  --no-wait
Or remove just the components created during this lab leaving the cluster in place:
kubectl delete namespace aks-istio-system pets aks-istio-egress aks-istio-ingress
Authors
This lab was originally developed by Richard Hooper. He can be reached at:
Twitter/X: @Pixel_Robots
BlueSky @pixelrobots.co.uk
LinkedIn: Richard Hooper