Getting Started with Kubernetes on Azure Kubernetes Service (AKS)
Getting Started
In this workshop, you will learn the basics of Kubernetes and how to package applications for delivery to Azure Kubernetes Service (AKS). The goal of this workshop is to cover as many application implementation details as possible to get you comfortable with hosting your apps on AKS. We will start with a simple application deployment and then progress to more complex scenarios by introducing integrations with other Azure services and open source tooling commonly used within cloud native apps.
Objectives
The objectives of this workshop are to:
- Introduce you to the basics of Kubernetes and
kubectl - Deploy an application to Azure Kubernetes Service
- Securing application secrets using Azure Key Vault
- Persisting application data using Azure Disk Storage
- Exposing applications using the Istio Ingress Gateway
- Monitoring applications using Azure Monitor and the Prometheus/Grafana stack
- Scaling applications using KEDA
Prerequisites
The following prerequisites are required to complete this workshop:
- Azure Subscription
- Azure CLI
- Visual Studio Code
- Docker Desktop
- Git
- Bash shell (e.g. Windows Terminal with WSL or Azure Cloud Shell)
Setting up your environment
To setup your own lab environment, you will need to run a Terraform script to provision the necessary resources in your Azure subscription. The steps below will walk you through the process.
Before you proceed, please ensure you have access to an Azure subscription with the ability to create resources and users in Azure Active Directory. If you do not have access to an Azure subscription, you can sign up for a free account.
- Using a web browser, navigate to the Azure Cloud Shell
- Ensure your Cloud Shell is set to Bash. If it is on PowerShell, click the drop down in the top left corner and select Bash.
- Run the following commands to ensure you have all the necessary providers registered in your subscription.
az provider register --namespace Microsoft.Quota
az provider register --namespace Microsoft.Compute
az provider register --namespace Microsoft.ContainerRegistry
az provider register --namespace Microsoft.ContainerService
az provider register --namespace Microsoft.Network
az provider register --namespace Microsoft.ApiManagement
az provider register --namespace Microsoft.Monitor
az provider register --namespace Microsoft.AlertsManagement
az provider register --namespace Microsoft.Dashboard
az provider register --namespace Microsoft.App
- Run the following commands to ensure you have all the necessary features registered in your subscription.
az feature register --namespace "Microsoft.ContainerService" --name "EnableWorkloadIdentityPreview"
az feature register --namespace "Microsoft.ContainerService" --name "AKS-GitOps"
az feature register --namespace "Microsoft.ContainerService" --name "AzureServiceMeshPreview"
az feature register --namespace "Microsoft.ContainerService" --name "AKS-KedaPreview"
az feature register --namespace "Microsoft.ContainerService" --name "AKS-PrometheusAddonPreview"
-
Clone this repo: https://github.com/pauldotyu/awesome-aks
-
Using your terminal, open the repo and navigate to the 2023-05-23-msbuild-preday-aks-workshop directory
-
Run the following command to create a terraform.tfvars file and populate it with the following content.
cat <<EOF > terraform.tfvars
deployment_locations = [
  {
    offset   = 0 # adjust this to the number of deployments that have already been created in the previous set
    count    = 1 # adjust this to the number of deployments you want to create
    location = "eastus"
    vm_sku   = "Standard_D4s_v4"
  }
]
EOF
-
Run the
terraform initcommand -
Run the
terraform applycommand and confirm the deployment when prompted
In 10-15 minutes, your lab environment should be ready to go.
If you run the terraform output command, you should see your username, password, AKS cluster name and resource group name.
Kubernetes Fundamentals
This section of the workshop will introduce you to the basics of Kubernetes. We'll be using Azure Kubernetes Service (AKS) to deploy and manage an Azure Voting App.
Working with kubectl
Kubernetes administrators will commonly interact with the Kubernetes API server using the kubectl command line tool. As you progress through your cloud native journey, you will find that there are other tools available for deploying, managing, and monitoring Kubernetes clusters. However, basic knowledge of kubectl is essential.
Connecting to your AKS cluster
An AKS cluster has been provisioned for you. Let's use the Azure CLI to download the credentials for the cluster.
Run the following command to set variables for your resource group and AKS cluster name. Don't forget to replace <user-number> in the command below with the username you've been assigned.
RG_NAME=rg-user<user-number>
AKS_NAME=aks-user<user-number>
Run the following command to download the credentials for your AKS cluster.
az aks get-credentials --resource-group $RG_NAME --name $AKS_NAME
The command above will download the credentials for the cluster and store them in ~/.kube/config. This file includes cluster certificate information and is used by kubectl to connect to the cluster. Since it does contain certificate information, it should be treated as a secret.
kubectl basics
To get some basic information about your cluster, run the following command:
kubectl cluster-info
The kubectl tool allows to you to interact with a variety of Kubernetes clusters.
You can see the list of clusters you have access to by running the following command:
kubectl config get-contexts
If you have more than one context listed, you can switch between clusters by running the following command:
kubectl config use-context <context-name>
Be sure to checkout the
kubectlCheat Sheet for a list of common commands and instructions on configuring yourkubectlwith and alias and enabling autocomplete.
Deploying your first app
The kubectl tool allows you to interact with the Kubernetes API server imperatively or declaratively. When you use the imperative approach, you are telling Kubernetes what to do -- on the command line. When you use the declarative approach, you are telling Kubernetes what you want -- usually specified in a YAML formatted declaration file.
Let's deploy our first app to Kubernetes using the imperative approach.
kubectl run nginx --image nginx
Here, we are telling Kubernetes to run a new Pod named nginx using the nginx image.
A Pod is the smallest unit of deployment in Kubernetes. It is a group of one or more containers that share the same network and storage. In this case, we are running a single container using the nginx image.
When you run multiple containers in a Pod, this is known as a sidecar pattern.
Let's see if our Pod is running.
kubectl get pods
Click to expand output. You should see something like this:
NAME    READY   STATUS    RESTARTS   AGE
nginx   1/1     Running   0          7s
We can also get more information about our Pod by running the following command:
kubectl describe pod nginx
This command will give us a lot of information about our Pod including the events that have occurred.
To view container logs, run the following command:
kubectl logs nginx
Now, let's take a look at how we can deploy our app using a declarative approach.
Let's create a YAML manifest that describes our Pod.
cat <<EOF > nginx2.yaml
apiVersion: v1
kind: Pod
metadata:
  name: nginx2
spec:
  containers:
  - name: nginx2
    image: nginx
    resources: {}
EOF
YAML is a human-readable data serialization language. It is commonly used for configuration files and in applications where data is being stored or transmitted. YAML is short for "YAML Ain't Markup Language".
Next, let's deploy our Pod using the YAML manifest we just created. Don't worry if you don't understand the YAML file. We'll be covering that in more detail later.
kubectl apply -f nginx2.yaml
Let's see if our Pod is running.
kubectl get pods
You should see something like this:
NAME     READY   STATUS    RESTARTS   AGE
nginx    1/1     Running   0          7m49s
nginx2   1/1     Running   0          3s
Here, we are telling Kubernetes that we want a Pod named nginx2 using the nginx image.
This is different from the imperative approach where we told Kubernetes to run a Pod named nginx using the nginx image. The declarative approach is preferred because it allows us to check our code into source control and track changes over time.
The kubectl apply command is idempotent. This means that if you run the command multiple times, the result will be the same. If the resource already exists, it will be updated. If the resource does not exist, it will be created.
Before we move on, be sure to delete all pods so that we don't waste cluster resources.
kubectl delete pods --all
Deploying to AKS
We'll be deploying the Azure Voting App to Azure Kubernetes Service (AKS). This is a simple web app that lets you vote for things and displays the vote totals. You may recognize this app from Microsoft Docs which allows you to vote for "Dogs" or "Cats". The example we'll be using is a slightly different in that it's been modified to allow you to vote for any two things you want based on the environment variables you set.
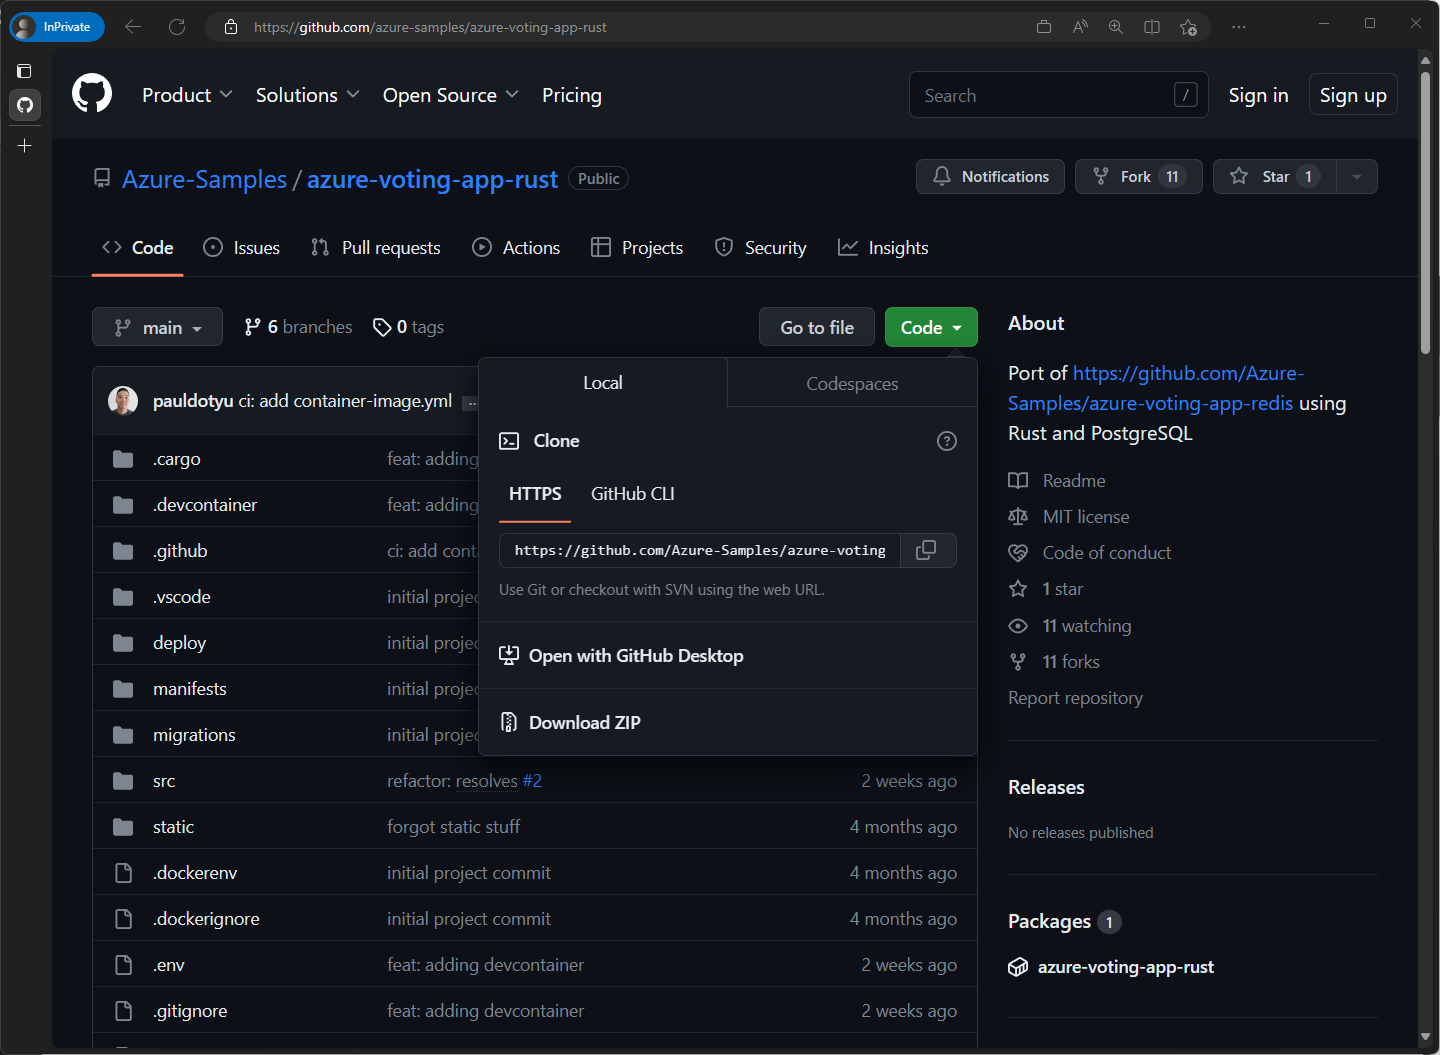
The repo can be found here: Azure-Samples/azure-voting-app-rust.
Also, you may have guessed by the repo name, this version of the app has been re-written in Rust 🦀
Getting familiar with Azure Voting App
This app uses PostgreSQL as the backend database. We'll be using Docker to package the app into a container image so that it can be deployed to AKS.
If you have access to GitHub Codespaces, it is recommended that you open the repo in a Codespace and skip the next step of forking/cloning the repo and opening in a VS Code Dev Container
If you are going to work from your local machine, start by forking, then cloning the repo to your local machine. When the repo has been cloned, navigate to the directory where you cloned the repo into and open VS Code. In VS Code, install the Dev Container extension, and click the "Reopen in Container" button. This will take a few minutes to complete.
Before we deploy the app to AKS, let's build and run it locally to make sure everything is working as expected.
cargo run
This command will take a few minutes to complete the first time, but subsequent runs will be much faster.
Once the app is running, you should be able to access it at http://localhost:8080.
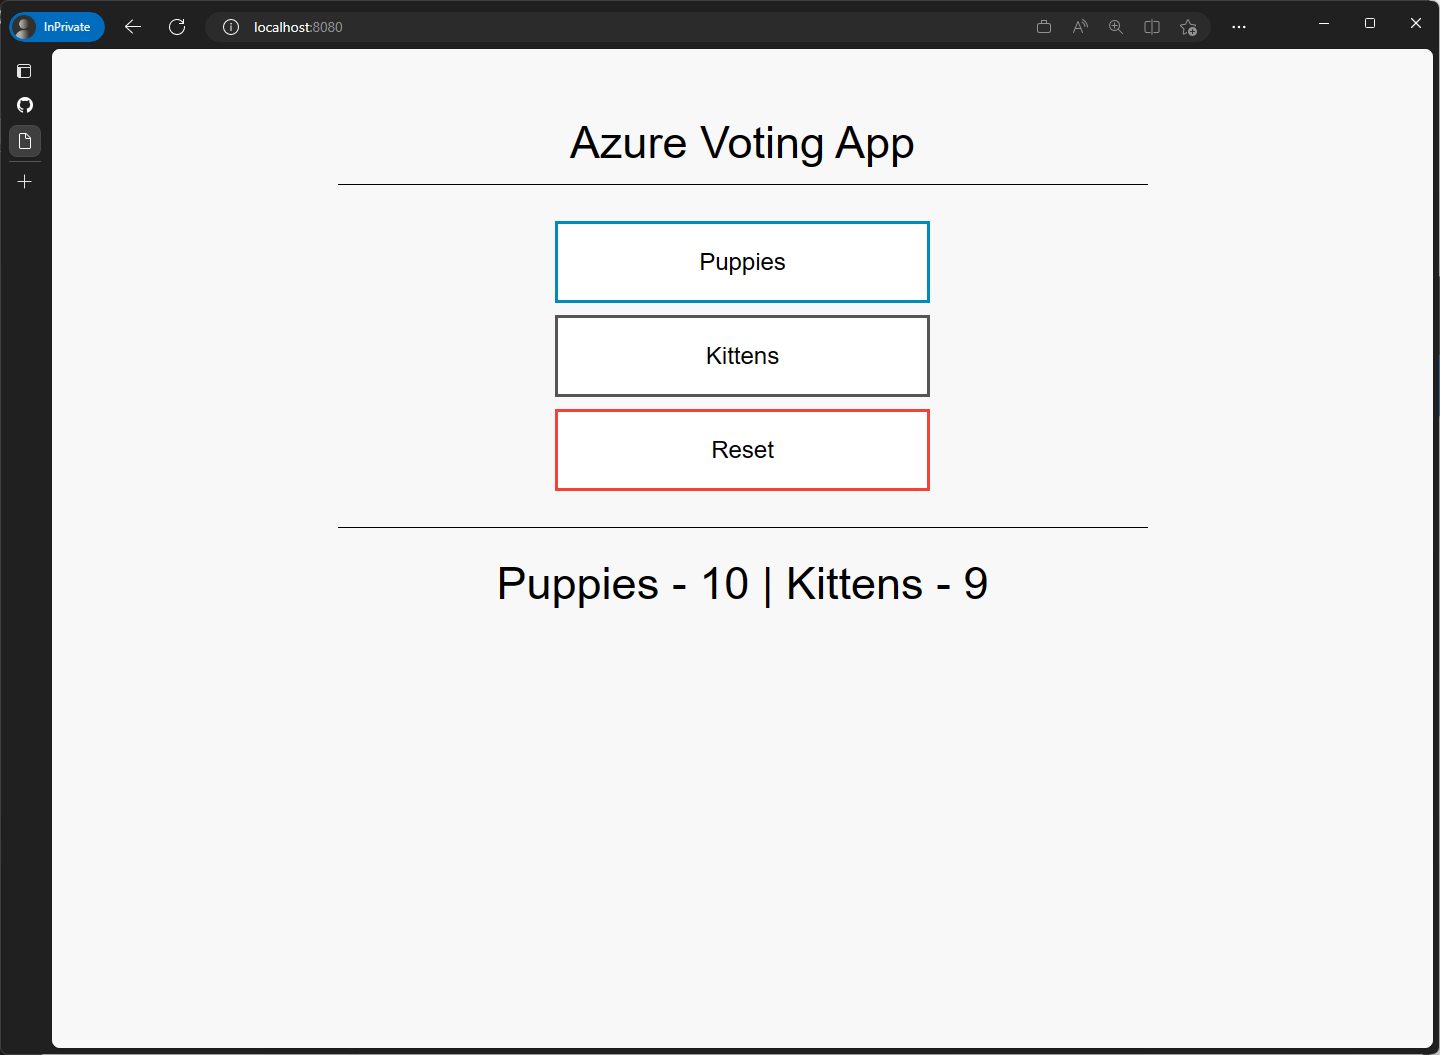
If you look at the docker-compose.yml file that is in the root of the repo, you'll see that the app is made up of two services: app and db.
As the names suggest, the app service is the web front-end and the db service is the database.
In the app service, you'll see that there are two environment variables defined: FIRST_VALUE and SECOND_VALUE. These are the options that will be displayed on the voting page.
Before we move on, let's stop the app by pressing Ctrl+C in the terminal then run the following commands to re-authenticate to Azure from inside this Dev Container's terminal and connect to our AKS cluster.
If you are in a new DevContainer or Codespace, run the following command to login to Azure.
az login
Run the following command to set variables for your resource group and AKS cluster name and don't forget to replace <user-number> in the command below with the username you've been assigned.
RG_NAME=rg-user<user-number>
AKS_NAME=aks-user<user-number>
Run the following command to download the credentials for your AKS cluster.
az aks get-credentials --resource-group $RG_NAME --name $AKS_NAME
Publishing the app to Azure Container Registry
Before you can deploy our app to Kubernetes, you need to package the container image and push it to a container registry. You'll be using Azure Container Registry (ACR) for this.
There are a few different ways to push an image to ACR. We'll be using the az acr build command which will use ACR Tasks to build the image and push it to ACR.
Let's start by getting the name of your ACR instance.
ACR_NAME=$(az resource list \
  --resource-group $RG_NAME \
  --resource-type Microsoft.ContainerRegistry/registries \
  --query "[0].name" \
  --output tsv)
Make sure you are at the root of your repository then run the following command to build and push the image to ACR.
az acr build \
  --registry $ACR_NAME \
  --image azure-voting-app:latest \
  --file Dockerfile .
This command will take a few minutes to complete. Let's move on to the next step while it's running.
Generating YAML manifests
Earlier, we learned that Kubernetes uses YAML manifests to describe the state of your cluster.
In the previous section, we used kubectl to run a pod using both the imperative and declarative approaches.
But, did you know that kubectl can also be used to generate YAML manifests for you? Let's take a look at how we can do that to generate a YAML file for our app.
Open a new terminal and make sure you are at the root of the repo then run the following command set variables for your resource group and AKS cluster names. Be sure to replace
<user-number>with your assigned user number.
RG_NAME=rg-user<user-number>
AKS_NAME=aks-user<user-number>
Run the following command to generate to get the name of your ACR.
ACR_NAME=$(az resource list \
  --resource-group $RG_NAME \
  --resource-type Microsoft.ContainerRegistry/registries \
  --query "[0].name" \
  --output tsv)
Run the following command to create a new directory and navigate into it.
mkdir pre03
cd pre03
Run the following command to generate a YAML manifest using
kubectl.
kubectl create deploy azure-voting-app \
  --image $ACR_NAME.azurecr.io/azure-voting-app:latest \
  --port=8080 \
  --dry-run=client \
  --output yaml > azure-voting-app-deployment.yaml
The --dry-run=client flag combined with the --output yaml flag tells kubectl to generate the YAML file but not actually run the command.
This is useful because it allows us to see what the YAML file will look like before we actually run it. By redirecting the output to a file, we can save the YAML file to disk.
If you open up the YAML file, you'll see that most of the details have been filled in for you 🥳
Did you notice that we are creating a Deployment resource instead of a Pod resource? This is because we want to scale our app up and down. If we were to use a Pod resource, we can only run a single instance of our app. With a Deployment resource, we can run multiple instances of our app and Kubernetes will automatically restart them if they fail.
Configuring apps using environment variables
The base YAML file that was generated for us is a good starting point, but we need to make a few changes to it before we can deploy it to AKS. The first thing we need to do is add the environment variables to configure the app.
But wait, we don't know where exactly to put the environment variables in the YAML file. Never fear, kubectl is here!
Run the following
kubectl explaincommand to get more information about Deployments.
kubectl explain deploy.spec.template.spec.containers
Here, we are using kubectl explain to get information about the Deployment resource. We are then drilling down into the spec.template.spec.containers section to get information about the containers property.
You can traverse the through all the Deployment properties in this way to get more information about them. Additionally, you can also use
kubectl explainto get more information about other Kubernetes resources.To see a list of all resources that can be explained, run the following command:
kubectl api-resources
We can see that the
containersobject has aenvproperty which is an array of environment variables. If we dig a little deeper, we can see how to define environment variables.
kubectl explain deploy.spec.template.spec.containers.env
Now that we know where to put the environment variables, let's add them to the YAML file. Open the
azure-voting-app-deployment.yamlfile, place your cursor after theresource: {}line, and add the following block of code.
env:
  - name: FIRST_VALUE
    value: "Dogs"
  - name: SECOND_VALUE
    value: "Cats"
YAML is very sensitive to indentation. Make sure you indent the environment variables exactly as its shown above. The resulting YAML file should look like this:
Click to expand output
apiVersion: apps/v1
kind: Deployment
metadata:
  creationTimestamp: null
  labels:
    app: azure-voting-app
  name: azure-voting-app
spec:
  replicas: 1
  selector:
    matchLabels:
      app: azure-voting-app
  strategy: {}
  template:
    metadata:
      creationTimestamp: null
      labels:
        app: azure-voting-app
    spec:
      containers:
        - image: <REPLACE_THIS_WITH_YOUR_ACR_NAME>.azurecr.io/azure-voting-app:latest
          name: azure-voting-app
          resources: {}
          env:
            - name: FIRST_VALUE
              value: "Dogs"
            - name: SECOND_VALUE
              value: "Cats"
            - name: DATABASE_SERVER
              value: azure-voting-db
            - name: DATABASE_PASSWORD
              valueFrom:
                secretKeyRef:
                  name: azure-voting-db-secrets
                  key: password
status: {}
Securing credentials using "Secrets"
We also need database credentials to be able to connect to the database. We could add them to the YAML file, but that would mean that they would be stored in plain text. This is not a good idea because anyone who has access to the YAML file would be able to see the credentials. Instead, we are going to use a Kubernetes secret to store the credentials in the cluster.
Run the following command to create a secret with two keys to store the database username and password.
kubectl create secret generic azure-voting-db-secrets \
  --from-literal=username=postgres \
  --from-literal=password=mypassword
Now that we have created the secret, we need to tell Kubernetes to use it. We can do this by adding a few more environment variables to the containers object.
But, instead of directly keying in the value as we did with "Dogs" and "Cats" above, we can use the valueFrom property to point to our Kubernetes secret..
In the
azure-voting-app-deployment.yamlfile, add the following YAML to the YAML file directly below theSECOND_VALUEenvironment variable.
- name: DATABASE_SERVER
  value: azure-voting-db
- name: DATABASE_USER
  valueFrom:
    secretKeyRef:
      name: azure-voting-db-secrets
      key: username
- name: DATABASE_PASSWORD
  valueFrom:
    secretKeyRef:
      name: azure-voting-db-secrets
      key: password
Your azure-voting-app-deployment.yaml file should now look like this:
Click to expand output
apiVersion: apps/v1
kind: Deployment
metadata:
  creationTimestamp: null
  labels:
    app: azure-voting-app
  name: azure-voting-app
spec:
  replicas: 1
  selector:
    matchLabels:
      app: azure-voting-app
  strategy: {}
  template:
    metadata:
      creationTimestamp: null
      labels:
        app: azure-voting-app
    spec:
      containers:
        - image: <REPLACE_THIS_WITH_YOUR_ACR_NAME>.azurecr.io/azure-voting-app:latest
          name: azure-voting-app
          ports:
            - containerPort: 8080
          resources: {}
          env:
            - name: FIRST_VALUE
              value: "Dogs"
            - name: SECOND_VALUE
              value: "Cats"
            - name: DATABASE_SERVER
              value: "azure-voting-db"
            - name: DATABASE_USER
              valueFrom:
                secretKeyRef:
                  name: azure-voting-db-secrets
                  key: username
            - name: DATABASE_PASSWORD
              valueFrom:
                secretKeyRef:
                  name: azure-voting-db-secrets
                  key: password
status: {}
Let's move on to configure the PostgreSQL database deployment. The process of creating the YAML will be very similar to what we did for the Azure Voting App deployment.
Using
kubectl, create a file calledazure-voting-db-deployment.yaml.
kubectl create deployment azure-voting-db \
  --image=postgres \
  --dry-run=client \
  -o yaml > azure-voting-db-deployment.yaml
Open the
azure-voting-db-deployment.yamlfile and add the following YAML to it (just below theresourcesproperty).
env:
  - name: POSTGRES_USER
    valueFrom:
      secretKeyRef:
        name: azure-voting-db-secrets
        key: username
  - name: POSTGRES_PASSWORD
    valueFrom:
      secretKeyRef:
        name: azure-voting-db-secrets
        key: password
Your azure-voting-db-deployment.yaml file should now look like this:
Click to expand output
apiVersion: apps/v1
kind: Deployment
metadata:
  creationTimestamp: null
  labels:
    app: azure-voting-db
  name: azure-voting-db
spec:
  replicas: 1
  selector:
    matchLabels:
      app: azure-voting-db
  strategy: {}
  template:
    metadata:
      creationTimestamp: null
      labels:
        app: azure-voting-db
    spec:
      containers:
        - image: postgres
          name: postgres
          resources: {}
          env:
            - name: POSTGRES_USER
              valueFrom:
                secretKeyRef:
                  name: azure-voting-db-secrets
                  key: username
            - name: POSTGRES_PASSWORD
              valueFrom:
                secretKeyRef:
                  name: azure-voting-db-secrets
                  key: password
status: {}
Run the following command to create the PostgreSQL database deployment.
kubectl apply -f azure-voting-db-deployment.yaml
Exposing Deployments with Services
The front end pod will need to be able to connect to the database pod. We could use the database pod's IP address to connect, but that will not be resilient since there is no gurantee the database pod will have the same IP address when it is recreated due to maintenance or failure. Remember, pods are ephemeral and are given random IP addresses as they are created.
So we'll need to create a Service for the database pod. Think of a service like an internal load balancer. This will give the front end app a single point of entry to connect to the database.
We can use the same technique of creating a YAML manifest for the service using kubectl.
kubectl allows you to imperatively create a service using the kubectl expose command.
Run the following command to create a service YAML manifest for the PostgreSQL database deployment.
kubectl expose deployment azure-voting-db \
  --port=5432 \
  --target-port=5432 \
  --name=azure-voting-db \
  --dry-run=client \
  -o yaml > azure-voting-db-service.yaml
Run the following command to apply the service YAML manifest for the PostgreSQL database deployment.
kubectl apply -f azure-voting-db-service.yaml
Before running the next step below, make sure your container image has completed building and pushing to ACR; otherwise, you will run into a "container image not found" error.
Run the following command to create a deployment for the Azure Voting App.
kubectl apply -f azure-voting-app-deployment.yaml
Run the following command to create a service YAML manifest for the Azure Voting App deployment.
kubectl expose deployment azure-voting-app \
  --port=8080 \
  --target-port=8080 \
  --name=azure-voting-app \
  --dry-run=client \
  -o yaml > azure-voting-app-service.yaml
Run the following command to apply the service YAML manifest for the Azure Voting App deployment.
kubectl apply -f azure-voting-app-service.yaml
Now that we have deployed the Azure Voting App and the PostgreSQL database, we can check to see if they are running.
Run the following command to get a list of deployments, pods, and services.
kubectl get deployments,pods,services
Click to expand output
NAME                               READY   UP-TO-DATE   AVAILABLE   AGE
deployment.apps/azure-voting-app   1/1     1            1           27m
deployment.apps/azure-voting-db    1/1     1            1           27m

NAME                                    READY   STATUS    RESTARTS   AGE
pod/azure-voting-app-6bc9446ddb-xvdgc   1/1     Running   0          10m
pod/azure-voting-db-5666f7fc58-nph78    1/1     Running   0          27m

NAME                       TYPE        CLUSTER-IP   EXTERNAL-IP   PORT(S)    AGE
service/azure-voting-app   ClusterIP   10.0.185.0   <none>        8080/TCP   22s
service/azure-voting-db    ClusterIP   10.0.13.23   <none>        5432/TCP   3m
service/kubernetes         ClusterIP   10.0.0.1     <none>        443/TCP    171m
The application and services are now running, but we can't access it yet. If you noticed, there is no way to access the application from outside the cluster. We can temporarily connect to the service by using the kubectl port-forward command for now.
Run the following command to expose the application.
kubectl port-forward service/azure-voting-app 8080:8080
Kubernetes will now forward all traffic from port 8080 on your local machine to port 8080 on the
azure-voting-appservice.
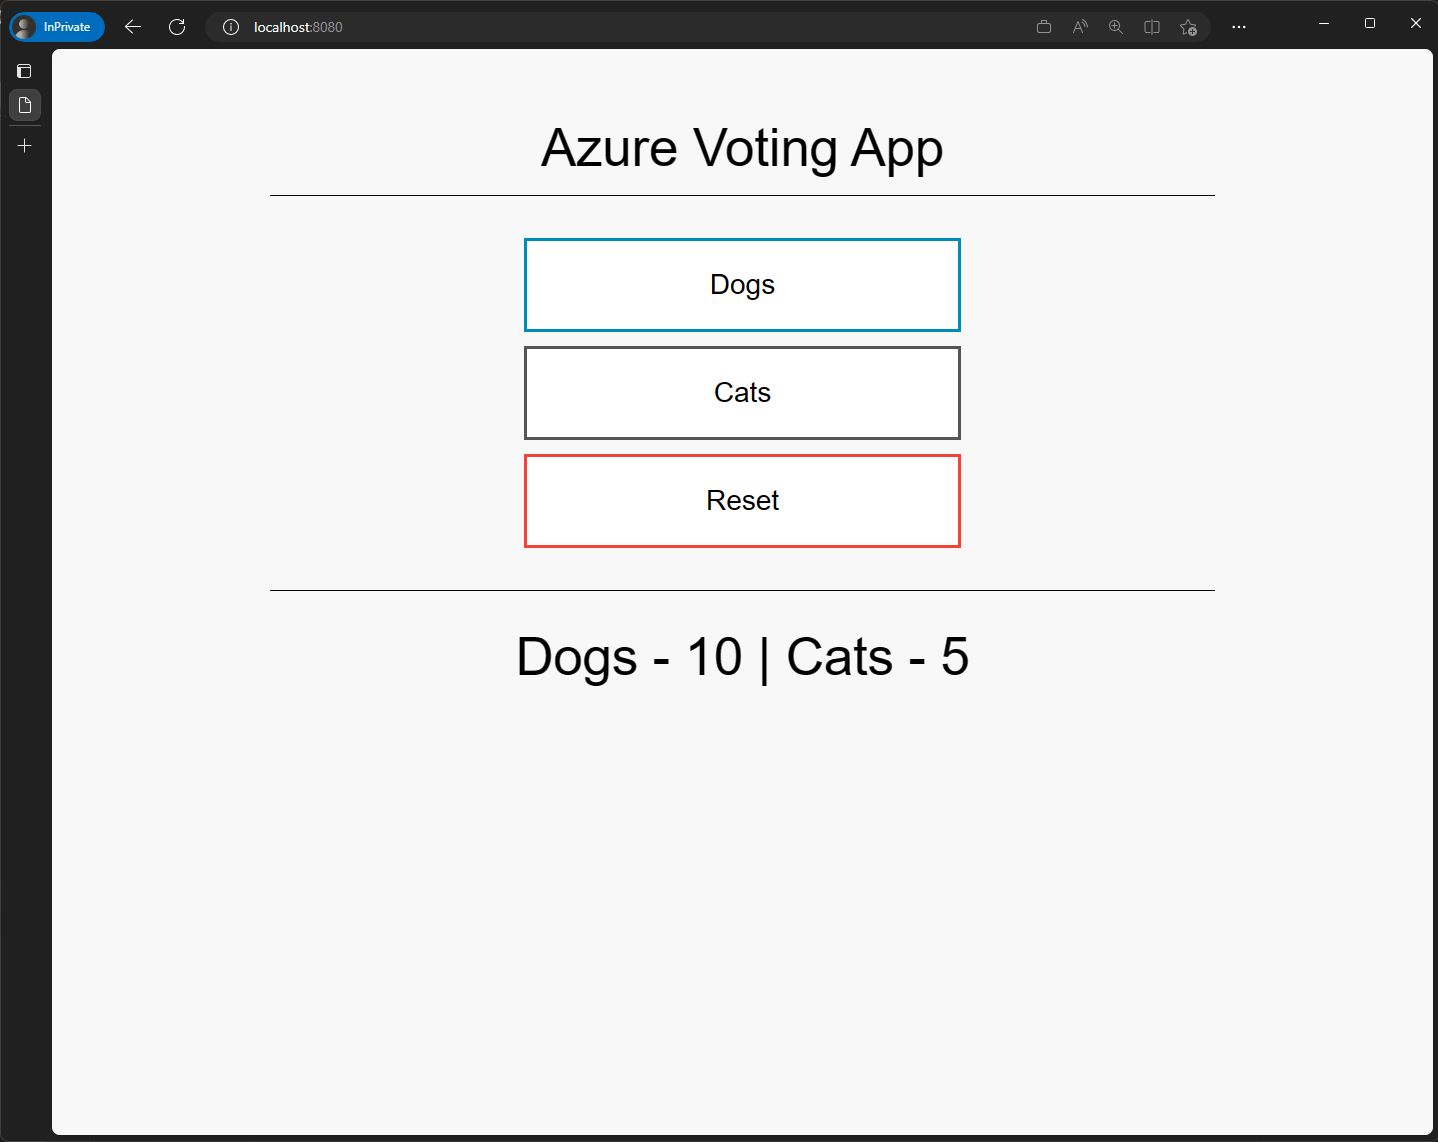
Now that we have exposed the application, we can access it from our local machine. Open a browser and navigate to http://localhost:8080.
You should see the Azure Voting App.
Press
Ctrl+Cto stop the port forwarding. We'll expose the application in a more permanent way later.
Dealing with secrets
The dirty secret about Kubernetes secrets is that they are not really secrets. They are just base64 encoded strings. Anyone with access to the cluster can decode them and see the actual value. This is not a problem if you are limiting access to your cluster.
But remember, anyone with access to your cluster can see your secrets!
Run the following command to get the
passwordsecret we saved in the cluster.
kubectl get secrets azure-voting-db-secrets -o jsonpath='{.data.password}'
We can decode the output by using the base64 --decode command.
Run the following command to decode the
passwordsecret.
kubectl get secrets azure-voting-db-secrets -o jsonpath='{.data.password}' | base64 --decode
There it is.. the secret is out. Anyone with access to the cluster can see the secret 😨
Run the following command to delete the
azure-voting-db-secretssecret. We'll create a new one next.
kubectl delete secret azure-voting-db-secrets
Securely storing secrets
There are a few ways to store secrets in a more secure manner. One way is to use Azure Key Vault.
Your lab environment already has an Azure Key Vault created for you.
Run the following command to get the name of your Azure Key Vault.
AKV_NAME=$(az resource list \
  --resource-group $RG_NAME \
  --resource-type Microsoft.KeyVault/vaults \
  --query "[0].name" -o tsv)
With the name of your Azure Key Vault, you can now store your secrets in the Azure Key Vault.
Run the following command to add the database username as a secret in the Azure Key Vault.
az keyvault secret set \
  --vault-name $AKV_NAME \
  --name database-user \
  --value postgres
Run the following command to add the database password as a secret in the Azure Key Vault.
az keyvault secret set \
  --vault-name $AKV_NAME \
  --name database-password \
  --value postgres
Using the Azure Key Vault secrets in Kubernetes
You AKS cluster has also been provisioned with the Secret Store CSI driver addon. This allows you to mount secrets from the Azure Key Vault as volumes in your pods.
To verify that the Secret Store CSI driver addon is installed in your cluster, run the following command:
kubectl get pods \
  --namespace kube-system \
  --selector 'app in (secrets-store-csi-driver, secrets-store-provider-azure)'
Click to expand output
You should see something like this:
NAME                                     READY   STATUS    RESTARTS   AGE
aks-secrets-store-csi-driver-dnxf5       3/3     Running   0          3m35s
aks-secrets-store-csi-driver-nf5h8       3/3     Running   0          3m35s
aks-secrets-store-csi-driver-v4bql       3/3     Running   0          3m35s
aks-secrets-store-provider-azure-82nps   1/1     Running   0          3m35s
aks-secrets-store-provider-azure-s6lbd   1/1     Running   0          3m35s
aks-secrets-store-provider-azure-tcc7f   1/1     Running   0          3m35s
Creating a ServiceAccount
In order to use the Secret Store CSI driver, we need to create a SecretProviderClass. This is a Kubernetes object that tells the Secret Store CSI driver which secrets to mount and where to mount them.
The authentication to the Azure Key Vault will be implemented using workload identity. This will allow the pod to use an Azure user-assigned managed identity to authenticate to the Azure Key Vault.
To do this, we need to create a ServiceAccount, link it to the Azure managed identity, and attach it to the pod.
Run the following command to get the the client ID for the user-assigned managed identity.
USER_ASSIGNED_CLIENT_ID=$(az identity show \
  --resource-group $RG_NAME \
  --name $AKS_NAME-identity \
  --query clientId -o tsv)
Next, we need to create a ServiceAccount and annotate it with the Azure managed identity client ID.
Set some variables we will use to create our ServiceAccount manifest. We need the namespace name that your app is deployed into and a service account name. We'll use the default namespace and
azure-voting-app-serviceaccountfor the service account name.
SERVICE_ACCOUNT_NAMESPACE=default
SERVICE_ACCOUNT_NAME=azure-voting-app-serviceaccount
Now run the following command to create the ServiceAccount manifest using the values we've set above.
cat <<EOF > azure-voting-app-serviceaccount.yaml
apiVersion: v1
kind: ServiceAccount
metadata:
  annotations:
    azure.workload.identity/client-id: ${USER_ASSIGNED_CLIENT_ID}
  labels:
    azure.workload.identity/use: "true"
  name: ${SERVICE_ACCOUNT_NAME}
  namespace: ${SERVICE_ACCOUNT_NAMESPACE}
EOF
Run the following command to apply the ServiceAccount manifest.
kubectl apply -f azure-voting-app-serviceaccount.yaml
Creating a SecretProviderClass
Now, we need to create a SecretProviderClass which will tell the Secret Store CSI driver which secrets to mount and where to retrieve them from. Here we need the clientID of the Azure managed identity, the name of the Azure Key Vault, and the tenant ID of the Azure Key Vault.
We should have the clientID and the Azure Key Vault name from steps above. To get the tenant ID, we can use the az identity show command again.
Run the following commands to retrieve information the
tenantId.
TENANT_ID=$(az identity show \
  --resource-group $RG_NAME \
  --name $AKS_NAME-identity \
  --query tenantId -o tsv)
Run the following command to needed to create a YAML manifest for the SecretProviderClass.
cat <<EOF > azure-voting-app-secretproviderclass.yaml
apiVersion: secrets-store.csi.x-k8s.io/v1
kind: SecretProviderClass
metadata:
  name: azure-keyvault-secrets                 # This needs to be unique per namespace
spec:
  provider: azure
  parameters:
    usePodIdentity: "false"
    useVMManagedIdentity: "false"
    clientID: "${USER_ASSIGNED_CLIENT_ID}"     # Setting this to use workload identity
    keyvaultName: ${AKV_NAME}                  # Set to the name of your key vault
    objects:  |
      array:
        - |
          objectName: database-user            # The name of the secret in the key vault
          objectType: secret                   # The type of the secret in the key vault
        - |
          objectName: database-password
          objectType: secret
    tenantId: "${TENANT_ID}"                   # The tenant ID of the key vault
EOF
The
objectsproperty in the manifest is an array of objects that tells the Secret Store CSI driver which secrets to pull out of the Azure Key Vault.The
clientIDproperty tells the Secret Store CSI driver which managed identity to use to authenticate to the Azure Key Vault.
Run the following command to apply the SecretProviderClass manifest.
kubectl apply -f azure-voting-app-secretproviderclass.yaml
Updating the database deployment
Finally, we need to update our database and app deployments to use the ServiceAccount and mount the secrets into each pod as files.
Our application code is written to read secrets from files, so all we need to do is make these files available to the pod on a path that the application is expecting.
In this case, secret files are expected to be in the /mnt/secrets-store directory.
Open the
azure-voting-db-deployment.yamlfile and replace your entireenv:block with this.
env:
  - name: POSTGRES_USER_FILE
    value: "/mnt/secrets-store/database-user"
  - name: POSTGRES_PASSWORD_FILE
    value: "/mnt/secrets-store/database-password"
Directly underneath the
env:block add this to mount the secrets into the container.
volumeMounts:
  - name: azure-voting-db-secrets
    mountPath: "/mnt/secrets-store"
    readOnly: true
Next add a new line after the
volumeMounts:block and add the code below to enable the pod to use the ServiceAccount and add a volume to mount the secrets into. Make sure bothserviceAccountName:andvolumes:are indented to the same level ascontainers:.
serviceAccountName: azure-voting-app-serviceaccount
volumes:
  - name: azure-voting-db-secrets
    csi:
      driver: secrets-store.csi.k8s.io
      readOnly: true
      volumeAttributes:
        secretProviderClass: azure-keyvault-secrets
Here, we are telling Kubernetes to use the azure-voting-app-serviceaccount ServiceAccount and attach a volume to the pod using the azure-keyvault-secrets SecretProviderClass.
The azure-keyvault-secrets SecretProviderClass will tell the Secret Store CSI driver to mount the secrets from the Azure Key Vault into the pod.
Your final azure-voting-db-deployment.yaml file should look like this.
Click to expand code
apiVersion: apps/v1
kind: Deployment
metadata:
  creationTimestamp: null
  labels:
    app: azure-voting-db
  name: azure-voting-db
spec:
  replicas: 1
  selector:
    matchLabels:
      app: azure-voting-db
  strategy: {}
  template:
    metadata:
      creationTimestamp: null
      labels:
        app: azure-voting-db
    spec:
      containers:
        - image: postgres
          name: postgres
          resources: {}
          env:
            - name: POSTGRES_USER_FILE
              value: "/mnt/secrets-store/database-user"
            - name: POSTGRES_PASSWORD_FILE
              value: "/mnt/secrets-store/database-password"
          volumeMounts:
            - name: azure-voting-db-secrets
              mountPath: "/mnt/secrets-store"
              readOnly: true
      serviceAccountName: azure-voting-app-serviceaccount
      volumes:
        - name: azure-voting-db-secrets
          csi:
            driver: secrets-store.csi.k8s.io
            readOnly: true
            volumeAttributes:
              secretProviderClass: azure-keyvault-secrets
status: {}
Updating the app deployment
Let's do the same for the app deployment.
Open the
azure-voting-app-deployment.yamlfile and do the same thing for the app deployment. Replace your entireenv:block with this.
env:
  - name: FIRST_VALUE
    value: "Dogs"
  - name: SECOND_VALUE
    value: "Cats"
  - name: DATABASE_SERVER
    value: "azure-voting-db"
Add this to mount the secrets into the container.
volumeMounts:
  - name: azure-voting-db-secrets
    mountPath: "/mnt/secrets-store"
    readOnly: true
Finally add this to enable the pod to use the service account and add a volume to mount the secrets into.
serviceAccountName: azure-voting-app-serviceaccount
volumes:
  - name: azure-voting-db-secrets
    csi:
      driver: secrets-store.csi.k8s.io
      readOnly: true
      volumeAttributes:
        secretProviderClass: azure-keyvault-secrets
Click to expand code
The updated YAML to look like the following:
apiVersion: apps/v1
kind: Deployment
metadata:
  creationTimestamp: null
  labels:
    app: azure-voting-app
  name: azure-voting-app
spec:
  replicas: 1
  selector:
    matchLabels:
      app: azure-voting-app
  strategy: {}
  template:
    metadata:
      creationTimestamp: null
      labels:
        app: azure-voting-app
    spec:
      containers:
        - image: <REPLACE_THIS_WITH_YOUR_ACR_NAME>.azurecr.io/azure-voting-app:latest
          name: azure-voting-app
          ports:
            - containerPort: 8080
          resources: {}
          env:
            - name: FIRST_VALUE
              value: "Dogs"
            - name: SECOND_VALUE
              value: "Cats"
            - name: DATABASE_SERVER
              value: "azure-voting-db"
          volumeMounts:
            - name: azure-voting-db-secrets
              mountPath: "/mnt/secrets-store"
              readOnly: true
      serviceAccountName: azure-voting-app-serviceaccount
      volumes:
        - name: azure-voting-db-secrets
          csi:
            driver: secrets-store.csi.k8s.io
            readOnly: true
            volumeAttributes:
              secretProviderClass: azure-keyvault-secrets
status: {}
Deploying the updated YAML files
Deploy the updated YAML files to your cluster.
kubectl apply -f azure-voting-db-deployment.yaml
kubectl apply -f azure-voting-app-deployment.yaml
Check the status of the Deployments, Pods, and Services. You should see the following:
kubectl get deployments,pods,services
Click to expand output
NAME                               READY   UP-TO-DATE   AVAILABLE   AGE
deployment.apps/azure-voting-app   1/1     1            1           23m
deployment.apps/azure-voting-db    1/1     1            1           23m

NAME                                    READY   STATUS    RESTARTS   AGE
pod/azure-voting-app-756dc858f8-b4rkx   2/2     Running   0          22m
pod/azure-voting-db-59f4d48797-djt4z    2/2     Running   0          23m

NAME                       TYPE        CLUSTER-IP     EXTERNAL-IP   PORT(S)    AGE
service/azure-voting-app   ClusterIP   10.0.110.128   <none>        8080/TCP   10h
service/azure-voting-db    ClusterIP   10.0.58.27     <none>        5432/TCP   10h
service/kubernetes         ClusterIP   10.0.0.1       <none>        443/TCP    12h
Now that secrets are pulled from Azure KeyVault using the Secrets Store CSI driver and mounted directly into the pods, the secrets end up as files in the pod which no one else can read. The base container image that we used to host the app does not have shell access; therefore, no one can interactively log into the container and read these secret files 😎🔒
Run the following command to enable port forwarding to the app service again to see if the app is working.
kubectl port-forward service/azure-voting-app 8080:8080
Open a browser and navigate to http://localhost:8080. You should see the voting app is working again.
After testing stop the app by pressing Ctrl+C in the terminal.
Persisting data
Databases need to store data, but pods are ephemeral. If the database pod is deleted or restarted, the data will be lost.
To illustrate the problem, let's see what happens when we restart the database and app pods.
Run the following command to delete the database and app pods. Kubernetes will automatically restart them.
kubectl delete pod --all
Wait for the pods to restart and then run the kubectl port-forward command again, and refresh the browser. You should see that the votes have been reset to 0 😭
Creating a PVC for PGDATA
When a PostgreSQL container is created, its data (PGDATA) points to a local directory (e.g., /var/lib/postgresql/data). When the pod crashes or restarts, the container starts with a clean slate and the data is gone.
This can be solved by leveraging persistent storage; more specifically, by taking advantage of the Azure CSI drivers and storage classes that have been pre-deployed into your AKS cluster.
Run the following command to see the storage classes that are available in your cluster.
kubectl get storageclasses
Click to expand output
NAME                    PROVISIONER          RECLAIMPOLICY   VOLUMEBINDINGMODE      ALLOWVOLUMEEXPANSION   AGE
azurefile               file.csi.azure.com   Delete          Immediate              true                   5h22m
azurefile-csi           file.csi.azure.com   Delete          Immediate              true                   5h22m
azurefile-csi-premium   file.csi.azure.com   Delete          Immediate              true                   5h22m
azurefile-premium       file.csi.azure.com   Delete          Immediate              true                   5h22m
default (default)       disk.csi.azure.com   Delete          WaitForFirstConsumer   true                   5h22m
managed                 disk.csi.azure.com   Delete          WaitForFirstConsumer   true                   5h22m
managed-csi             disk.csi.azure.com   Delete          WaitForFirstConsumer   true                   5h22m
managed-csi-premium     disk.csi.azure.com   Delete          WaitForFirstConsumer   true                   5h22m
managed-premium         disk.csi.azure.com   Delete          WaitForFirstConsumer   true                   5h22m
Typically for persistent storage, you would create a Persistent Volume (PV) and Persistent Volume Claim (PVC) to request storage. However, the Azure CSI drivers allow you to create a PVC and have the storage classes create the PV for you using Azure Storage.
We'll create a PVC using the managed-csi storage class. This will create a managed disk in Azure.
Create a new
azure-voting-app-pvc.yamlmanifest.
cat <<EOF > azure-voting-app-pvc.yaml
apiVersion: v1
kind: PersistentVolumeClaim
metadata:
  name: pvc-azuredisk
spec:
  accessModes:
    - ReadWriteOnce
  resources:
    requests:
      storage: 10Gi
  storageClassName: managed-csi
EOF
Apply the manifest to create the PVC.
kubectl apply -f azure-voting-app-pvc.yaml
Updating the database manifest to be a StatefulSet and use the PVC
With the PVC created, we can now update the azure-voting-db-deployment.yaml manifest to use it.
Now that we are using a PVC, we should update our database manifest to use a StatefulSet instead of a Deployment. This will ensure that the PVC is not deleted when the pod is deleted.
Open the
azure-voting-db-deployment.yamlmanifest and changekind: Deploymenttokind: StatefulSet.Also, since we are using a StatefulSet, we need to remove the
strategy: {}section from the manifest.Next, add an additional volume to the pod. You should already have a
volumessection in the YAML, add the following YAML to the end of thevolumessection.
- name: azure-voting-db-data
  persistentVolumeClaim:
    claimName: pvc-azuredisk
Also in the
azure-voting-db-deployment.yamlmanifest, add a volume mount to the container definition. You should already have avolumeMountssection in the YAML. Add the following YAML to the end of thevolumeMountssection.
- name: azure-voting-db-data
  mountPath: "/var/lib/postgresql/data"
  subPath: "data"
The
subPathproperty allows us to mount a subdirectory of the volume into the container.
Your azure-voting-db-deployment.yaml file should now look like this:
Click to expand code
apiVersion: apps/v1
kind: StatefulSet
metadata:
  creationTimestamp: null
  labels:
    app: azure-voting-db
  name: azure-voting-db
spec:
  replicas: 1
  selector:
    matchLabels:
      app: azure-voting-db
  template:
    metadata:
      creationTimestamp: null
      labels:
        app: azure-voting-db
    spec:
      containers:
        - image: postgres
          name: postgres
          resources: {}
          env:
            - name: POSTGRES_USER_FILE
              value: "/mnt/secrets-store/database-user"
            - name: POSTGRES_PASSWORD_FILE
              value: "/mnt/secrets-store/database-password"
          volumeMounts:
            - name: azure-voting-db-secrets
              mountPath: "/mnt/secrets-store"
              readOnly: true
            - name: azure-voting-db-data
              mountPath: "/var/lib/postgresql/data"
              subPath: "data"
      serviceAccountName: azure-voting-app-serviceaccount
      volumes:
        - name: azure-voting-db-secrets
          csi:
            driver: secrets-store.csi.k8s.io
            readOnly: true
            volumeAttributes:
              secretProviderClass: azure-keyvault-secrets
        - name: azure-voting-db-data
          persistentVolumeClaim:
            claimName: pvc-azuredisk

status: {}
Run the following command to delete the original db deployment and deploy a new statefulset.
kubectl delete deploy azure-voting-db
Now run the following command to apply the updated manifest.
kubectl apply -f azure-voting-db-deployment.yaml
Run the following command to see the status of the PVC.
kubectl get pvc
Click to expand output
You should see the following output with a STATUS of Bound. This means the PVC has been successfully created and is ready to be used by the pod.
NAME            STATUS   VOLUME                                     CAPACITY   ACCESS MODES   STORAGECLASS          AGE
pvc-azuredisk   Bound    pvc-e25b6853-21c9-493c-8d19-f4bae2e29be8   10Gi       RWO            managed-csi           2m9s
Run the following command to check the status of the database pod.
kubectl get pod -l app=azure-voting-db
When the database pod is running, use the
kubectl port-forwardcommand to access the app again.Refresh the browser, add some votes, then delete the pods as we did at the beginning of this section.
When you refresh the browser, you should see that the vote data has persisted even though the pods were deleted 😎
Sharing your app
Up until now, we've been accessing our app using port forwarding. This is great for testing, but not very useful if you want users to use your app.
To expose your app to users, we can leverage the newly announced Istio service mesh add-on for AKS. Istio is a service mesh that provides a lot of useful features, including security, observability, traffic management, and more. We won't be using all the features of Istio, We will however, leverage the Ingress Gateway to expose our app outside of the cluster.
Setting up Istio
The Istio add-on has already been installed in your AKS cluster with an external ingress gateway enabled.
If you run the following command, you should see the Ingress Gateway service has been provisioned using a Load Balancer and it has an external IP address.
kubectl get service -n aks-istio-ingress
Click to expand output
Note the NAME and EXTERNAL-IP of the service. The NAME will be used when we create our Istio resources to expose our app and the EXTERNAL-IP address will be used to access our app.
NAME                                TYPE           CLUSTER-IP     EXTERNAL-IP     PORT(S)                                      AGE
aks-istio-ingressgateway-external   LoadBalancer   10.0.182.197   20.252.61.166   15021:30831/TCP,80:30738/TCP,443:31546/TCP   40m
Istio works by injecting a sidecar container into each pod. This sidecar container is responsible for handling all the traffic to and from containers in the pod. This sidecar can be manually injected in your deployments or you can tell Istio to automatically inject Istio sidecars.
Label the
defaultnamespace so that Istio will automatically inject the sidecar into our pods.
kubectl label namespace default istio.io/rev=asm-1-17
Our deployments do not have a sidecar container. Let's redeploy our manifests to trigger Istio to inject sidecar containers into our pods.
Run the following commands to delete the app.
kubectl delete -f azure-voting-db-deployment.yaml
kubectl delete -f azure-voting-app-deployment.yaml
Now we can run the following commands to re-deploy the app.
kubectl apply -f azure-voting-db-deployment.yaml
kubectl apply -f azure-voting-app-deployment.yaml
With our namespace labeled, Istio will automatically inject the sidecar container into our pods.
Run the following command to see the status of the pods. You should now see each pod is running two containers, the app container and the Istio sidecar container.
kubectl get pods
Click to expand output
NAME                                READY   STATUS    RESTARTS   AGE
azure-voting-app-777cbb5494-8tnc7   2/2     Running   0          44s
azure-voting-db-0                   2/2     Running   0          46s
azure-voting-db-765c8d56c4-snq96    1/1     Running   0          4m10s
Exposing the app using the Istio Ingress Gateway
Now that we have Istio installed and our app is running with the Istio sidecar, we can expose our app to the world using the Ingress Gateway. To do this, we need to implement two custom resources that got installed in the AKS cluster when Istio was installed. We will use the Gateway and Virtual Service resources to route traffic to our app.
Run the following commands to create the Istio Ingress Gateway resource.
cat <<EOF > azure-voting-app-servicemesh.yaml
apiVersion: networking.istio.io/v1alpha3
kind: Gateway
metadata:
  name: azure-voting-app-gateway
spec:
  selector:
    istio: aks-istio-ingressgateway-external
  servers:
    - port:
        number: 80
        name: http
        protocol: HTTP
      hosts:
        - "*"
---
apiVersion: networking.istio.io/v1alpha3
kind: VirtualService
metadata:
  name: azure-voting-app-virtualservice
spec:
  hosts:
    - "*"
  gateways:
    - azure-voting-app-gateway
  http:
    - route:
        - destination:
            host: azure-voting-app
            port:
              number: 8080
EOF
Here, we are creating a Gateway resource that will route traffic to our app using the aks-istio-ingressgateway-external service. This service was automatically created for you when the Istio Ingress Gateway was deployed. The gateway will listen on port 80 and route traffic to any host.
The manifest above also creates a VirtualService resource that will route traffic to our backend Service resource via the Gateway.
Run the following command to apply the Istio Ingress Gateway resource.
kubectl apply -f azure-voting-app-servicemesh.yaml
Run the following command to get the IP address of the Istio Ingress Gateway.
INGRESS_IP=$(kubectl get svc -n aks-istio-ingress aks-istio-ingressgateway-external -o jsonpath='{.status.loadBalancer.ingress[0].ip}')
You can run the following command to get the URL of your app.
echo "http://$INGRESS_IP/"
Our app is now accessible to the world! 🌐
Observing your app
Now that the app is fully deployed, we need a way to observe what's happening within the cluster. In AKS, we can use Azure Container Insights to get insights into our cluster. Additionally, we can leverage Azure Monitor managed service for Prometheus and Azure Managed Grafana to get insights into our cluster using tooling that is very popular in the Cloud Native ecosystem.
We'll explore both options.
Azure Container Insights
Your AKS cluster has been provisioned with Azure Container Insights enabled. This means that you can view metrics and logs for your cluster and the applications running in it.
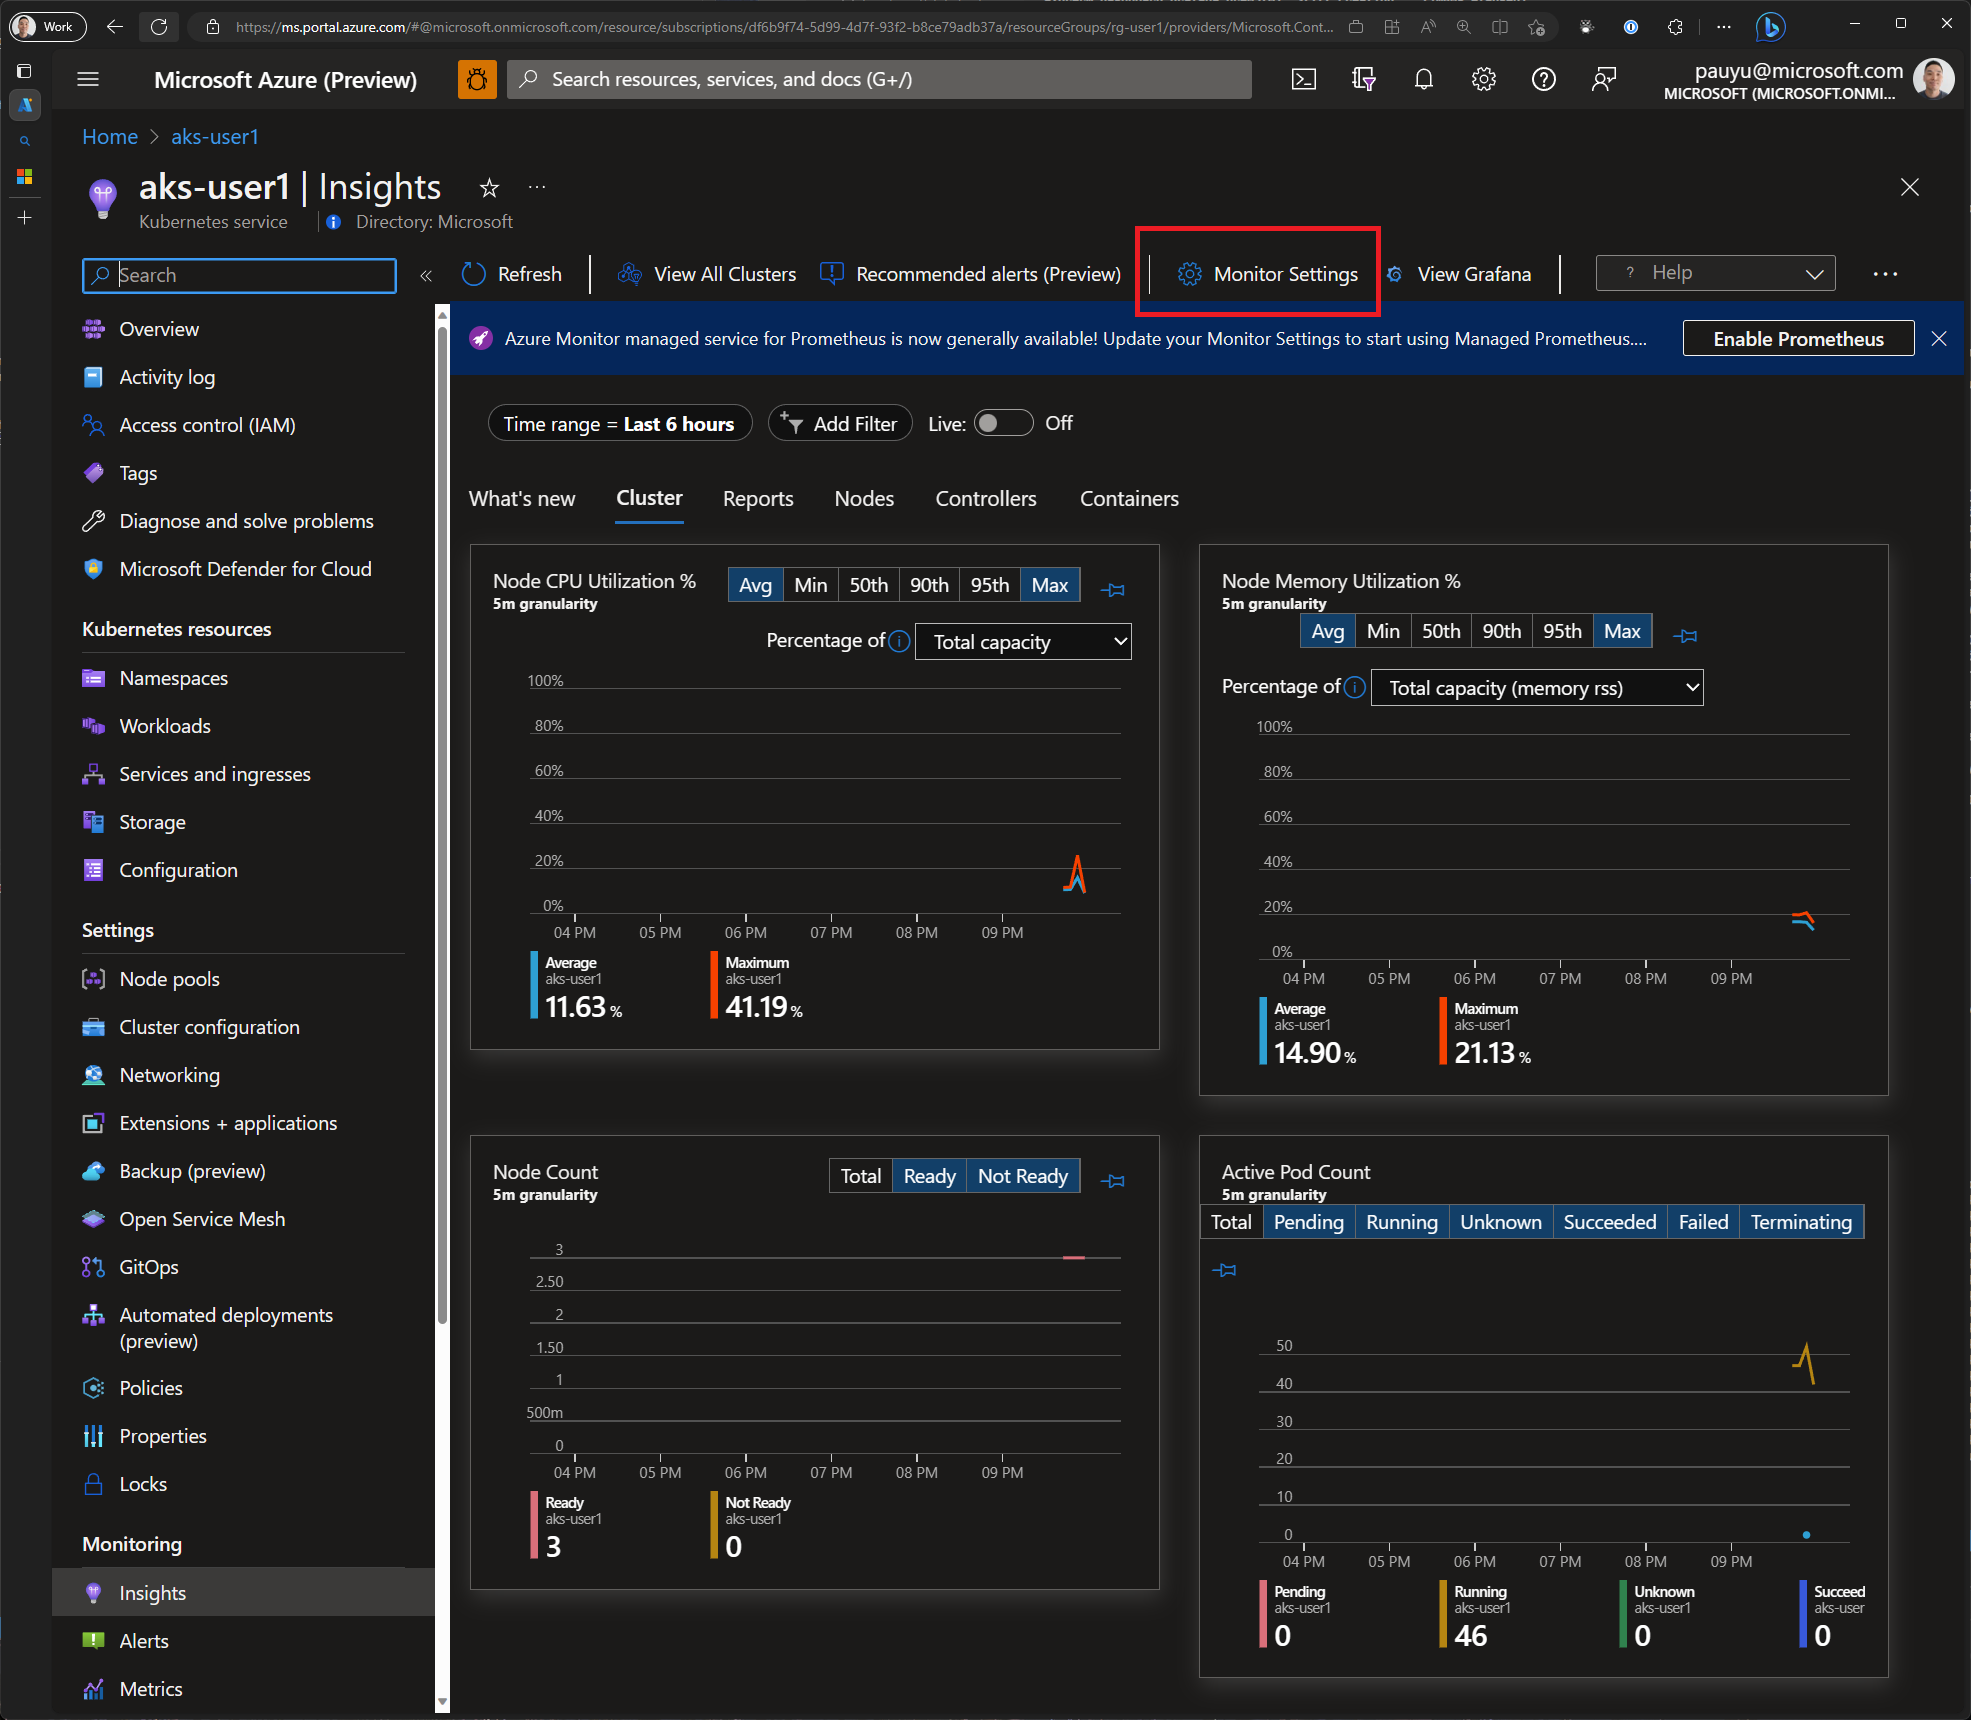
Open the Azure portal and navigate to your AKS cluster. Click on the Insights tab and explore the metrics and logs available.
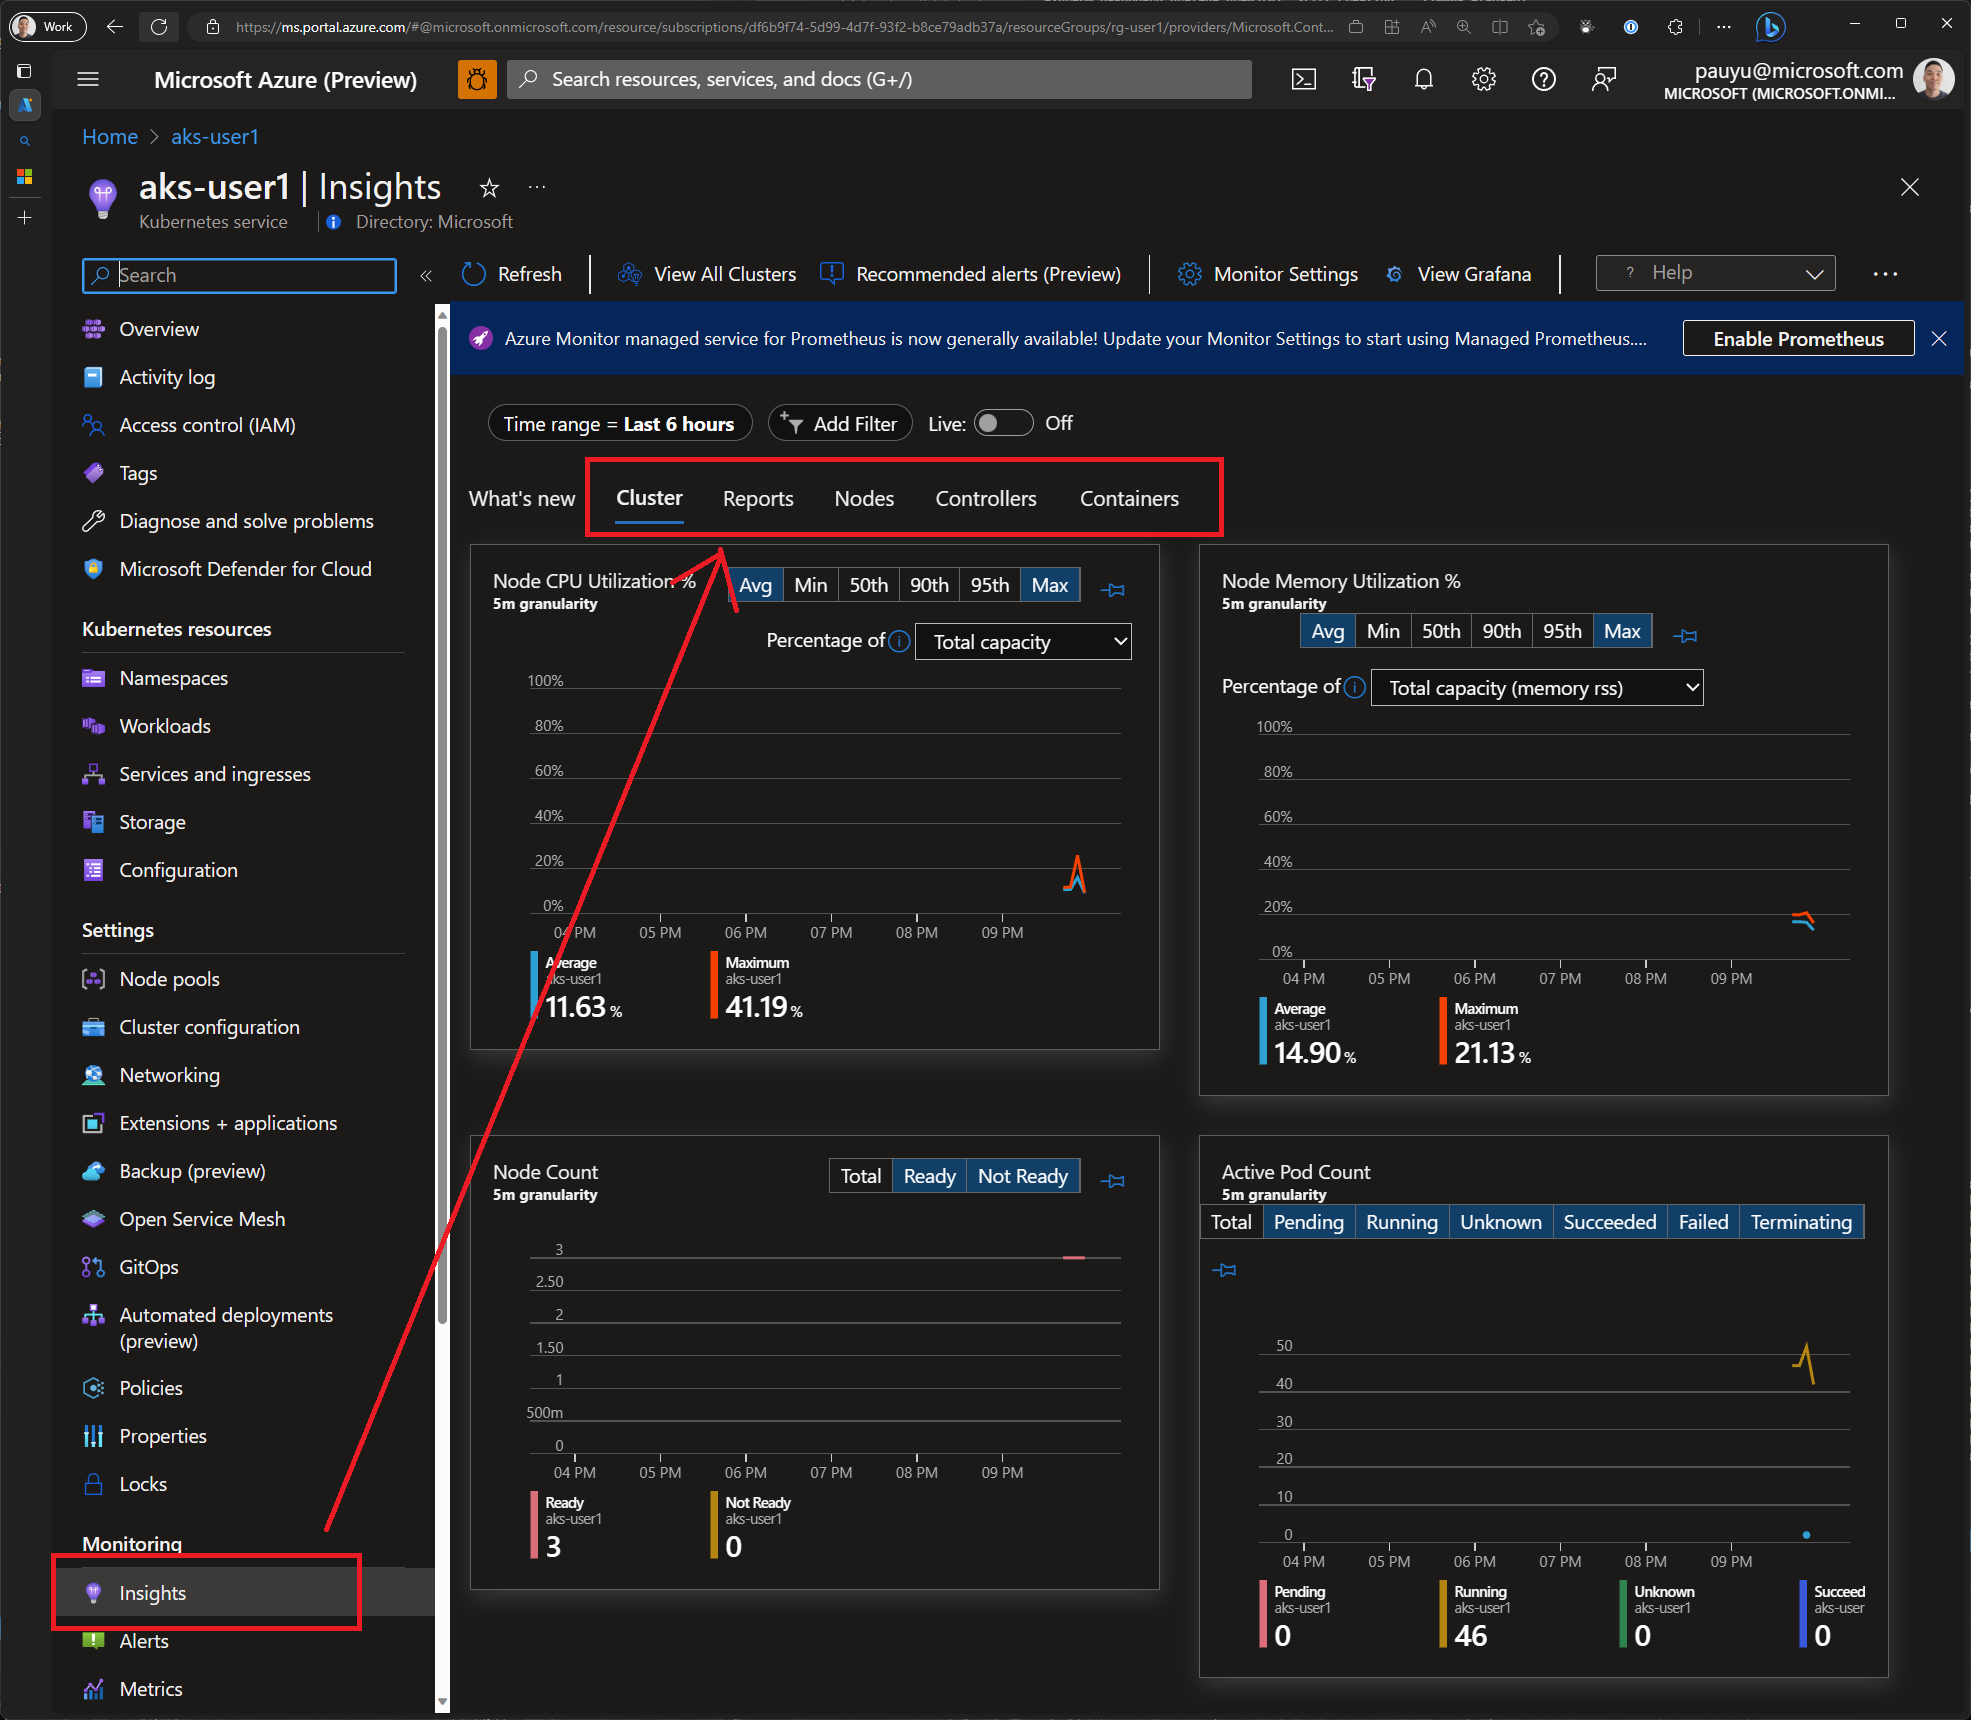
As you click through the different metrics and logs, you'll notice that you can view metrics and logs for the cluster as a whole, as well as for individual pods. This is very useful for troubleshooting issues.
Prometheus and Grafana
Azure Container Insights provides a lot of useful information, but it doesn't provide everything. For example, it doesn't provide information about the traffic flowing through Istio sidecar proxies. To get this information, we'll need to use Prometheus and Grafana. In the Insights tab, you'll notice that there is a link to enable Prometheus. Let's enable it.
In the Azure portal, navigate to your AKS cluster. Click on the Insights tab and click the Enable button next to Prometheus. Check the checkboxes next to Enable Prometheus metrics and Enable Grafana and click Configure.
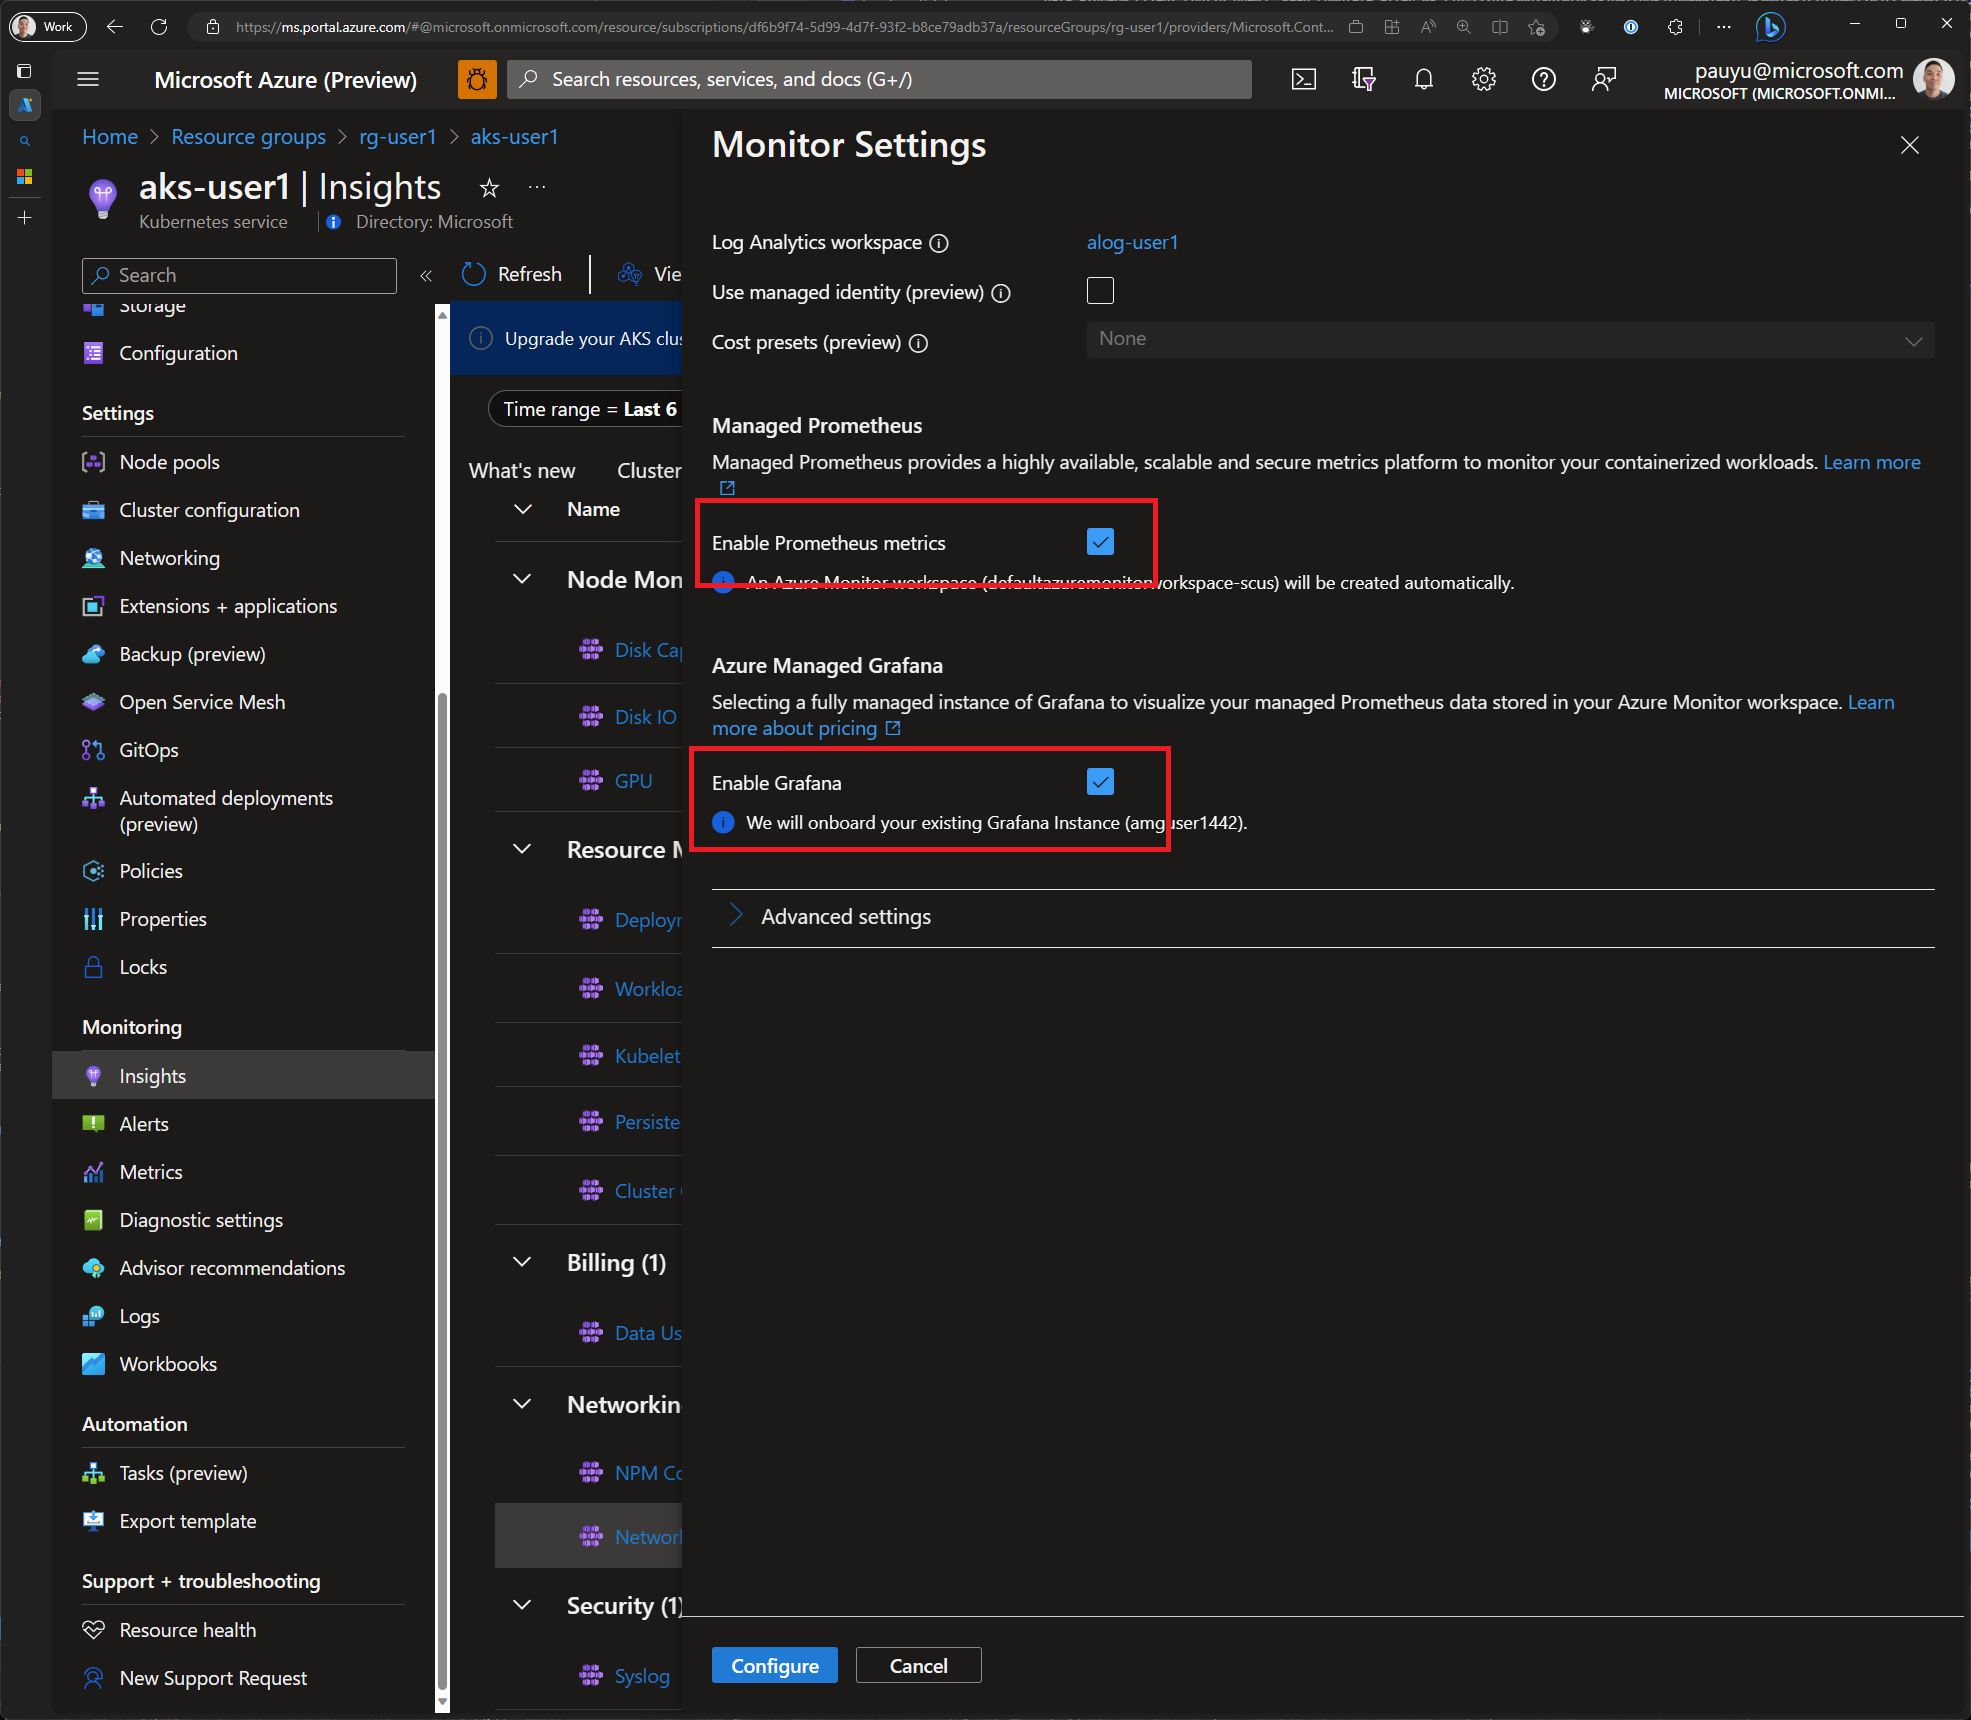
It will take a few minutes for your cluster to be onboarded. Once it's onboarded, you'll see a link to Grafana.
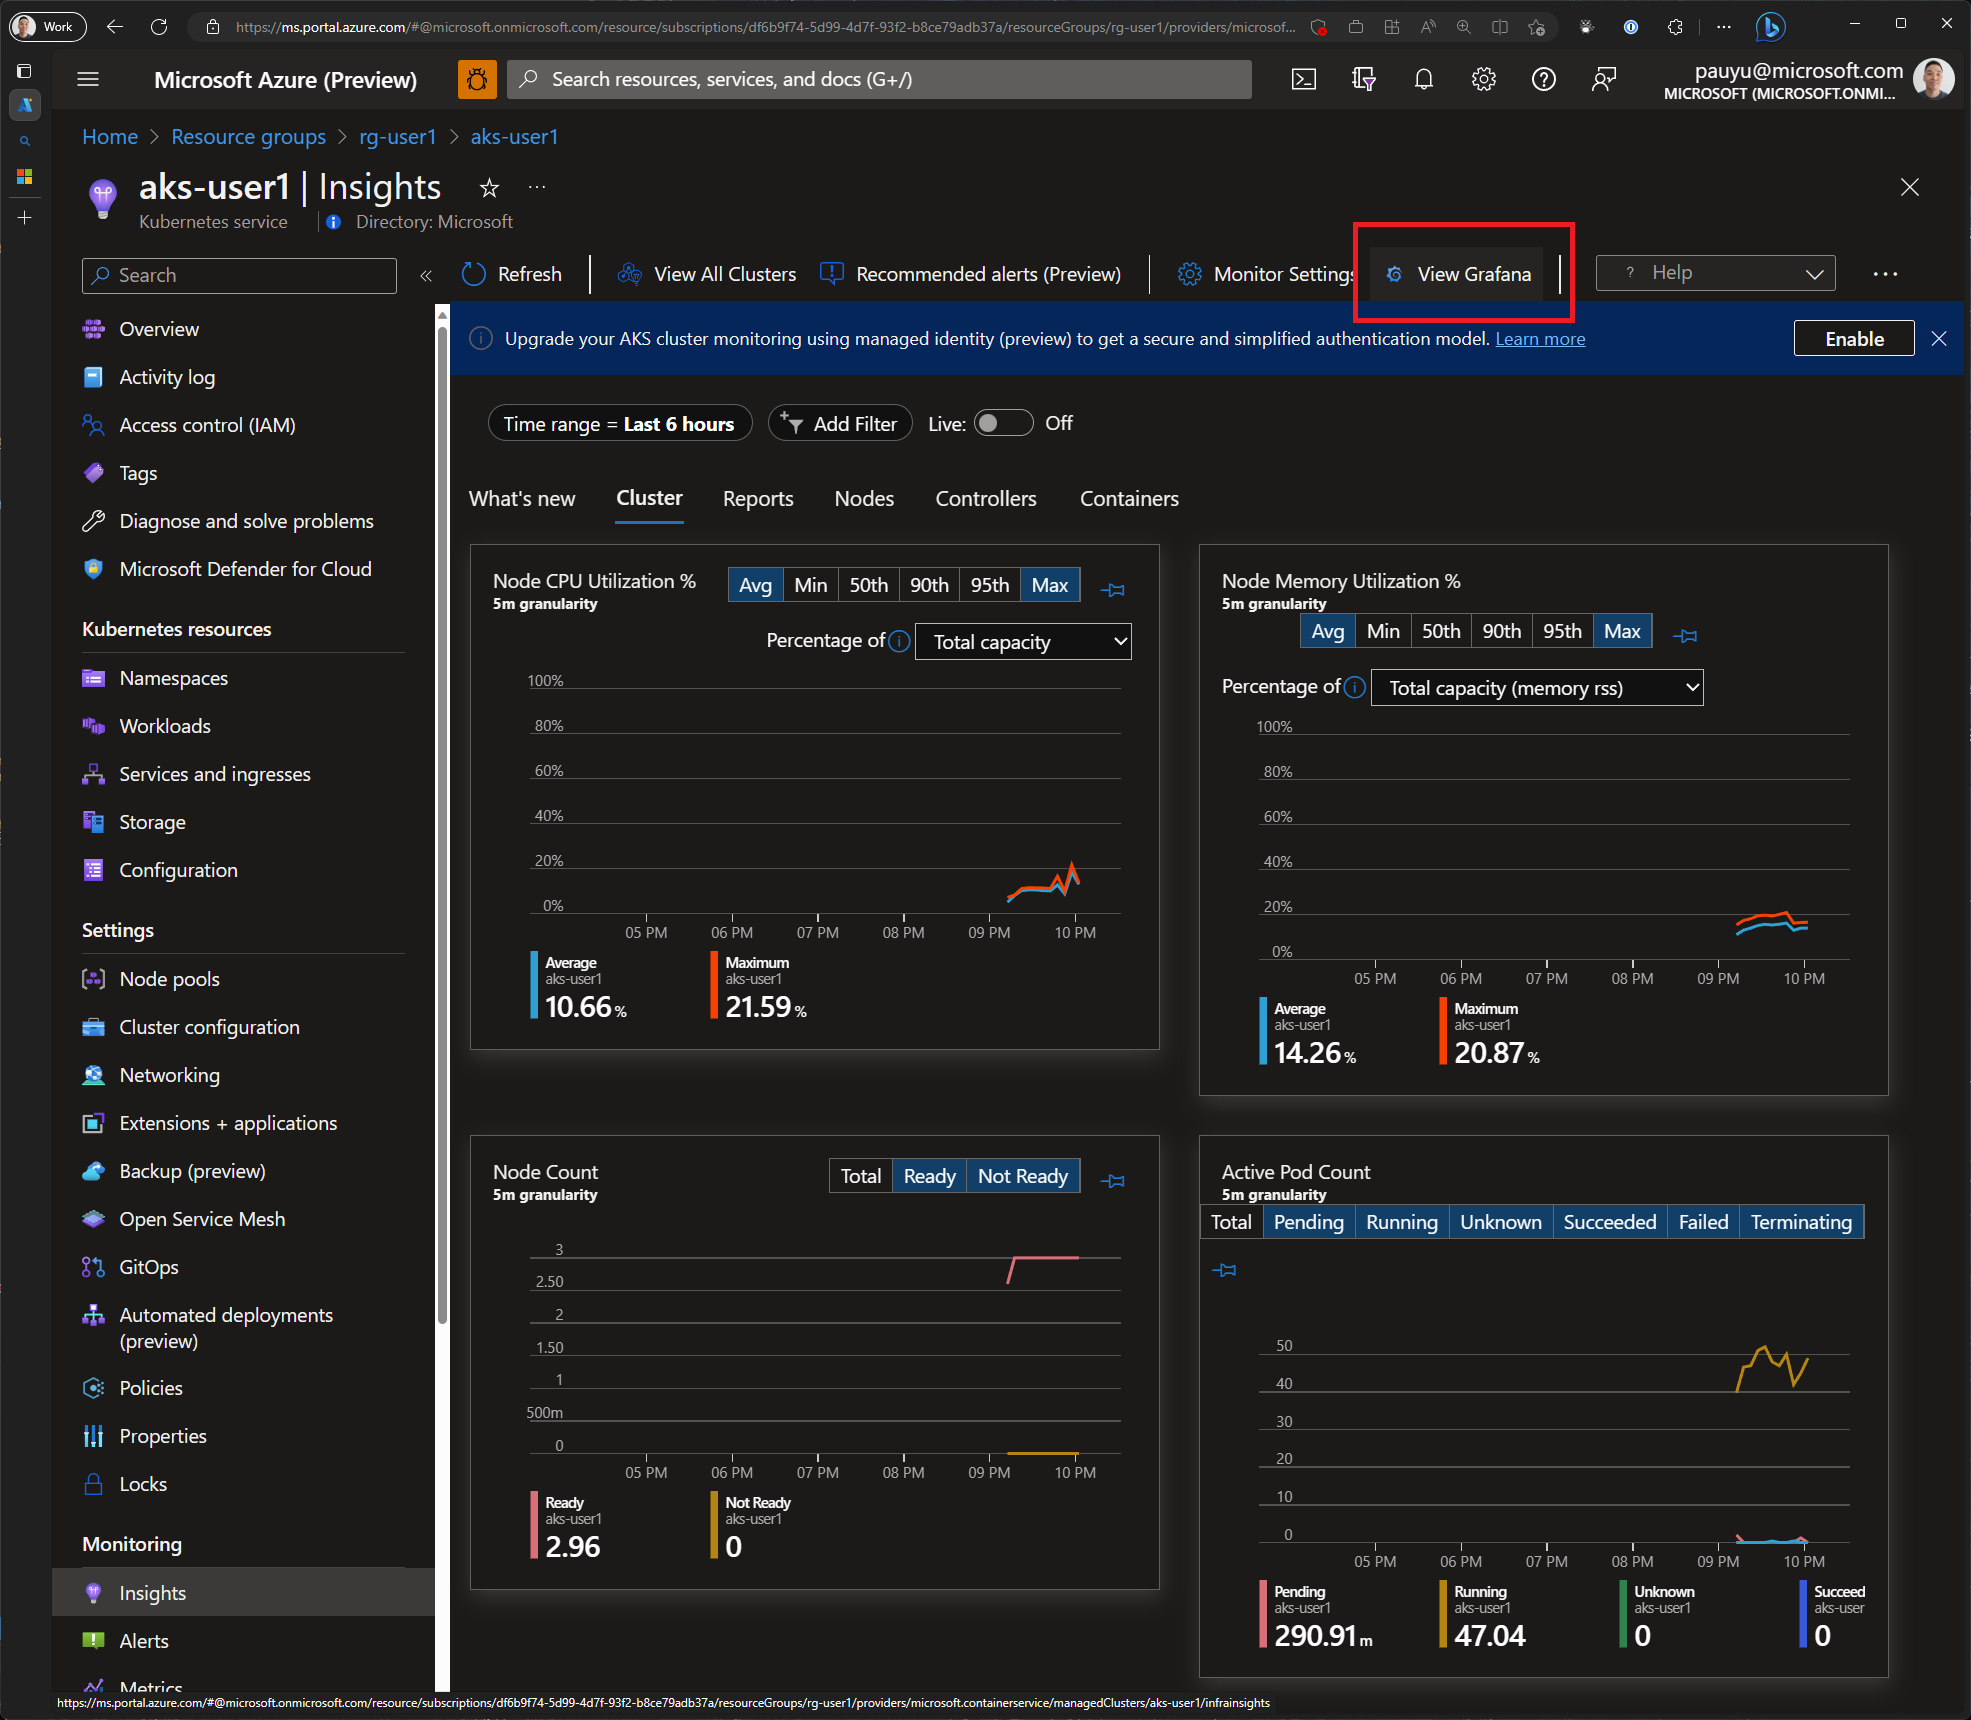
Click on the View Grafana button then click the Browse dashboards link to open Grafana.
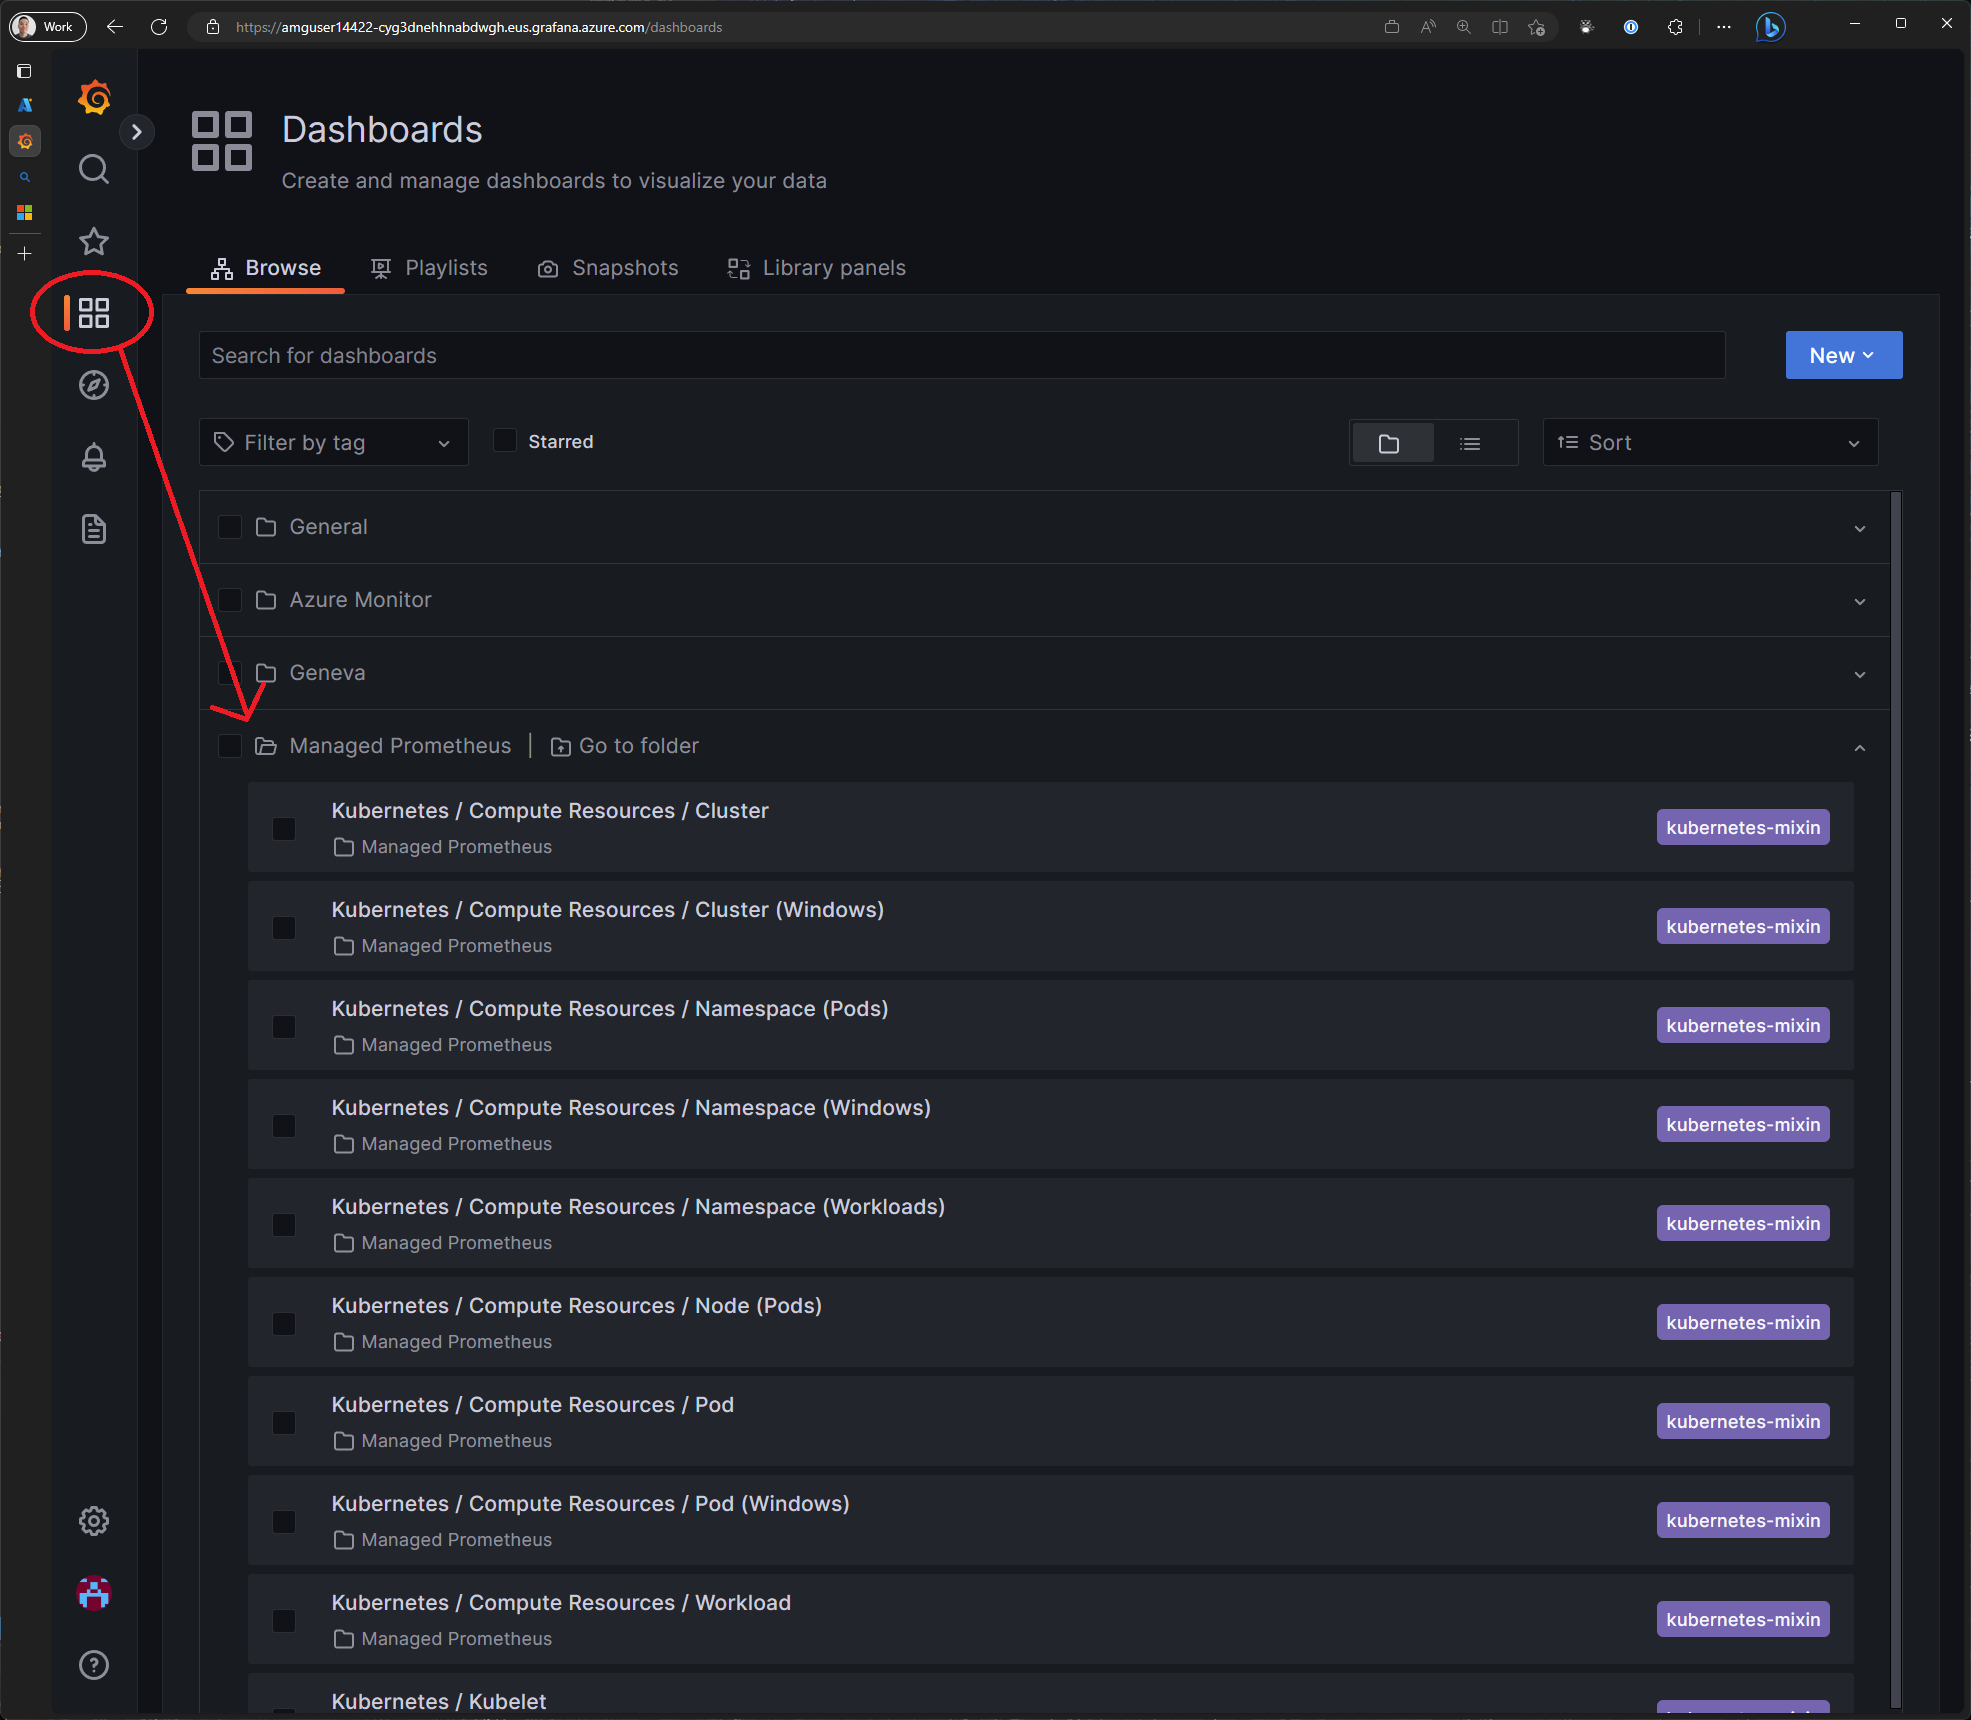
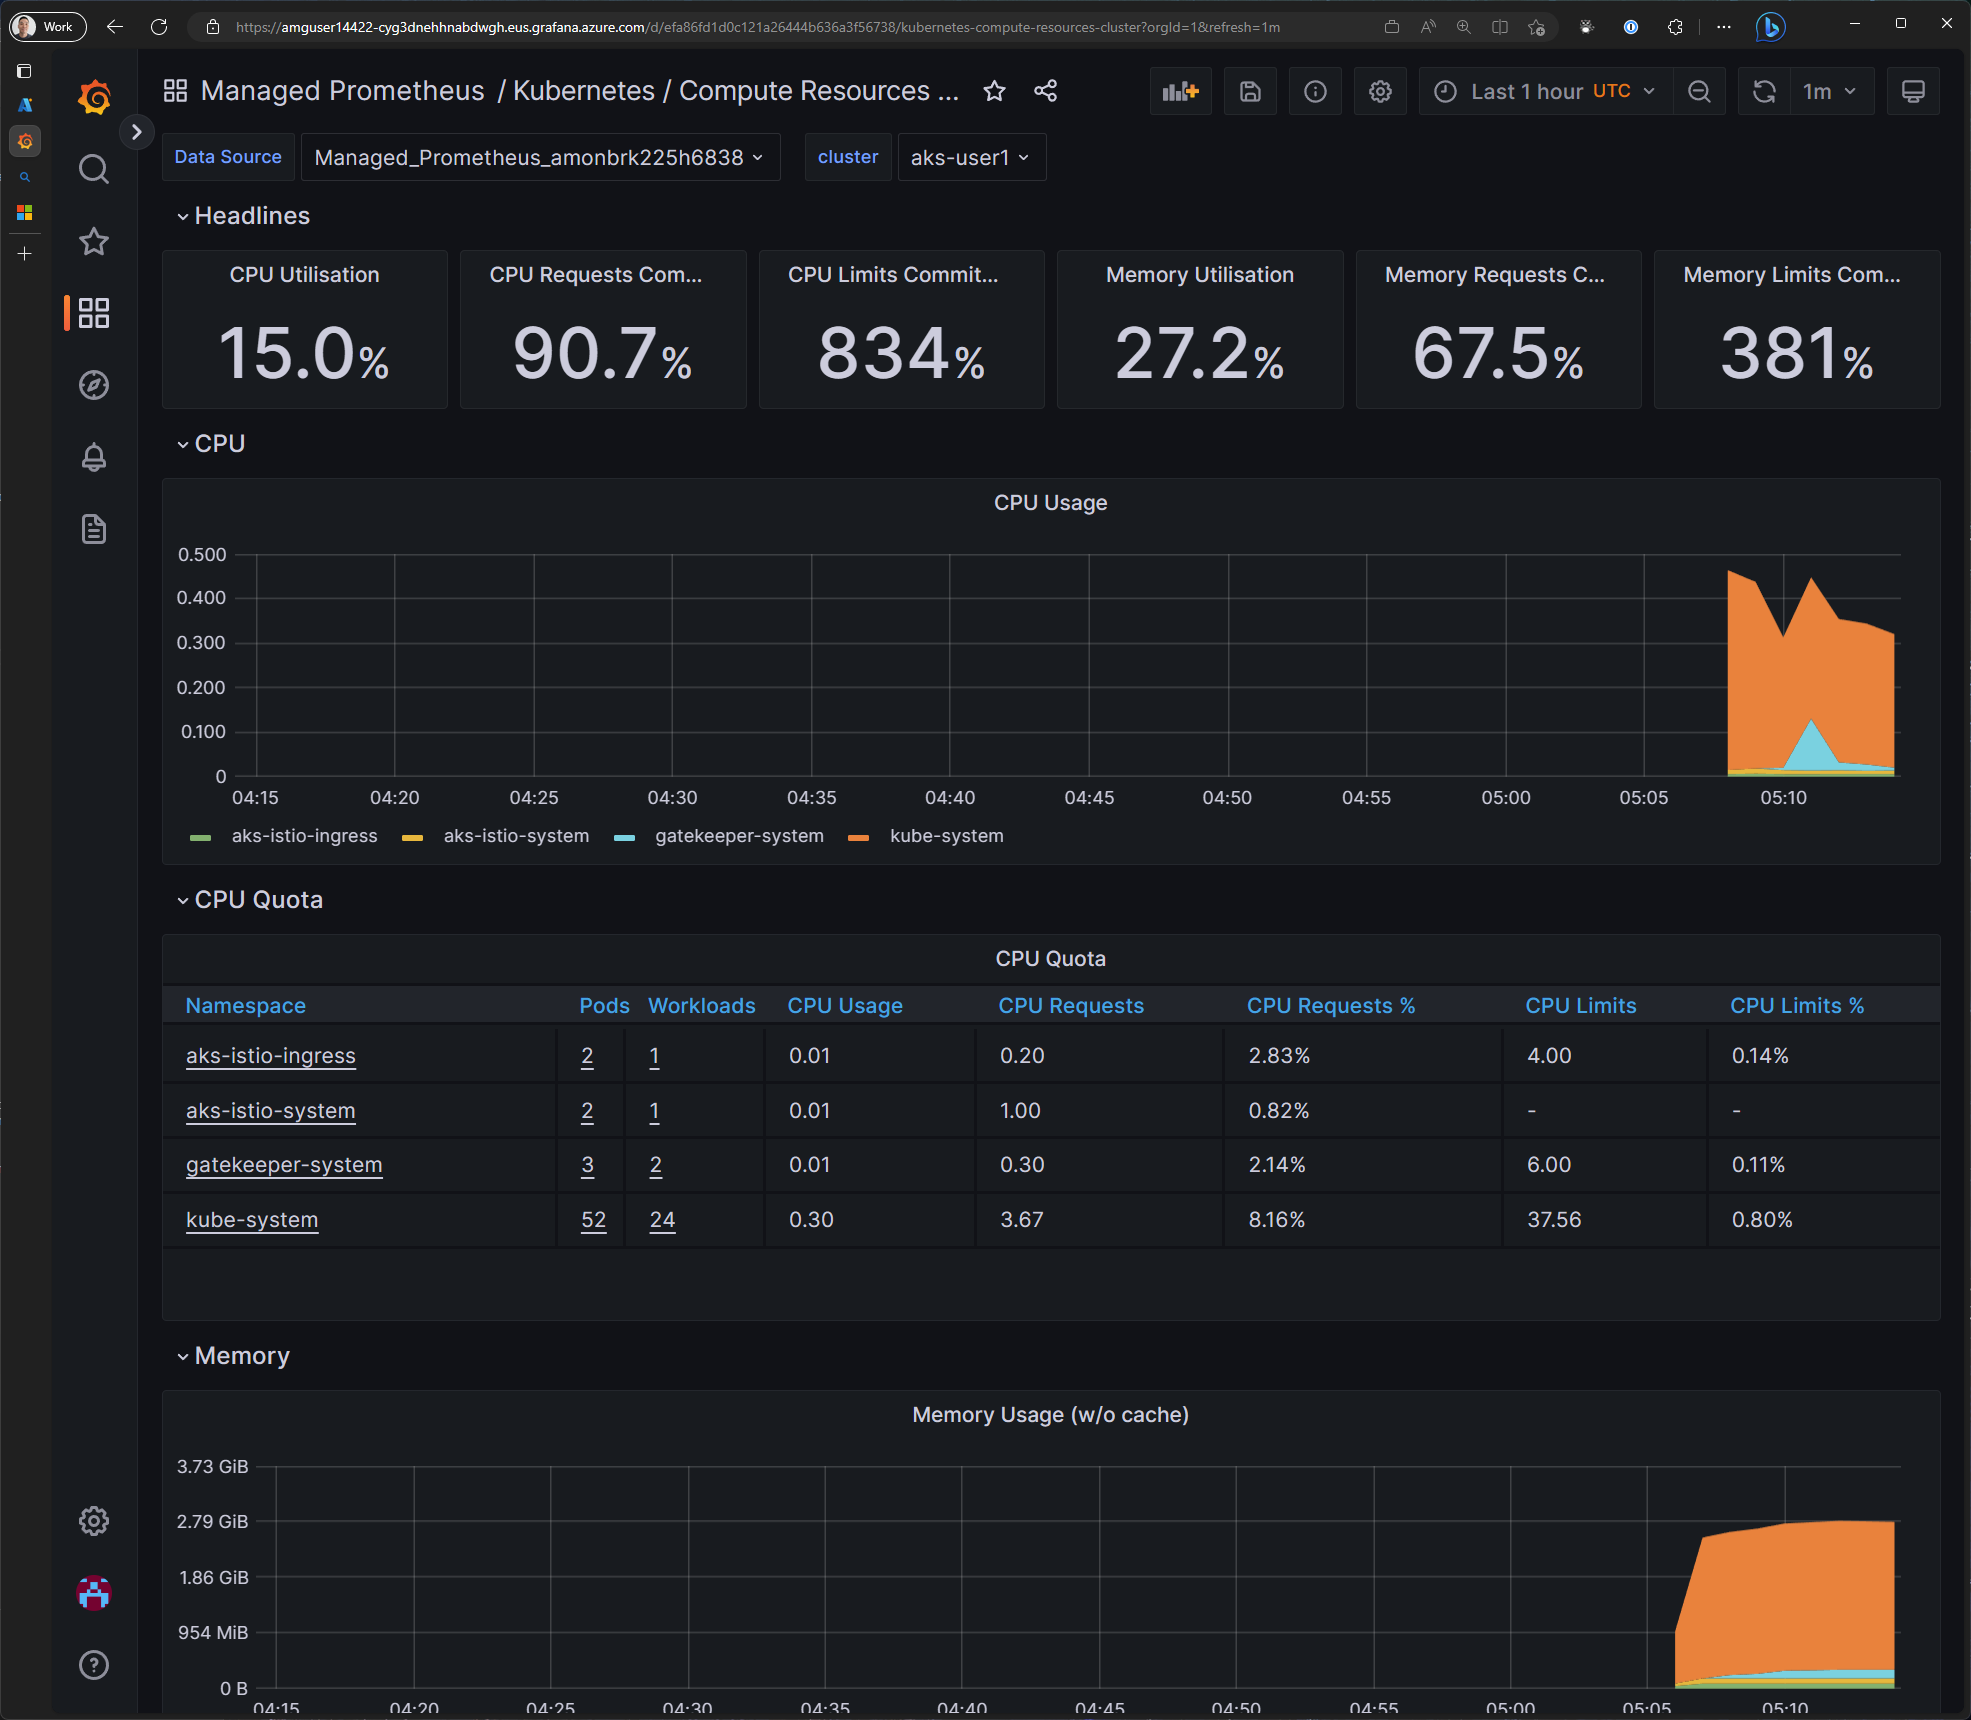
The Azure Managed Grafana instance is pre-configured with Azure Managed Prometheus as a data source and also includes a some dashboards. Let's take a look at some of the Kubernetes dashboards and import the Istio workload dashboard.
In Grafana, click on the Dashboards button, then click Browse. In the list of dashboards, click on the Managed Prometheus folder to expand a list of dashboards. Click on the Kubernetes / Compute Resources / Cluster dashboard to open it.
You can also browse other dashboards that are available in the Grafana marketplace.
Here is a list of all the Grafana dashboards that have been published by the Azure Monitor team: https://grafana.com/orgs/azuremonitorteam/dashboards
These should be enough to get you started. Feel free to explore the other dashboards and create your own.
Scaling your app
As your app becomes more popular, you'll need to scale it to handle the increased load. In AKS, you can scale your app by increasing the number of replicas in your deployment. The Kubernetes Horizontal Pod Autoscaler (HPA) will automatically scale your app based on CPU and/or memory utilization. But not all workloads rely on these metrics for scaling. If say, you need to scale your workload based on the number of items in a queue, HPA will not be sufficient.
This is where we take a different approach and deploy KEDA to scale our app. KEDA is a Kubernetes-based Event Driven Autoscaler. It allows you to scale your app on basically any metric. If there is a metric that KEDA can can access to, it can scale based on it. Under the covers KEDA, looks at the metrics and your scaling rules and eventually creates a HPA to do the actual scaling.
The AKS add-on for KEDA has already been installed in your cluster.
Setting request and limits
When scaling on a performance metric, we need to let Kubernetes know how much compute and memory resources to allocate for each pod. We do this by setting the requests and limits in our deployment. The requests are the minimum amount of resources that Kubernetes will allocate for each pod. The limits are the maximum amount of resources that Kubernetes will allocate for each pod. Kubernetes will use these values to determine how many pods to run based on the amount of resources available on the nodes in the cluster.
Open the
azure-voting-app-deployment.yamlfile, find the emptyresources: {}block and replace it with the following.
resources:
  requests:
    cpu: 4m
    memory: 55Mi
  limits:
    cpu: 6m
    memory: 75Mi
Setting resource requests and limits is a best practice and should be done for all your deployments.
Your azure-voting-app-deployment.yaml file should now look like this:
Click to expand code
apiVersion: apps/v1
kind: StatefulSet
metadata:
  creationTimestamp: null
  labels:
    app: azure-voting-db
  name: azure-voting-db
spec:
  replicas: 1
  selector:
    matchLabels:
      app: azure-voting-db
  template:
    metadata:
      creationTimestamp: null
      labels:
        app: azure-voting-db
    spec:
      containers:
        - image: postgres
          name: postgres
          resources:
            requests:
              cpu: 4m
              memory: 55Mi
            limits:
              cpu: 6m
              memory: 75Mi
          env:
            - name: POSTGRES_USER_FILE
              value: "/mnt/secrets-store/database-user"
            - name: POSTGRES_PASSWORD_FILE
              value: "/mnt/secrets-store/database-password"
          volumeMounts:
            - name: azure-voting-db-secrets
              mountPath: "/mnt/secrets-store"
              readOnly: true
            - name: azure-voting-db-data
              mountPath: "/var/lib/postgresql/data"
              subPath: "data"
      serviceAccountName: azure-voting-app-serviceaccount
      volumes:
        - name: azure-voting-db-secrets
          csi:
            driver: secrets-store.csi.k8s.io
            readOnly: true
            volumeAttributes:
              secretProviderClass: azure-keyvault-secrets
        - name: azure-voting-db-data
          persistentVolumeClaim:
            claimName: pvc-azuredisk

status: {}
Run the following command to deploy the updated manifest.
kubectl apply -f azure-voting-app-deployment.yaml
Scaling with KEDA based on CPU utilization
Create a new
azure-voting-app-scaledobject.yamlmanifest for KEDA. Here we will scale the application up when the CPU utilization is greater than 50%.
cat <<EOF > azure-voting-app-scaledobject.yaml
apiVersion: keda.sh/v1alpha1
kind: ScaledObject
metadata:
  name: azure-voting-app-scaledobject
spec:
  scaleTargetRef:
    name: azure-voting-app
  triggers:
    - type: cpu
      metricType: Utilization
      metadata:
        value: "50"
EOF
The default values for minimum and maximum replica counts weren't included in our manifest above, but it will default to 0 and 100 respectively. In some cases, the minimum defaults to 1 so consult the documentation for the specific scaler you are using.
Apply the manifest to create the ScaledObject.
kubectl apply -f azure-voting-app-scaledobject.yaml
Run the following command to ensure the ScaledObject was created.
kubectl get scaledobject
Sample output
Wait until the READY column shows True
NAME                            SCALETARGETKIND      SCALETARGETNAME    MIN   MAX   TRIGGERS   AUTHENTICATION   READY   ACTIVE   FALLBACK   AGE
azure-voting-app-scaledobject   apps/v1.Deployment   azure-voting-app               cpu                         True    True     Unknown    16s
Load testing your app
Now that our app is enabled for autoscaling, let's generate some load on our app and watch KEDA scale our app.
We'll use the Azure Load Testing service to generate load on our app and watch KEDA scale our app.
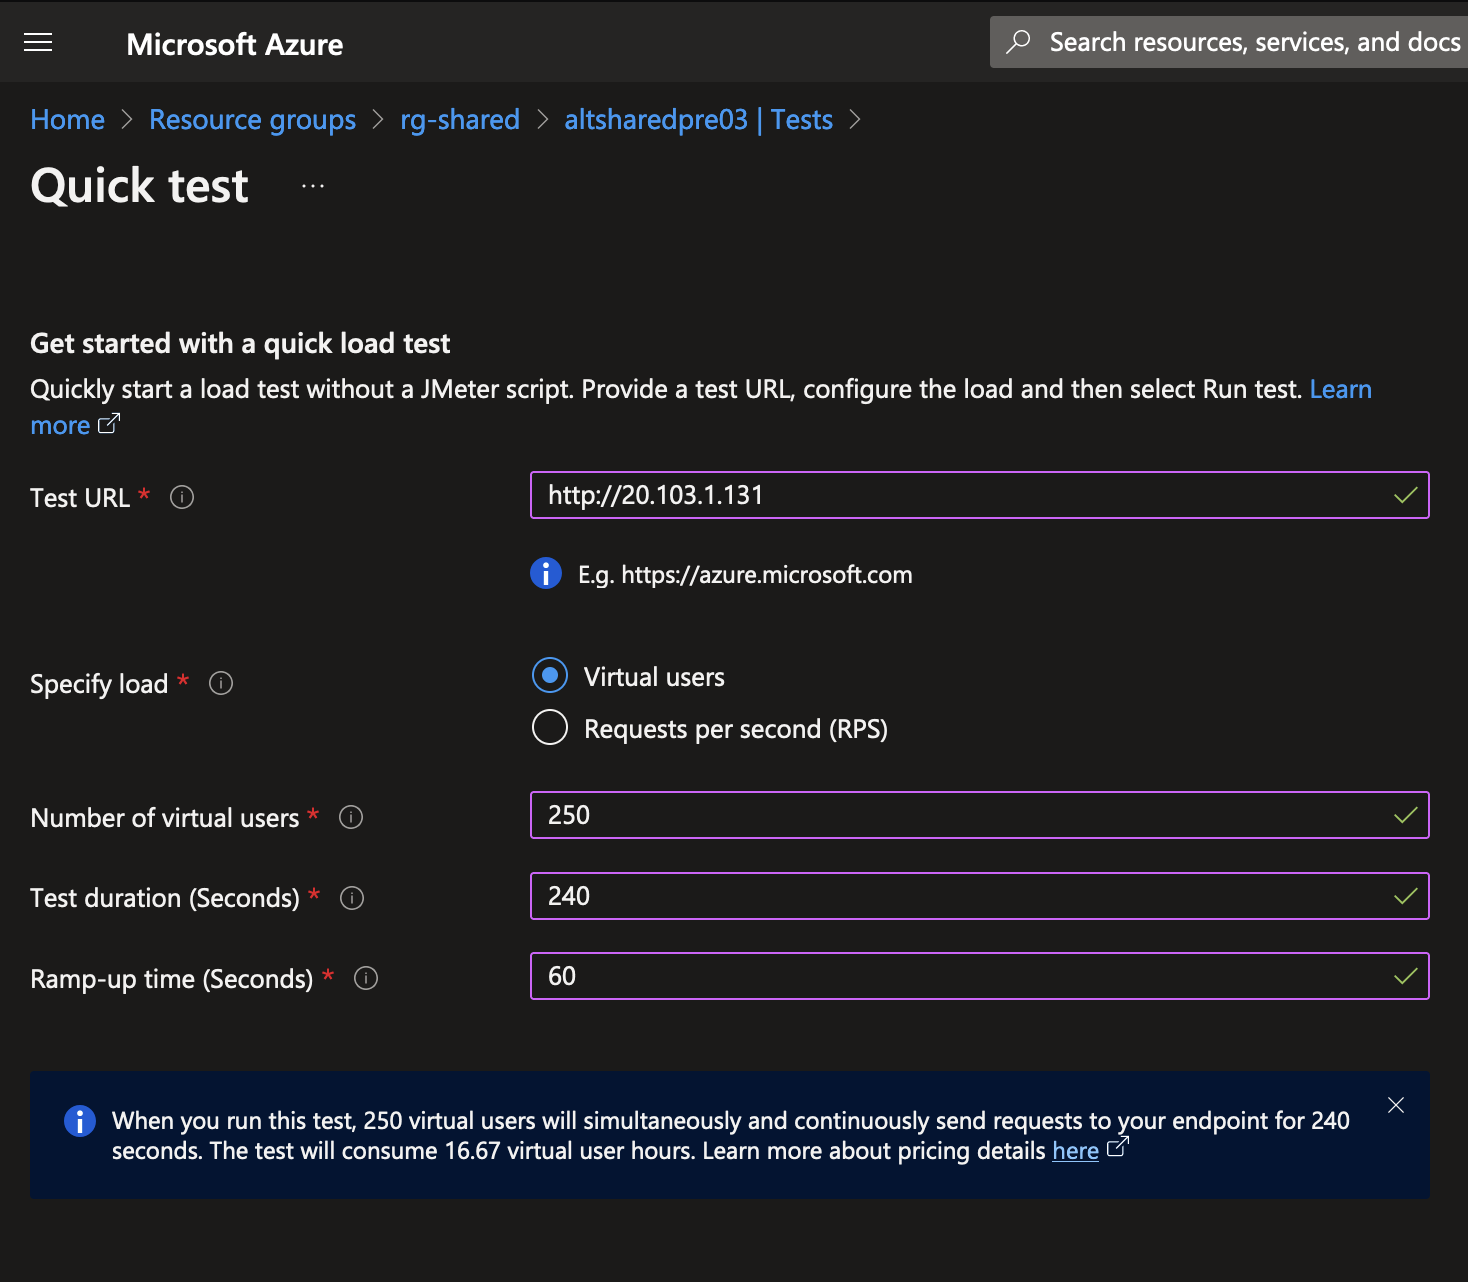
In the Azure Portal, navigate to your shared resource group and click on your Azure Load Testing resource.
Click the Quick test button to create a new test. In the Quick test blade, enter your ingress IP as the URL.
Set the number of virtual users to 250, test duration to 240 seconds, and the ramp up time of 60.
Click the Run test button to start the test.
If you are familiar with creating JMeter tests, you can also create a JMeter test file and upload it to Azure Load Testing.
As the test is running, run the following command to watch the deployment scale.
kubectl get deployment azure-voting-app -w
In a different terminal tab, you can also run the following command to watch the Horizontal Pod Autoscaler reporting metrics as well.
kubectl get hpa -w
After a few minutes, you should start to see the number of replicas increase as the load test runs.
In addition to viewing your application metrics from the Azure Load Testing service, you can also view detailed metrics from your managed Grafana instance and/or Container Insights from the Azure Portal, so be sure to check that out as well.
Summary
Congratulations, on making it this far 🎉
Hope you had a lot of fun but unfortunately, all good things must come to an end 🥲
Before you go, let's do a quick recap.
In this workshop, you learned how to:
- Deploy an application to Kubernetes using imperative and declarative methods
- Leverage the power of
kubectlto generate YAML manifests for our app and deployed them to our AKS cluster - Add an additional layer of security for our application secrets by storing them in Azure Key Vault and using the Secrets Store CSI driver to mount them into our pods
- Effectively run stateful workloads on AKS using StorageClasses to create persistent storage for the database
- Expose the frontend application to the internet using Istio's Ingress gateway
- Scale the app using KEDA and load test the application to ensure it scales as expected
To learn more about Kubernetes, check out the Kubernetes Learning Path and be sure to check out the AKS docs. For additional workshop content, be sure to check out https://azure-samples.github.io/aks-labs/catalog/ and https://aka.ms/oss-labs/
If you have any questions or feedback, please let me know in the comments below or reach out to me on Twitter @pauldotyu or LinkedIn /in/yupaul