Signing a Container Image with Notation and Azure Key Vault
Container Secure Supply Chain
Containers Secure Supply Chain (CSSC) framework is a seamless, agile ecosystem of tools and processes built to integrate and execute security controls throughout the lifecycle of containers. The container secure supply chain strategy is built considering all the security needs of the container applications. To find out more about the CSSC framework, visit the Azure Container Secure Supply Chain page.
As a quick overview, a container supply chain is built in stages to ensure that the container is secure at every stage of the lifecycle. Microsoft identifies these stages in the container supply chain:
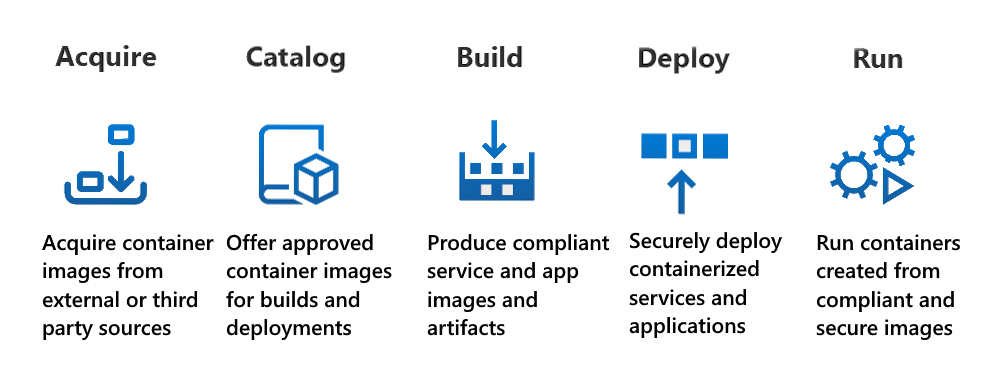
Container images are signed as part of the Acquire stage of the platform. Once a container image acquired from an external source or third-party vendor is verified for functionality and security, it is signed before being added to a catalog of approved container images. In this exercise, we will sign a container image using Notation, an open source supply chain security tool developed by the Notary Project community.
Prerequisites
For this workshop, you will also need to install the following tools:
Install Notation
First, set a local variable for the version of Notation you want to install (in this lab we will use version 1.2.0). Also set environment variables for the operating system and architecture you are using.
export NOTATION_VERSION=1.2.0
export OS=$(uname | tr '[:upper:]' '[:lower:]')
export ARCH=$(uname -m)
Use the following commands to download and install Notation.
curl -LO https://github.com/notaryproject/notation/releases/download/v$NOTATION_VERSION/notation_$NOTATION_VERSION\_${OS}_${ARCH}.tar.gz
curl -LO https://github.com/notaryproject/notation/releases/download/v$NOTATION_VERSION/notation_$NOTATION_VERSION\_checksums.txt
shasum --check notation_$NOTATION_VERSION\_checksums.txt
If the checksum verification is successful, you should see something like this (the result shown here is for Linux AMD64):
shasum: notation_1.2.0_darwin_amd64.tar.gz: No such file or directory
notation_1.2.0_darwin_amd64.tar.gz: FAILED open or read
shasum: notation_1.2.0_darwin_arm64.tar.gz: No such file or directory
notation_1.2.0_darwin_arm64.tar.gz: FAILED open or read
notation_1.2.0_linux_amd64.tar.gz: OK
shasum: notation_1.2.0_linux_arm64.tar.gz: No such file or directory
notation_1.2.0_linux_arm64.tar.gz: FAILED open or read
shasum: notation_1.2.0_linux_armv7.tar.gz: No such file or directory
notation_1.2.0_linux_armv7.tar.gz: FAILED open or read
shasum: notation_1.2.0_windows_amd64.zip: No such file or directory
notation_1.2.0_windows_amd64.zip: FAILED open or read
shasum: WARNING: 5 listed files could not be read
If the checksum verification is successful, extract the binary and move it to the desired bin directory in your $PATH.
tar xvf notation_$NOTATION_VERSION\_${OS}_${ARCH}.tar.gz
mv ./notation /usr/local
ln -s /usr/local/notation /usr/local/bin/notation
Verify the installation by running the following command:
notation version
You should see the version of Notation installed.
Notation - a tool to sign and verify artifacts.

Version:     1.2.0
Go version:  go1.23.0
Git commit:  4700ad6f1bef13e411772d7ae4399f891fc3a6ae
Install the Notation Azure Key Vault Plugin
After installing Notation, install the Notation Azure Key Vault plugin. You can find the URL and the SHA256 checksum for the Notation Azure Key Vault plugin on the release page.
notation plugin install --url https://github.com/Azure/notation-azure-kv/releases/download/v${NOTATION_VERSION}/notation-azure-kv_${NOTATION_VERSION}_${OS}_${ARCH}.tar.gz --sha256sum <checksum_from_the_release_page>
Once the plugin is installed, confirm the azure-kv plugin is installed by running the following command:
notation plugin ls
Create Azure Container Registry and Azure Key Vault
If you have already created an Azure Container Registry and Azure Key Vault, you can skip this section. Make sure the environment variables AKV_NAME and ACR_NAME are set correctly.
Before beginning this exercise, let's set the environment variables for the Azure Container Registry and Azure Key Vault which was created at the beginning of the lab with the Bicep template.
Set the local variables containing information about the certificate to be used for signing the container image.
CERT_NAME="wabbit-networks-io"
CERT_SUBJECT="CN=wabbit-networks.io,O=Notation,L=Seattle,ST=WA,C=US"
CERT_PATH="./${CERT_NAME}.pem"
Now set the local variables containing information about the container registry and the image source code directory containing the Dockerfile to build.
REPO="net-monitor"
TAG="v1"
IMAGE="${ACR_SERVER}/${REPO}:${TAG}"
IMAGE_SOURCE="https://github.com/wabbit-networks/net-monitor.git#main"
Create a self-signed certificate in Azure Key Vault
Use the following command to create a certificate policy file named my_policy.json which will be used the create the self-signed certificate in Azure Key Vault. The subject value will be used as the trust identity during verification.
cat <<EOF > ./my_policy.json
{
    "issuerParameters": {
    "certificateTransparency": null,
    "name": "Self"
    },
    "keyProperties": {
      "exportable": false,
      "keySize": 2048,
      "keyType": "RSA",
      "reuseKey": true
    },
    "secretProperties": {
      "contentType": "application/x-pem-file"
    },
    "x509CertificateProperties": {
    "ekus": [
        "1.3.6.1.5.5.7.3.3"
    ],
    "keyUsage": [
        "digitalSignature"
    ],
    "subject": "${CERT_SUBJECT}",
    "validityInMonths": 12
    }
}
EOF
Use the following command to create a certificate compatible with Notary Project certificate requirement in the Azure Key Vault instance.
az keyvault certificate create \
--vault-name ${AKV_NAME} \
--name ${CERT_NAME} \
--policy @my_policy.json
Signing a Container Image using Notation and Azure Key Vault Plugin
To sign a container image using Notation and Azure Key Vault, you first need to authenticate to your Azure Container Registry using the following command.
az acr login --name ${ACR_NAME}
Build and push a new image with ACR Tasks. Use the digest value to identify the image to sign.
DIGEST="$(az acr build -r ${ACR_NAME} -t ${ACR_SERVER}/${REPO}:${TAG} ${IMAGE_SOURCE} --no-logs --query "outputImages[0].digest" -o tsv)"
IMAGE="${ACR_SERVER}/${REPO}@${DIGEST}"
Get the ID of the signing key. The following command will get the Key ID of the latest version of the certificate.
KEY_ID="$(az keyvault certificate show -n $CERT_NAME --vault-name $AKV_NAME --query 'kid' -o tsv)"
Sign the image with the CBOR Object Signing and Encryption (COSE): Structures and Process format using the Notation Azure Key Vault plugin and the key retrieved in the previous step with the following command.
notation sign \
--signature-format cose \
--id ${KEY_ID} \
--plugin azure-kv \
--plugin-config self_signed=true ${IMAGE}
Verify the image using Notation
To verify the signed container image, add the root certificate that signs the leaf certificate to the trust store. The following command will download the root certificate and add it to the trust store. In the case of a self-signed certificate, the root certificate is the self-signed certificate
Run the following command to download the root certificate.
az keyvault certificate download \
--name ${CERT_NAME} \
--vault-name ${AKV_NAME} \
--file ${CERT_PATH}
Add the root certificate to the trust store using the following command.
STORE_TYPE="ca"
STORE_NAME="wabbit-networks.io"
notation cert add --type ${STORE_TYPE} --store ${STORE_NAME} ${CERT_PATH}
Verify the image using the following command.
notation cert ls
Configure the trust policy before verification. The trust policy is a JSON file that specifies the trust policy for the image. The trust policy is used to verify the signature of the image. For more information on trust policies and trust stores, see Trust store and trust policy specification
Run the following command to create a trust policy file named trust_policy.json.
cat <<EOF > ./trust_policy.json
{
    "version": "1.0",
    "trustPolicies": [
        {
            "name": "wabbit-networks-images",
            "registryScopes": [ "${ACR_SERVER}/${REPO}" ],
            "signatureVerification": {
                "level" : "strict"
            },
            "trustStores": [ "${STORE_TYPE}:${STORE_NAME}" ],
            "trustedIdentities": [
                "x509.subject: ${CERT_SUBJECT}"
            ]
        }
    ]
}
EOF
Import and verify the trust policy from the trust_policy.json file using the following Notation CLI commands.
notation policy import ./trust_policy.json
notation policy show
Verify the image using the following command:
notation verify $IMAGE
Upon successful verification of the image using the trust policy, the sha256 digest of the verified image is returned in a successful output message.