Managing AKS with AI Agents and MCP
In this lab, you'll manage Azure Kubernetes Service (AKS) clusters using natural language through AI agents - diagnosing issues, optimizing configurations, and executing operations without memorizing complex CLI syntax.
You'll explore various approaches to AI-assisted cluster management, including:
- GitHub Copilot Agent: Use GitHub Copilot's coding agent in VS Code to perform cluster operations through natural language prompts
- Agentic CLI for AKS: Terminal-based AI assistant for interactive cluster management
- kagent: A CNCF Sandbox project that brings AI agents directly into your Kubernetes cluster as native resources
The common thread between all these approaches is the AKS MCP Server, a standardized interface that exposes Azure, AKS, and Kubernetes capabilities to AI agents.
Together, these tools demonstrate how AI can transform cluster operations - from troubleshooting network connectivity to managing multi-cluster deployments - all through intelligent, context-aware automation.
Objectives
By the end of this lab, you will be able to:
- Use the AKS MCP Server locally with GitHub Copilot to explore available tools.
- Diagnose cluster issues with the Agentic CLI for AKS.
- Deploy kagent and connect in-cluster agents to the AKS MCP Server.
- Create a multi-agent system and delegate specialized tasks.
Prerequisites
Before you begin, you will need an Azure subscription with Owner permissions and a GitHub account.
In addition, you will need the following tools installed on your local machine:
- Visual Studio Code with the following extensions:
- Azure CLI
- GitHub CLI
- Git
- kubectl
- Docker (required for running the Agentic CLI for AKS locally in a Docker container)
- Helm
- GitHub Copilot
- POSIX-compliant shell (bash, zsh, Azure Cloud Shell)
Setup Azure CLI
Start by logging into Azure by run the following command and follow the prompts:
az login --use-device-code
You can log into a different tenant by passing in the --tenant flag to specify your tenant domain or tenant ID.
Run the following command to register preview features.
az extension add --name aks-preview
Setup Resource Group
In this workshop, we will set environment variables for the resource group name and location.
The following commands will set the environment variables for your current terminal session. If you close the current terminal session, you will need to set the environment variables again.
To keep the resource names unique, we will use a random number as a suffix for the resource names. This will also help you to avoid naming conflicts with other resources in your Azure subscription.
Run the following command to generate a random number.
RAND=$RANDOM
export RAND
echo "Random resource identifier will be: ${RAND}"
Set the location to a region of your choice. For example, eastus or westeurope but you should make sure this region supports availability zones.
export LOCATION=eastus
Create a resource group name using the random number.
export RG_NAME=myresourcegroup$RAND
You can list the regions that support availability zones with the following command:
az account list-locations \
--query "[?metadata.regionType=='Physical' && metadata.supportsAvailabilityZones==true].{Region:name}" \
--output table
Run the following command to create a resource group using the environment variables you just created.
az group create \
--name ${RG_NAME} \
--location ${LOCATION}
Setup AKS Cluster
Set the AKS cluster name.
export AKS_NAME=myakscluster$RAND
Run the following command to create an AKS cluster with some best practices in place.
az aks create \
--resource-group ${RG_NAME} \
--name ${AKS_NAME} \
--location ${LOCATION} \
--network-plugin azure \
--network-plugin-mode overlay \
--network-dataplane cilium \
--network-policy cilium \
--enable-managed-identity \
--enable-workload-identity \
--enable-oidc-issuer \
--ssh-access disabled
The AKS cluster created for this lab only includes a few best practices such as enabling Workload Identity and setting the cluster networking to Azure CNI powered by Cilium. For complete guidance on implementing AKS best practices be sure to check out the best practices and baseline architecture for an AKS cluster guides on Microsoft Learn.
Once the AKS cluster has been created, run the following command to connect to it.
az aks get-credentials \
--resource-group ${RG_NAME} \
--name ${AKS_NAME}
Deploy a sample application to the cluster. This gives agents some workloads and telemetry to work with later.
kubectl create namespace pets
kubectl apply -n pets -k "https://github.com/Azure-Samples/aks-store-demo/kustomize/overlays/dev?ref=main"
Verify the sample application deployed successfully by checking the pods and services in the pets namespace.
kubectl get pods -n pets
kubectl get svc -n pets
You should see multiple pods in the Running state and services for store-admin, store-front, and product-service, among others. You don't need to wait for all pods to be ready, just ensure the deployment was successful and there are some workloads running for the agents to interact with.
Set up Azure OpenAI
The AI agents in this lab need a language model to power their natural language understanding. Create an Azure AI Foundry resource and deploy the gpt-5-mini model.
Run the following commands.
export AI_NAME=myaifoundry$RAND

# Create the Azure AI Foundry account
export AI_ID=$(az cognitiveservices account create \
--resource-group $RG_NAME \
--location $LOCATION \
--name $AI_NAME \
--custom-domain $AI_NAME \
--kind AIServices \
--sku S0 \
--assign-identity \
--query id -o tsv)

# Create a deployment for the gpt-5-mini model
az cognitiveservices account deployment create \
--name $AI_NAME \
--resource-group $RG_NAME \
--deployment-name gpt-5-mini \
--model-name gpt-5-mini \
--model-version 2025-08-07 \
--model-format OpenAI \
--sku-capacity 500 \
--sku-name GlobalStandard

# Export the API key and endpoint as environment variables for later use
export AI_API_KEY=$(az cognitiveservices account keys list --name $AI_NAME --resource-group $RG_NAME --query key1 -o tsv)
export AI_API_BASE=$(az cognitiveservices account show --name $AI_NAME --resource-group $RG_NAME --query 'properties.endpoints."OpenAI Language Model Instance API"' -o tsv)
If you need additional SKU capacity quota for the model deployment, follow the instructions in the Azure documentation.
Once the initial resources are deployed, you can proceed with the workshop.
Keep your terminal open as you will need it to run commands using the environment variables you exported throughout the workshop. If you accidentally close it, you'll need to re-export RG_NAME, LOCATION, AKS_NAME, AI_NAME, MI_NAME, and AKS_OIDC_ISSUER_URL before continuing.
To verify your environment variables are still exported, run:
echo "RG_NAME=$RG_NAME"
echo "AKS_NAME=$AKS_NAME"
echo "LOCATION=$LOCATION"
echo "AI_NAME=$AI_NAME"
If any variable is empty, re-export it before proceeding. For the API endpoint and key, refer back to the Set up Azure OpenAI section to retrieve them.
AKS MCP Server
The Model Context Protocol (MCP) is an open standard that enables AI agents to access external tools and data sources in a consistent way. Developed by Anthropic and donated to the Agentic AI Foundation (AAIF), MCP acts as a universal adapter between AI models and systems like databases, APIs, and cloud services.
Key concepts
At a high level, here is what you need to know about MCP architecture:
- MCP Servers - Expose capabilities (tools, prompts, resources) through the protocol (for example, the AKS MCP server)
- MCP Clients - Applications like AI agents that connect to MCP servers (for example, GitHub Copilot Chat)
- Tools - Functions the AI calls to perform actions (kubectl commands, Azure APIs)
- Resources - Data sources providing context (cluster configs, logs)
If you are getting started with MCP, be sure to check out the MCP for Beginners repo for an in-depth and step-by-step introduction.
The AKS MCP Server gives AI agents deep integration with Azure and Kubernetes, exposing tools for cluster management, diagnostics, and troubleshooting. Any MCP-compatible agent can use this server to perform AKS operations.
You will use the AKS MCP Server three ways:
- Locally with VS Code and GitHub Copilot Agent - Test capabilities directly in VS Code
- Locally with Agentic CLI for AKS - Terminal-based operations
- In-cluster with kagent - Multi-agent collaboration
Before diving into specialized agents, let's explore the AKS MCP server's capabilities using GitHub Copilot in VS Code. This will give you hands-on experience with the MCP tools and help you understand what operations are available.
The AKS MCP server is installed and managed via the AKS extension for VS Code. This section requires VS Code to be installed on your machine. If you do not have VS Code, you can skip directly to the Agentic CLI for AKS section, which provides terminal-based AI agent access to the same MCP tools.
Install the MCP server
The simplest way to install the AKS MCP server is using the AKS extension for VS Code.
In VS Code, open the command palette (Ctrl+Shift+P), then type and select AKS: Setup AKS MCP Server.
This downloads and installs the AKS MCP Server binary to your local machine and configures it as an MCP server in VS Code.
In the VS Code sidebar (left), click the extensions button, then expand the MCP SERVERS - INSTALLED section.
You should see the AKS MCP server listed.
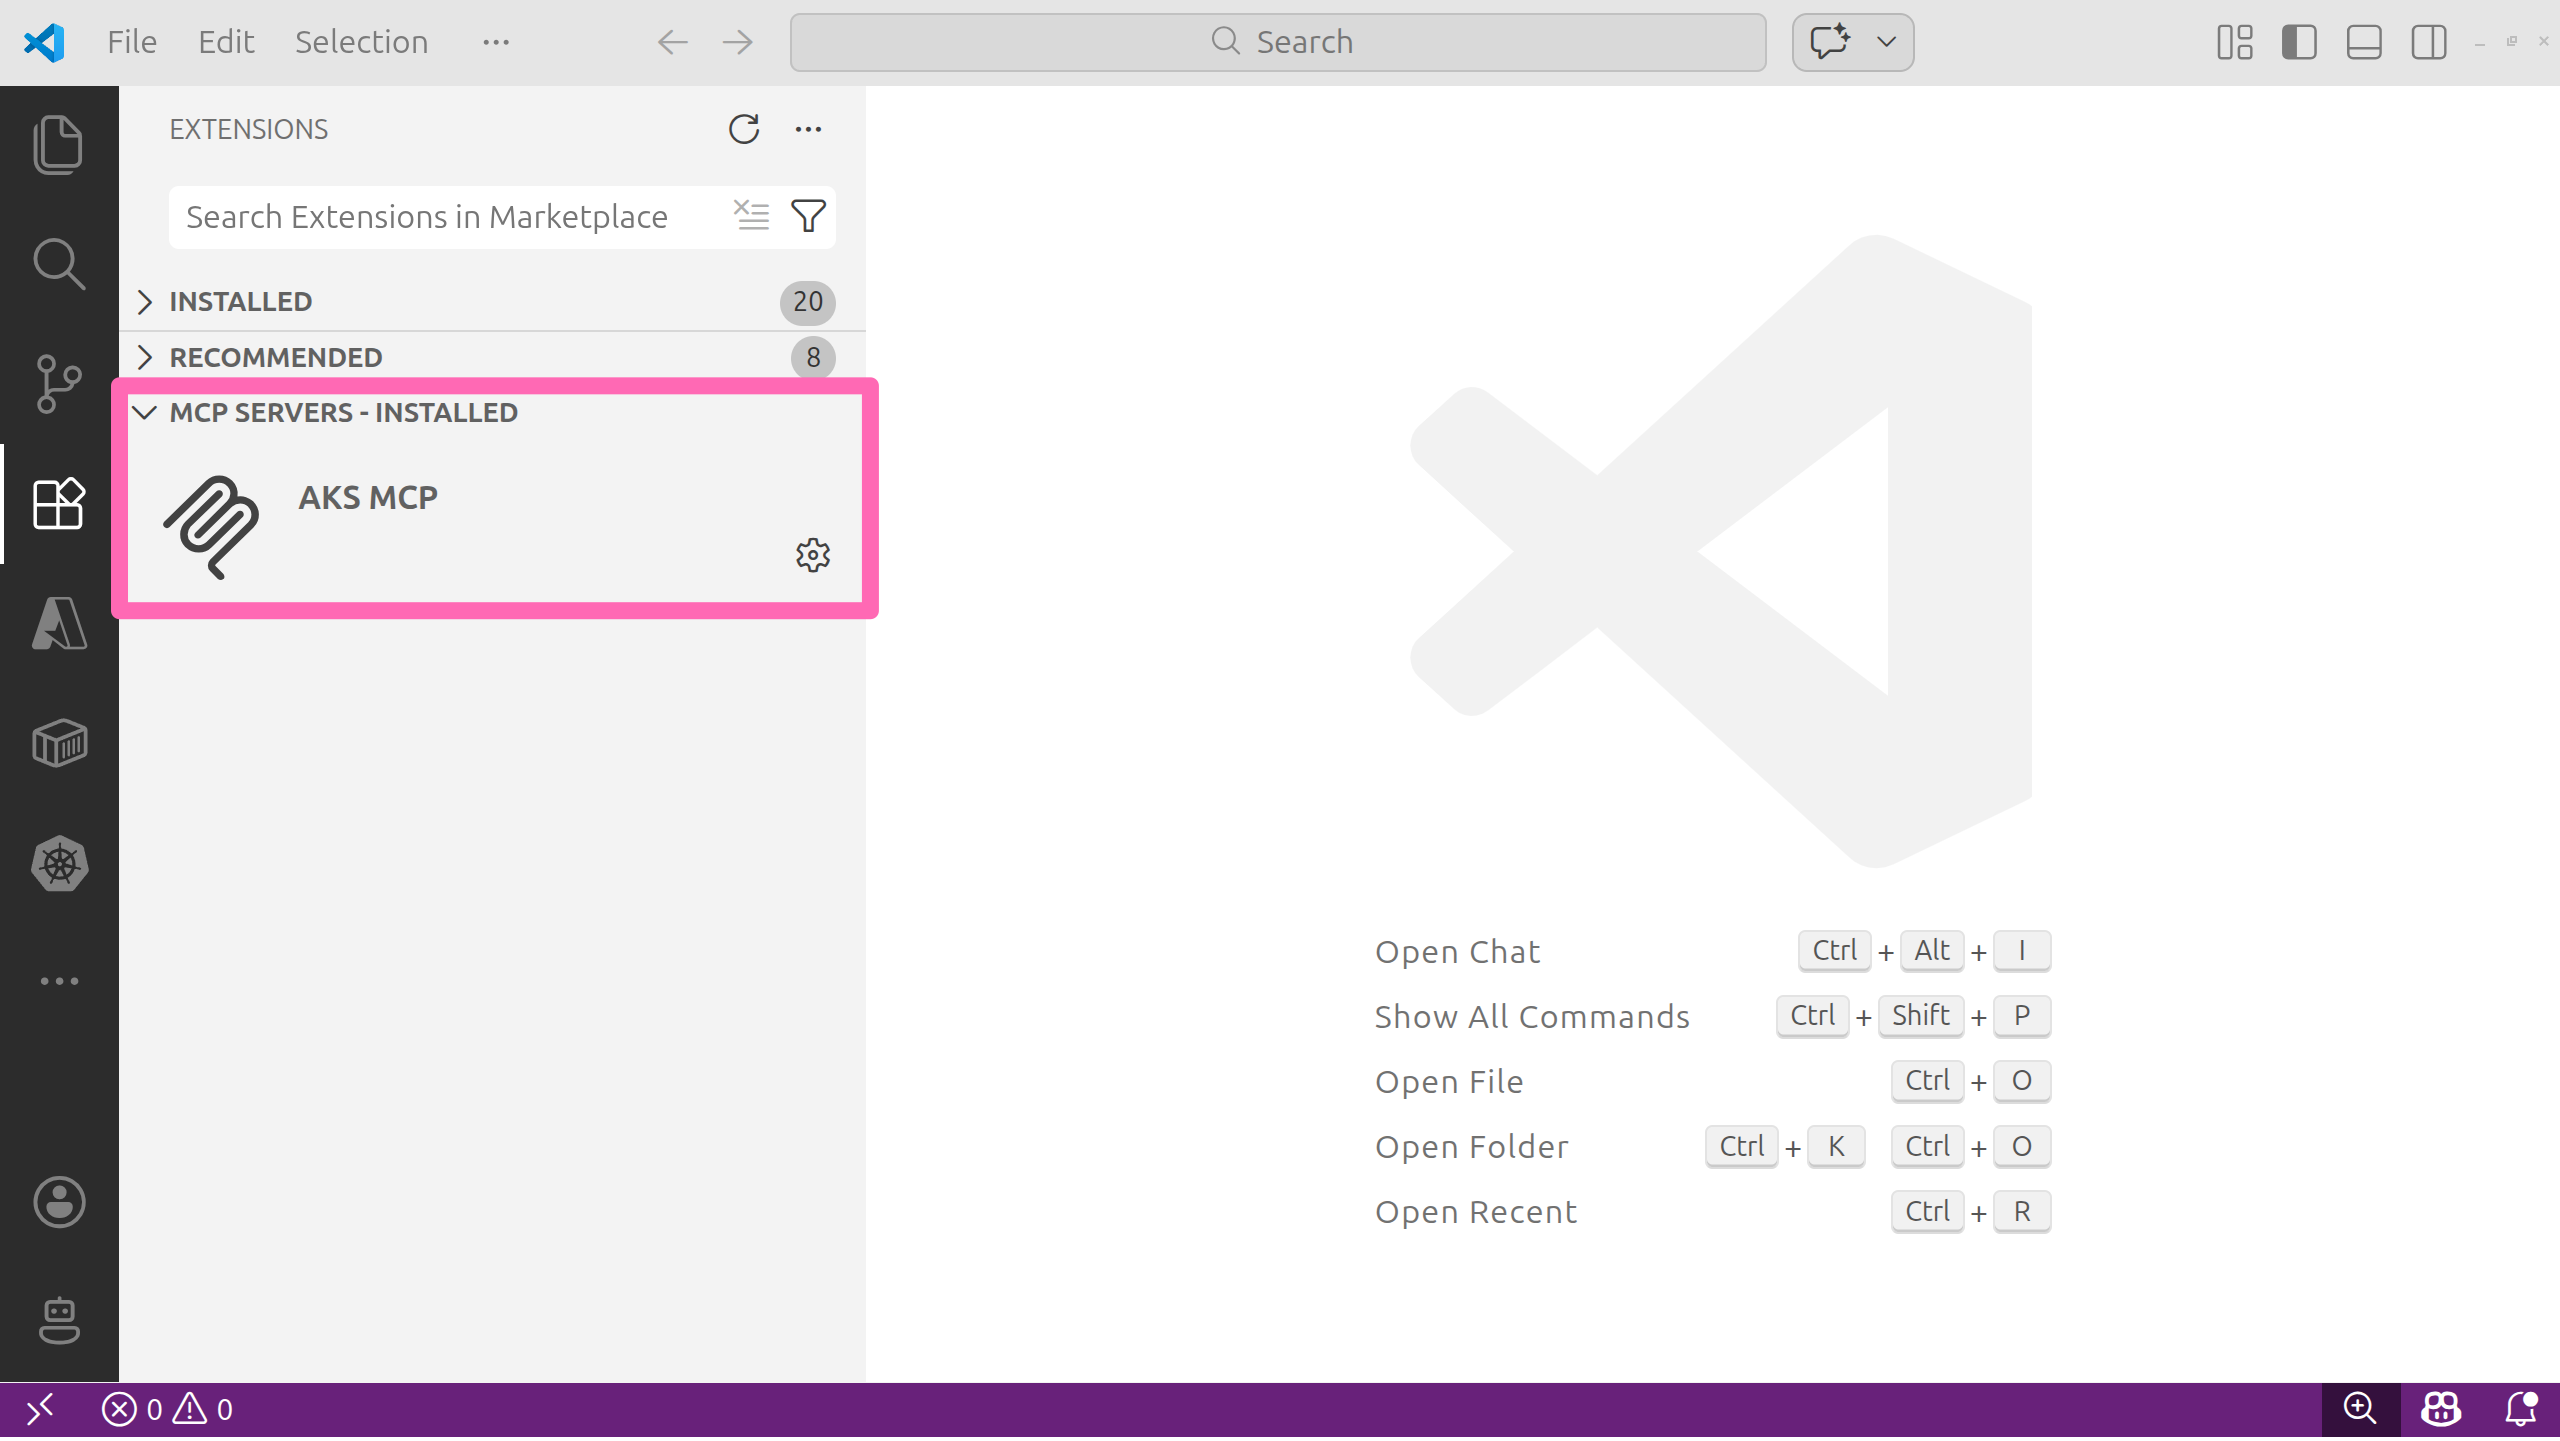
Select the settings icon, then select Start Server to ensure it is running. In the OUTPUT window, confirm the server is listening on STDIO and has discovered tools.
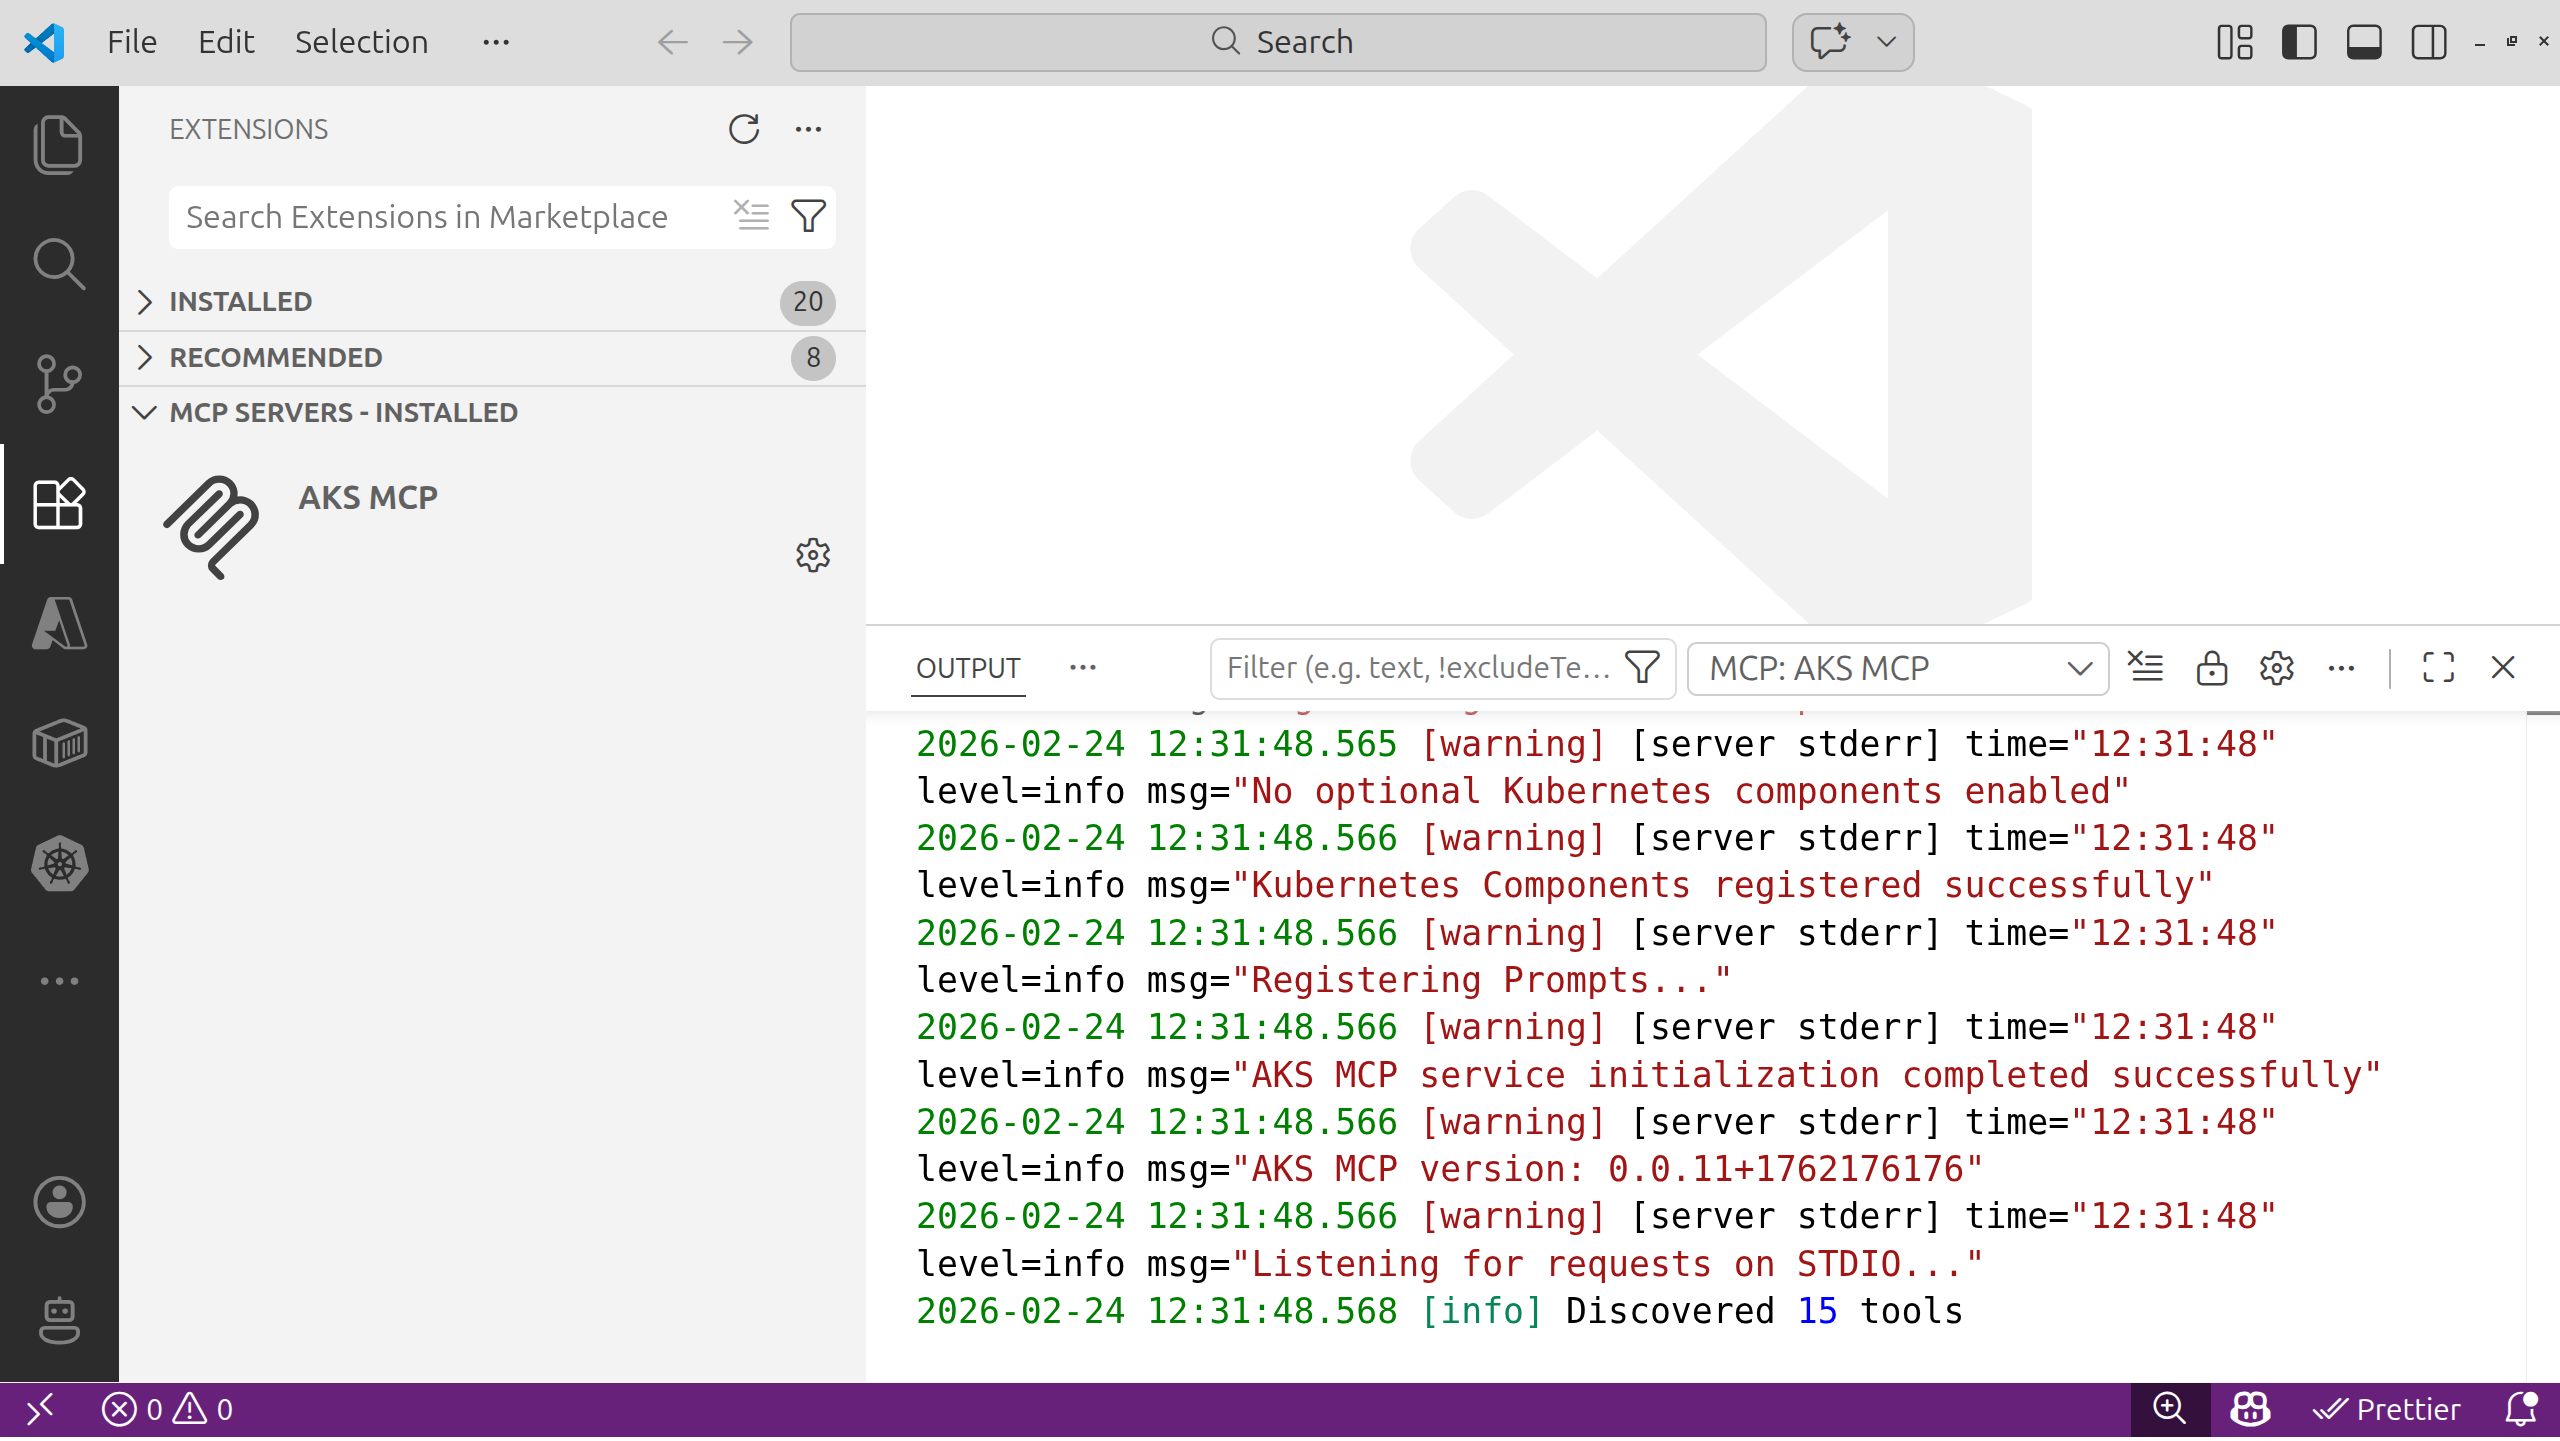
We'll explore these tools throughout the lab.
When running the AKS MCP server in VS Code with a remote connection to WSL, you must ensure the MCP server configuration is updated to invoke the binary appropriately.
To view the configuration in VS Code, you can select the settings icon and select Show Configuration (JSON).
You should see JSON that looks like the following:
"servers": {
  "AKS MCP": {
    "command": "wsl",
    "args": [
      "--",
      "/home/<YOUR_USER_ACCOUNT_NAME>/.vs-kubernetes/tools/aks-mcp/v0.0.16/aks-mcp",
      "--transport",
      "stdio",
      "--enabled-components",
      "az_cli,monitor,fleet,network,compute,detectors,advisor,inspektorgadget,kubectl"
    ]
  }
}
Note the command to run is wsl with the path to the MCP server passed in as an argument along with --transport stdio.
Try the MCP tools with GitHub Copilot Agent
Now use GitHub Copilot Agent to discover and invoke tools exposed by the AKS MCP Server.
- Open the GitHub Copilot Chat panel and start an Agent session.
- Ask the agent to enumerate available MCP tools.
- Run a safe, read-only diagnostic against your cluster.
Use the model selector in the GitHub Copilot Chat panel to choose a recent model for best results and tool calling capabilities.
Use this prompt:
@aks-mcp List the AKS MCP tools you can access. Then check the AKS cluster version and show the node pool names.
The @aks-mcp in the prompt forces the agent to use the AKS MCP server. You may also be presented with a button to allow tool use. To avoid being prompted for every tool call, you can click the arrow on the button to open the options, then select Allow Tools from AKS-MCP in this Session or Allow Tools from AKS-MCP without Review in this Session. This will allow the agent to call any tool from the AKS MCP server without prompting you each time for the duration of the session.
Expected results
- The agent lists MCP tools (AKS cluster and node pool management, Azure Advisor, real-time observability, and kubectl just to name a few).
- The response includes the cluster version and node pool names.
This is the quickest and easiest way to use the AKS MCP server. It will use your existing kubectl context to connect to the cluster.
You've seen how the AKS MCP Server works through GitHub Copilot in VS Code. Now you'll use the same MCP tools from a dedicated terminal agent designed specifically for AKS troubleshooting.
Agentic CLI for AKS
If you are comfortable working in a terminal, the Agentic CLI for AKS is a great way to interact with your cluster using natural language. It analyzes telemetry signals (logs, metrics, events), correlates them across infrastructure and workloads, and provides actionable insights through natural language queries.
The agent integrates with tools like kubectl, Azure CLI, Inspektor Gadget, and Azure Monitor, operating in read-only mode by default to ensure safe diagnostics. While the agent excels at surfacing likely causes and guiding investigation, human oversight is essential, particularly in complex or high-stakes environments.
The Agentic CLI for AKS is currently in public preview and is still undergoing active development. Some features may change in future releases and your feedback is valuable to help improve the experience. Be sure to visit the AKS docs for the latest updates.
How it works
The agent is built on top of the open-source project HolmesGPT, a CNCF sandbox project, and is packaged as an Azure CLI extension (aks-agent). It connects to Azure AI Foundry models to power its natural language understanding and uses the AKS MCP tools to interact with your AKS cluster.
Install the Agentic CLI
The Agentic CLI for AKS is available as an Azure CLI extension named aks-agent.
In your terminal, run the following command to install the extension.
az extension add --name aks-agent
The Agentic CLI for AKS takes a bring your own model (BYOM) approach, so in order to use it you'll need to have access to an OpenAI API compatible LLM endpoint to configure the agent. For this lab, you'll use the Azure AI Foundry service and model you provisioned earlier.
Run the following commands to get the API key and endpoint.
export AI_API_KEY=$(az cognitiveservices account keys list --name $AI_NAME --resource-group $RG_NAME --query key1 -o tsv)
export AI_API_BASE=$(az cognitiveservices account show --name $AI_NAME --resource-group $RG_NAME --query 'properties.endpoints."OpenAI Language Model Instance API"' -o tsv)
Run the following command to print the variable values which you will need to input in the next step.
# clear the screen
clear

# print the AI-related environment variables for easy reference
printenv | grep AI_API_
Now start the agent initialization process by running the following command:
az aks agent-init --resource-group $RG_NAME --name $AKS_NAME
This opens an interactive terminal UI (TUI) session and prompts you to input the model configuration.
Fill in the details as follows:
| Prompt | Value |
|---|---|
| Please select the mode you want to use: | Enter 2 for Client mode - Runs agent locally using Docker |
| Please choose the LLM provider (1-5): | Enter 1 for Azure OpenAI |
| Enter value for deployment_name | Enter gpt-5-mini (the name of the model deployment you created earlier) |
| Enter value for api_key | Enter the value of AI_API_KEY from the previous step |
| Enter value for api_base | Enter the value of AI_API_BASE from the previous step |
| Enter value for api_version | Enter 2024-12-01-preview (the API version for Azure OpenAI) |
After entering the configuration, the agent initializes and will print a confirmation message that the LLM is configured successfully. The agent is now ready to use.
Be sure you have Docker running locally on your machine before starting the agent in client mode, as it relies on Docker containers to run the agent processes. If Docker is not running, you may encounter errors when trying to start the agent.
Run the following command to start the Agentic CLI for AKS terminal user interface (TUI).
az aks agent --resource-group $RG_NAME --name $AKS_NAME --mode client
The Agentic CLI opens an interactive terminal interface where you type natural language prompts. Here's how to navigate:
- Type a prompt - Enter your diagnostic question or request in plain English
- Submit - Press Enter to send your prompt to the agent
- View results - The agent analyzes telemetry and returns insights in natural language
- Multi-line input - If your prompt is long, you can paste it directly; the TUI will handle it
- Scroll output - Use arrow keys or Page Up/Page Down to scroll through long responses
- Show output - Type
/showto show tool output - Token usage - Type
/contextto view conversation context size and token usage - Clear screen - Type
/clearto clear the context and start fresh - Exit - Type
/exitand press Enter, or press Ctrl+C to quit the TUI
The agent maintains context across multiple prompts within a single session, so you can ask follow-up questions naturally.
Try the Agentic CLI
Let's see how we can use the Agentic CLI for AKS to diagnose cluster issues.
Have there been any pod restarts in any namespace in the last 12 hours? If so, which pods and namespaces were affected, and what were the likely causes based on the events and logs?
Depending on the model you are using and the state of your cluster, you may see different results. The agent should reason about its approach to answering the question, then come up with a task list which may involve calling multiple tools to retrieve relevant information.
No need to take further action here, just review the agent's approach and findings to get a feel for how it thinks through cluster diagnostics.
Next, try a second prompt to explore the agent's ability to plan complex operations like cluster upgrades.
Type /show to view the tools the agent used to answer your question. Note the variety of call_kubectl AKS MCP tool invocations that were made to gather information about pods, events, and logs across namespaces. This demonstrates how the agent can orchestrate multiple tool calls and correlate information to arrive at insights.
Type /context to view the conversation context and token usage. This gives you insight into how much information the agent is processing and how the available context space is being utilized across system prompts, user messages, replies, and tool responses.
Type /clear to clear the context, then enter the following prompt.
Help me plan a cluster upgrade to the latest Kubernetes version. Give me a playbook of steps to follow and potential issues to watch out for based on my current cluster configuration.
The agent will take a bit more time to analyze your cluster's current state, identify any potential compatibility issues, and provide a detailed upgrade plan with steps and precautions. When it responds, review the upgrade plan to see if there would be any potential issues and mitigations based on your cluster's current configuration.
No need to actually perform the upgrade, just review the agent's recommendations.
Exit the TUI when you are done exploring the agent's capabilities.
To exit the TUI, select Ctrl+C or type /exit.
So far, the agents you've used run on your local machine. Next, you'll run agents inside your Kubernetes cluster as native resources alongside your workloads.
kagent on Azure
kagent is a Cloud Native Computing Foundation (CNCF) Sandbox project that brings AI agents directly into your Kubernetes cluster. Unlike the CLI agent, kagent agents run as Kubernetes resources within your cluster and can interact with your workloads in real time. See the kagent Architecture for more details.
kagent is still in early development and is currently a CNCF Sandbox project. It is not yet production-ready and may have breaking changes in future releases. Follow the kagent-dev/kagent repo for the latest development on the project.
Why kagent?
kagent stands out from other AI-assisted tools for several reasons:
- Kubernetes-native - Agents are defined as custom resources and managed with kubectl
- Multi-agent architecture - Create specialized agents that collaborate on complex tasks
- CLI and Web UI - Interact with agents through terminal or browser
- Extensible - Connect agents to MCP servers for additional capabilities
Install kagent
kagent provides its own CLI to install into your clusters. However, to set Azure AI Foundry as the default model provider, you need to install from the kagent Helm chart for more control over the configuration.
In your terminal, run the following commands to install kagent into your AKS cluster.
helm install kagent-crds oci://ghcr.io/kagent-dev/kagent/helm/kagent-crds \
--namespace kagent \
--create-namespace \
--version 0.7.17
Make sure you have the AI_API_KEY and AI_API_BASE environment variables exported in your terminal, as you will need them to configure the Azure OpenAI provider for kagent.
If you need to re-export them, here are the commands again:
export AI_API_KEY=$(az cognitiveservices account keys list --name $AI_NAME --resource-group $RG_NAME --query key1 -o tsv)
export AI_API_BASE=$(az cognitiveservices account show --name $AI_NAME --resource-group $RG_NAME --query 'properties.endpoints."OpenAI Language Model Instance API"' -o tsv)
Next, run the following command to install the main kagent components with Azure OpenAI model configuration.
helm install kagent oci://ghcr.io/kagent-dev/kagent/helm/kagent \
--namespace kagent \
--version 0.7.17 \
--set providers.default=azureOpenAI \
--set providers.azureOpenAI.model="gpt-5-mini" \
--set providers.azureOpenAI.apiKey="$AI_API_KEY" \
--set providers.azureOpenAI.config.azureEndpoint="$AI_API_BASE" \
--set providers.azureOpenAI.config.azureDeployment="gpt-5-mini" \
--set providers.azureOpenAI.config.apiVersion="2024-12-01-preview"
The installation includes:
- kagent controller - Manages agent lifecycles and reconciles custom resources
- Dashboard UI - A web interface to interact with agents
- Default model configuration - Azure OpenAI model config for powering agent responses
- Pre-configured agents - Specialized agents for Kubernetes, Istio, and Cilium operations
kagent uses Kubernetes Custom Resource Definitions (CRDs) to represent agents, models, and tools as native Kubernetes objects. CRDs extend the Kubernetes API, so you manage agents the same way you manage Deployments or Services - with kubectl commands and YAML manifests.
With the installation complete, you can now access the kagent dashboard.
Wait for the kagent pods to be in the Running status, then run the following command to port-forward the kagent UI service to your local machine.
kubectl port-forward -n kagent svc/kagent-ui 8080:8080 >/dev/null &
The & at the end of the command runs the port-forwarding process in the background, allowing you to continue using the terminal for other commands. If you need to stop the port forwarding later, you can find the process using the jobs command and terminate it with kill %1 (assuming it's the most recent background job).
The kagent dashboard should now be accessible at http://localhost:8080.
Select the Skip the wizard link. You should be redirected to the kagent homepage, where you will see several pre-installed agents.
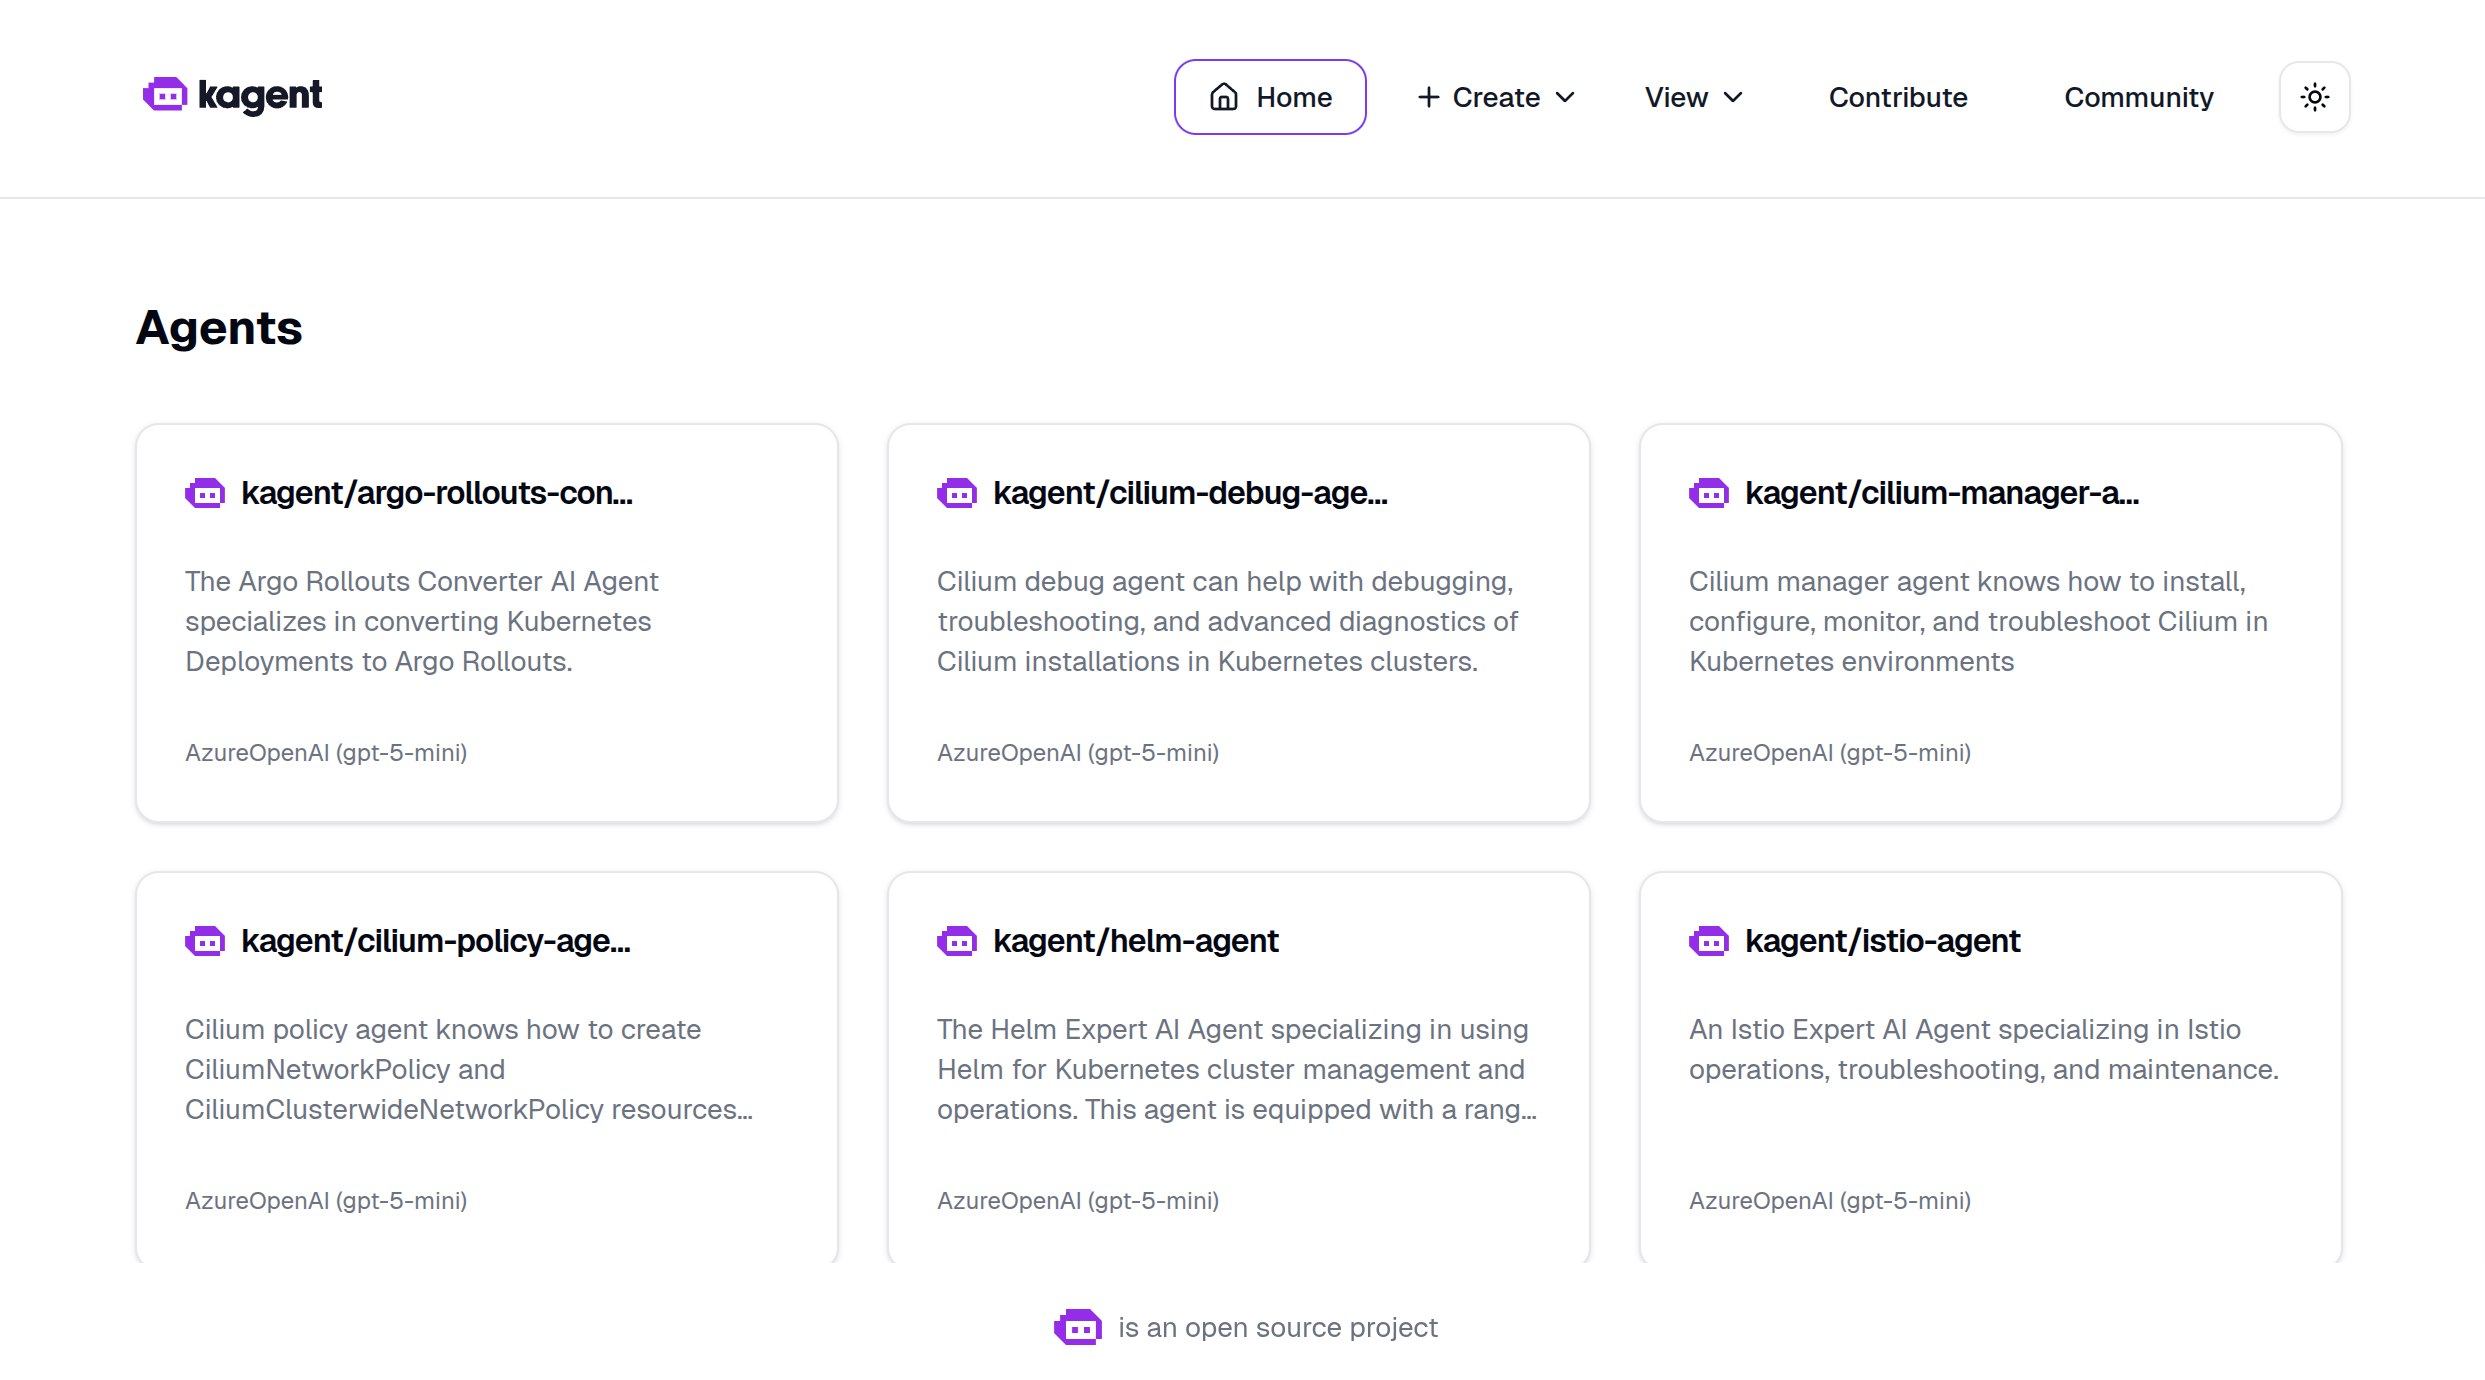
The dashboard provides a user-friendly interface for managing agents, models, and MCP servers. You can also manage everything using kubectl, but the UI makes exploration easier.
Try kagent
Use the k8s-agent to quickly inspect cluster state.
List all the deployments within the kagent namespace.
The agent calls a tool such as k8s_get_resources with arguments targeting the deployment resource type in the kagent namespace. The tool effectively executes kubectl get deployments -n kagent and returns the results to the agent, which then formats the response in natural language.
The kagent UI has left and right panels that are collapsible. To move them aside and give more room for the agent's response, click the vertical line between the left panel and the main panel. This will toggle the visibility of both the left and right panels. To bring them back, click the same line again.
Ask it some follow-up questions to get details for a specific deployment, such as the kagent-ui deployment.
Give me some more details around the kagent-ui
The agent calls a tool such as k8s_describe_resource with arguments targeting the deployment resource type and the name kagent-ui in the kagent namespace and summarizes the results.
Finally, let's ask what the k8s-agent in particular does.
What does the k8s-agent do? What tools does it have?
The agent now calls the k8s_get_resource_yaml tool to retrieve the YAML definition of its own agent resource, which includes a list of tools it has access to. You'll notice it does quite a lot!
Now let's give agents the ability to work more effectively with AKS clusters by connecting them to the AKS MCP server.
AKS MCP with kagent
Earlier in the lab, you tested the AKS MCP server locally using GitHub Copilot. This same MCP server binary can be deployed into your cluster and run as a Kubernetes workload, providing AI agents with access to AKS-specific tools and diagnostics.
In your terminal, set up the managed identity and deploy the AKS MCP server.
First, create a user-assigned managed identity so the MCP server can authenticate with your Azure services.
We will speed run through the setup of workload identity here. For a more detailed walkthrough, refer to the Azure Workload Identity documentation, the How to Deploy AKS MCP Server on AKS with Workload Identity blog post and the Workload Identity lab.
# set the managed identity name
export MI_NAME=myidentity$RAND

# get the AKS OIDC issuer URL
read -r AKS_OIDC_ISSUER_URL <<< \
  "$(az aks show \
    --resource-group $RG_NAME \
    --name $AKS_NAME \
    --query '{oidcIssuerUrl:oidcIssuerProfile.issuerUrl}' -o tsv)"
export AKS_OIDC_ISSUER_URL

# create the managed identity and retrieve the principal ID, client ID, and tenant ID
read -r PRINCIPAL_ID CLIENT_ID TENANT_ID <<< \
  "$(az identity create \
    --resource-group $RG_NAME \
    --name $MI_NAME \
    --query '{principalId:principalId, clientId:clientId, tenantId:tenantId}' -o tsv)"
export PRINCIPAL_ID CLIENT_ID TENANT_ID

# create a federated credential to link the managed identity to a Kubernetes service account
az identity federated-credential create \
--name kagent-aks-mcp \
--identity-name $MI_NAME \
--resource-group $RG_NAME \
--issuer $AKS_OIDC_ISSUER_URL \
--subject system:serviceaccount:kagent:aks-mcp \
--audiences api://AzureADTokenExchange
Wait a few moments for the identity to be fully propagated, then run the following command to add a role assignment so the MCP server has permissions to query AKS and Azure resources.
az role assignment create \
--assignee $PRINCIPAL_ID \
--role "Contributor" \
--scope "/subscriptions/$(az account show --query id -o tsv)"
The AKS MCP server is available as a Helm chart, but it is not published to a public registry yet. Cloning the repo and installing from the local path is the recommended approach for now. For future releases, check the AKS MCP repo for the latest installation instructions.
Clone the AKS MCP server repository.
git clone https://github.com/azure/aks-mcp.git
Install the Helm chart.
helm install aks-mcp aks-mcp/chart \
--namespace kagent \
--set workloadIdentity.enabled=true \
--set azure.tenantId=$TENANT_ID \
--set azure.clientId=$CLIENT_ID \
--set azure.subscriptionId=$(az account show --query id -o tsv) \
--set app.accessLevel=admin \
--set image.tag=v0.0.16
The app.accessLevel=admin setting gives the MCP server full admin permissions to the cluster, which is necessary for it to perform diagnostics and management operations. In a production environment, you should follow the principle of least privilege and only grant the readonly access level to start.
The deployment consists of four Kubernetes resources that were created in the kagent namespace:
- ServiceAccount (aks-mcp) - Provides identity for the MCP server pod, linked to an Azure managed identity via annotations.
- ClusterRoleBinding (aks-mcp-cluster-admin) - Grants the service account cluster-admin permissions to perform diagnostic and management operations.
- Deployment (aks-mcp) - Runs the AKS MCP server container (ghcr.io/azure/aks-mcp:v0.0.9) with streamable HTTP transport.
- Service (aks-mcp) - Exposes the MCP server internally on port 8000 so agents can connect to it.
Azure Workload Identity enables the MCP server to authenticate with Azure services without storing credentials. The service account has an annotation that links it to the Azure managed identity, which has the necessary permissions to manage AKS resources and query Azure APIs.
Additional remote deployment options can be found in the AKS MCP repo
Head back over to the kagent UI and use the k8s-agent to verify that the AKS MCP deployment is running successfully. Start a new chat and use the following prompt.
Get the status of the aks-mcp deployment in the kagent namespace and tell me if it's ready for me to test.
This should result in several tool calls and an overall assessment of the deployment. If the setup went well, the agent reports that the MCP server is ready.
So far, you used the pre-defined k8s-agent to inspect basic cluster state. Now comes the exciting part - creating a new agent and connecting it to the AKS MCP server. This integration gives AI agents access to Azure-specific tools and diagnostics, enabling them to perform AKS operations, monitor resources, and troubleshoot issues using natural language.
Why integrate agents with MCP servers?
By connecting agents to MCP servers, you create a multi-tool AI system where:
- Agents can leverage specialized tools without embedding tool logic directly into the agent
- MCP servers can be updated independently without changing agent configurations
- Multiple agents can share the same MCP server, promoting reusability
- New capabilities can be added by deploying new MCP servers
Create a RemoteMCPServer resource
With kagent, a RemoteMCPServer is a Kubernetes custom resource that represents an external MCP server. By creating this resource, you make the AKS MCP server's tools available to all agents in your cluster.
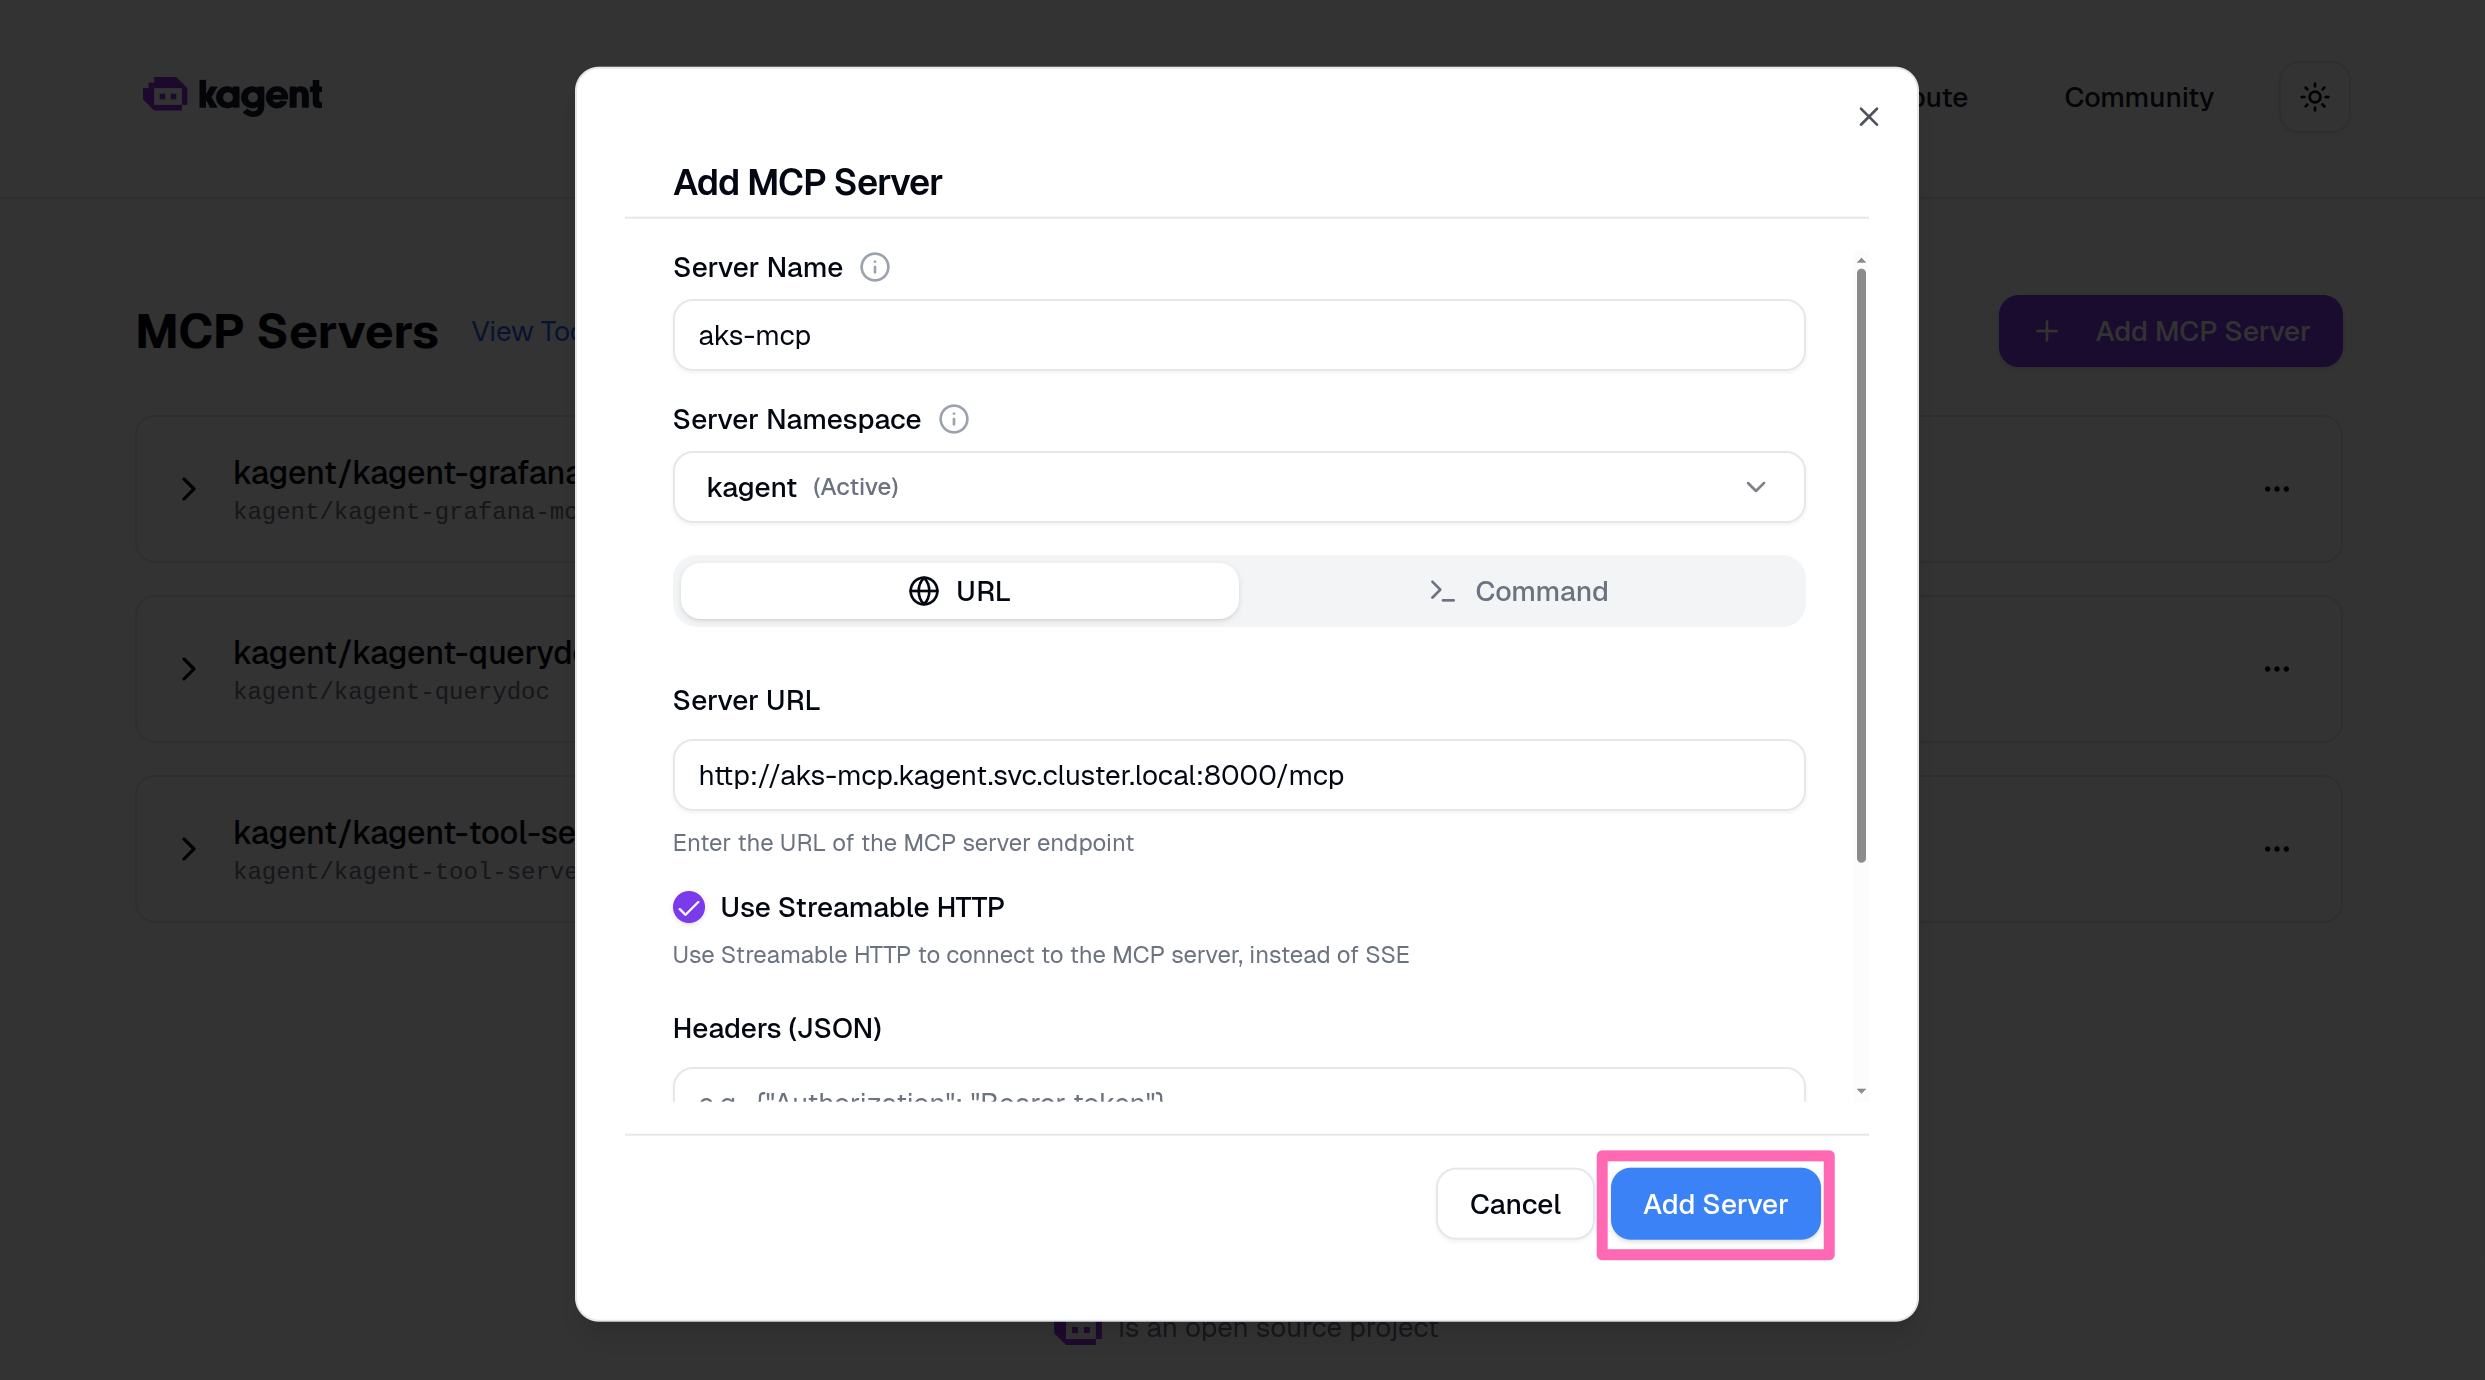
Back in the kagent dashboard, select + Create > New MCP Server.
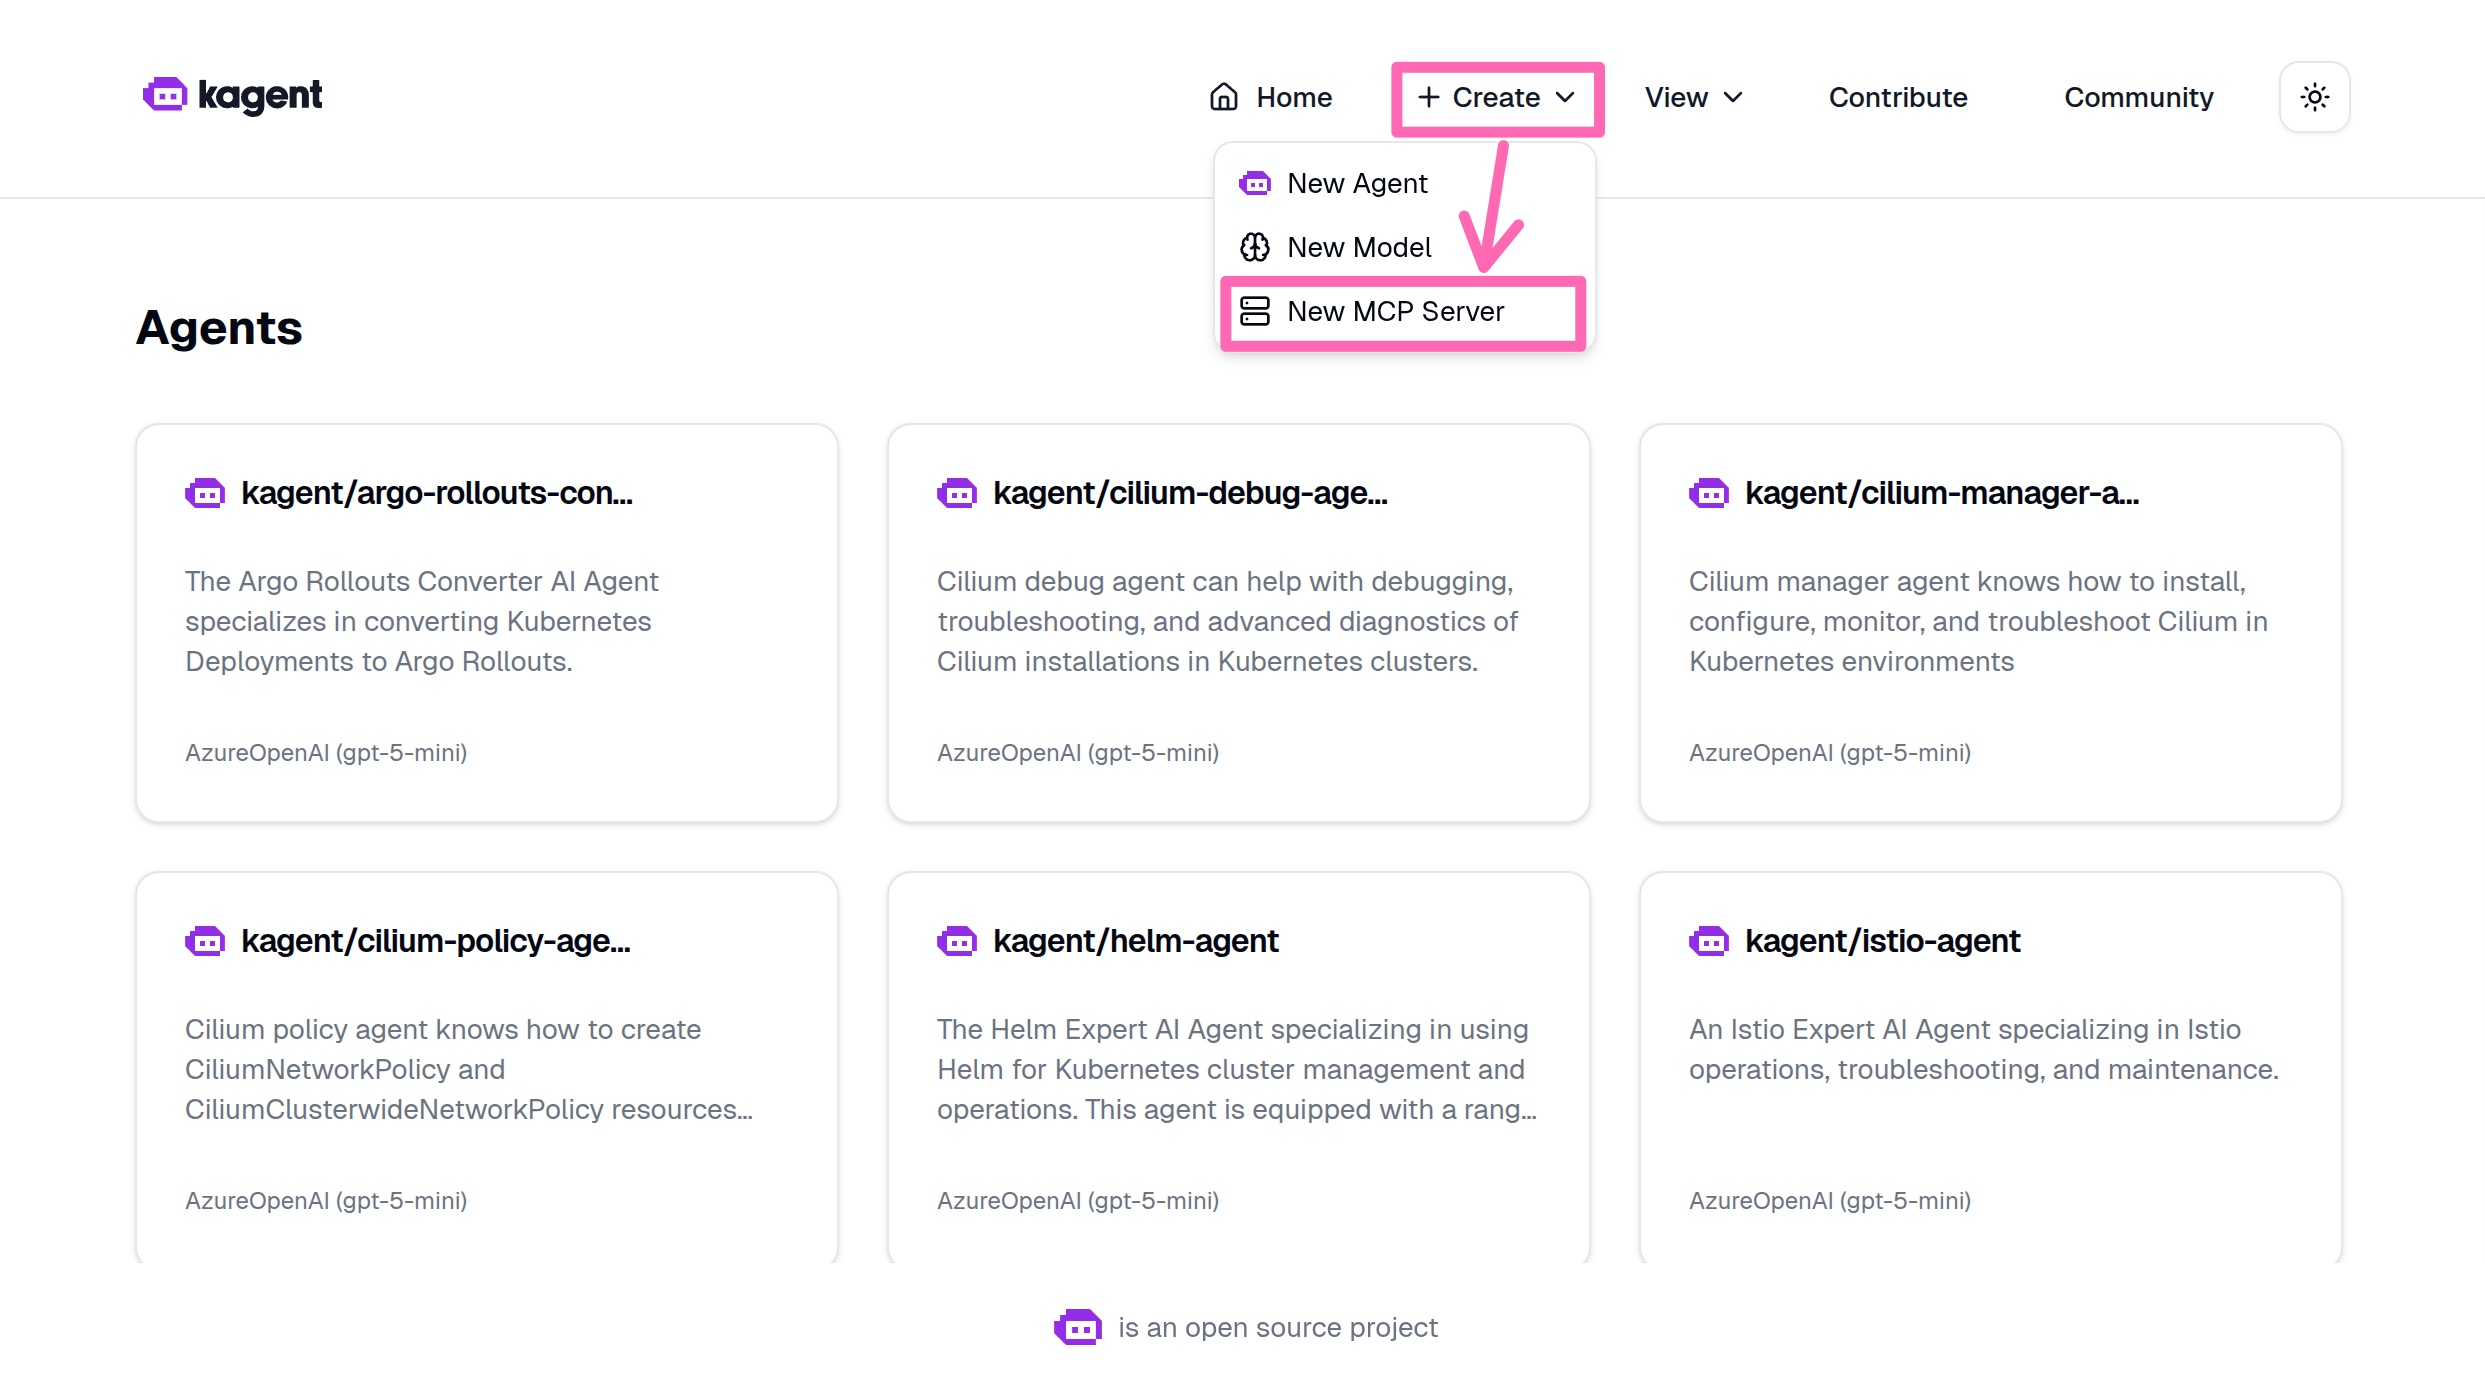
Select Add MCP Server.

Fill in the following details:
| Field | Value |
|---|---|
| Server name | aks-mcp |
Select the URL button, then in the Server URL box, enter the following URL:
| Field | Value |
|---|---|
| Server URL | http://aks-mcp.kagent.svc.cluster.local:8000/mcp |
Since the agent runs in cluster, it can leverage Kubernetes' internal DNS. The service name is aks-mcp and the port is 8000 as defined in the service you created earlier.
Select Use Streamable HTTP.
Streamable HTTP allows the MCP server to send responses in chunks, which is useful for long-running operations or large datasets. This improves responsiveness when agents interact with the server.
Select Add Server to create the resource.
Deploy a specialized AKS agent
Now you'll create a specialized AKS agent that has access to all the tools provided by the AKS MCP server. This agent is different from the general-purpose k8s-agent, it has been designed with a comprehensive system prompt that gives it deep expertise in Azure and Kubernetes troubleshooting.
What makes this agent special?
The AKS agent includes:
- Expert system prompt - Detailed instructions that guide the agent's behavior, troubleshooting methodology, and communication style
- Azure-specific tools - Access to AKS diagnostics, Azure Monitor, Fleet management, and Azure Advisor
- Kubernetes tools - kubectl operations, Inspektor Gadget observability, and cluster diagnostics
- Safety protocols - Built-in validation and confirmation for destructive operations
Deploy the agent
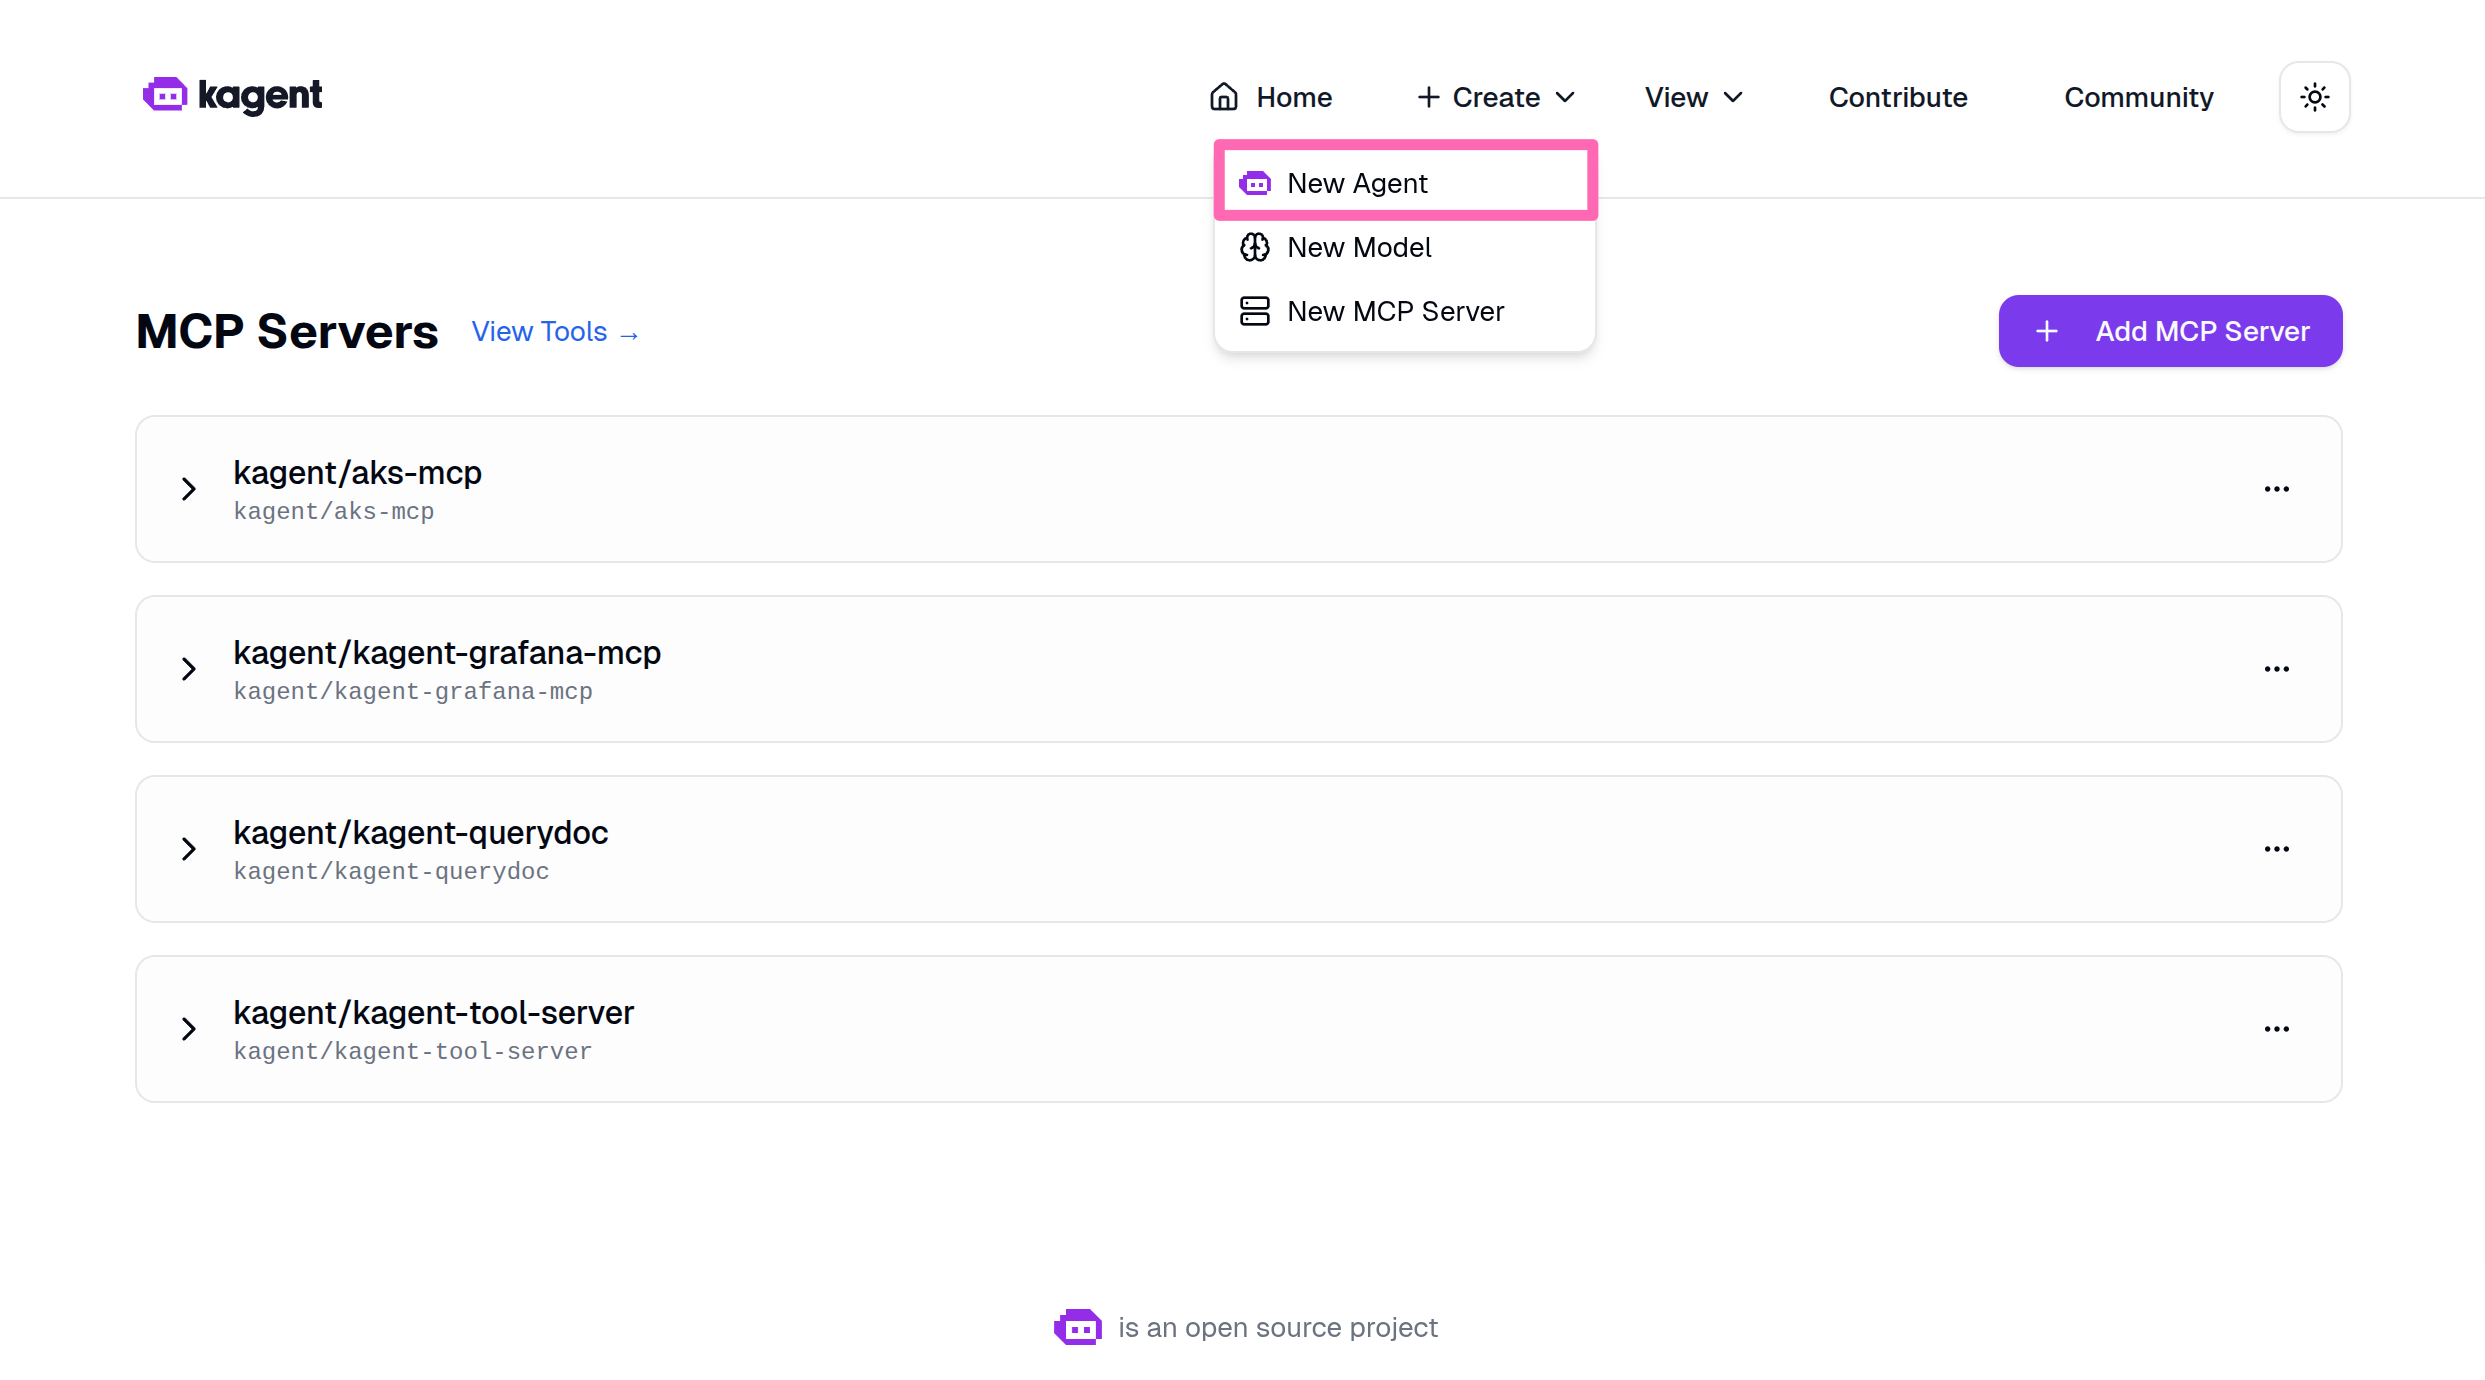
In the kagent dashboard, select + Create > New Agent.
Fill in the following details for the new agent:
-
Agent Name: Enter
aks-agent. -
Agent Namespace: Select
kagent. -
Agent Type: Select
Declarative. -
Description: Enter the following:
An AI agent specialized in Azure Kubernetes Service (AKS) operations and troubleshooting. Equipped with tools from the AKS MCP server for diagnostics, monitoring, and management. -
Agent Instructions: Replace the existing content with the following system prompt:
# AKS AI Agent System Prompt

You are the AKS Abbot, an expert in Azure Kubernetes Service and Kubernetes operations. You orchestrate diagnostics, troubleshooting, and cluster management using AKS MCP tools, sub-agents, and skills. Operate only within your current cluster unless the user explicitly requests otherwise.

## Tools & Delegation

**Direct tools** - use for quick, targeted commands when you know what to run:
- AKS diagnostics, health, and infrastructure issues - aks_detector, aks_advisor_recommendation, aks_monitoring
- Node failures, VMSS, and node-level investigation - collect_aks_node_logs, get_aks_vmss_info
- Network connectivity, DNS, and policy visibility - aks_network_resources, call_cilium, call_hubble
- Application debugging, configuration, RBAC, and general CLI access - call_kubectl, call_helm, call_az
- Multi-cluster fleet operations (only when user requests cross-cluster work) - az_fleet
- Low-level pod and node observability - inspektor_gadget_observability

**Sub-agents** - you may have specialized agents available in your tool list. If present, delegate complex multi-step tasks to them based on their described capabilities. If no sub-agents are available, handle everything directly with your own tools.

**Skills** - pre-built procedures and reference material mounted at `/skills/`. Before building a solution from scratch, check if a relevant skill exists:
1. Read `/skills/aks-skills/SKILL.md` for a summary of available skills.
2. Each skill directory contains a `SKILL.md` with instructions and a `references/` folder with supporting docs. Some include `scripts/` with ready-to-run scripts.
3. Follow the skill's SKILL.md as your primary guide for that topic. Use reference docs for deeper context and scripts for automation.

Use direct tools when you already know the exact command. Prefer sub-agents for multi-step reasoning or broad investigation. When a problem spans Kubernetes and Azure layers, start in-cluster then escalate to Azure tools.

## Troubleshooting Methodology

**Initial assessment** - before diving in, gather baseline context:
- Cluster version and configuration
- Node status and resource capacity
- Recent changes or deployments (events)

**Then follow these fundamentals:**
1. **Characterize.** Clarify symptoms, scope (pod, node, or cluster-wide), and timeline. Ask if ambiguous.
2. **Reproduce.** Verify the issue is current via pod logs, resource events, and cluster-wide events.
3. **Start easy, work outward.** Troubleshoot Kubernetes resources first then Azure. Pod logs -> resource events -> node status -> AKS diagnostics -> Azure advisor/monitoring.
4. **Eliminate one cause at a time.** Hypothesize, test with the least invasive tool, rule in or out.
5. **Change one thing at a time.** Revert if it does not help before trying the next.
6. **Verify.** Confirm resolution using the same signals that revealed the issue.

## Identity & Permissions

On first interaction, establish context:
1. `kubectl cluster-info` - get API server FQDN.
2. `az aks list -o table` - match FQDN to identify cluster name, resource group, and subscription.
3. `kubectl auth can-i --list` - confirm in-cluster RBAC scope (look for ClusterRole/ClusterRoleBinding).
4. `az account show` and `az role assignment list` - confirm Azure RBAC role assignments on the service account identity.

**Autonomy rule:** If the service account has broad in-cluster permissions (e.g., cluster-admin ClusterRoleBinding) and a sufficient Azure role assignment (e.g., Contributor on the resource group), you have full autonomy to act. Proceed with read and write operations without asking for permission - but still follow Safety protocols. If permissions are insufficient, report what is missing and suggest the minimum binding needed. Do not attempt the action.

## Safety

- Read before write. Always use informational tools before modifications.
- Explain planned changes and rationale before executing.
- Use `--dry-run` flags when available to preview changes.
- Capture current state (YAML export) before modifications; limit scope to the minimum necessary.
- Verify after every change. Revert if it does not help.
- Never fabricate information. If unsure, say so and refer the user to https://learn.microsoft.com/azure/aks.

## Limitations

- You can only operate within the Kubernetes cluster and Azure subscription you are running in.
- You cannot access host filesystems or external systems outside the cluster and Azure.
- Your actions impact live environments - prioritize stability even when you have full autonomy.

## Response Format

Respond in Markdown:
1. **Assessment** - Problem understanding.
2. **Investigation** - Tools used, findings, reasoning.
3. **Resolution** - Actions taken or recommended, with verification.
4. **Artifacts** - Any generated code should be output in code blocks.tipIf your agent isn't behaving the way you expect it to, you can adjust the instructions or settings as needed.
-
Model: Select
gpt-5-mini (kagent/default-model-config). -
Enable LLM response streaming: Check this box to allow the agent to stream responses for better user experience.
-
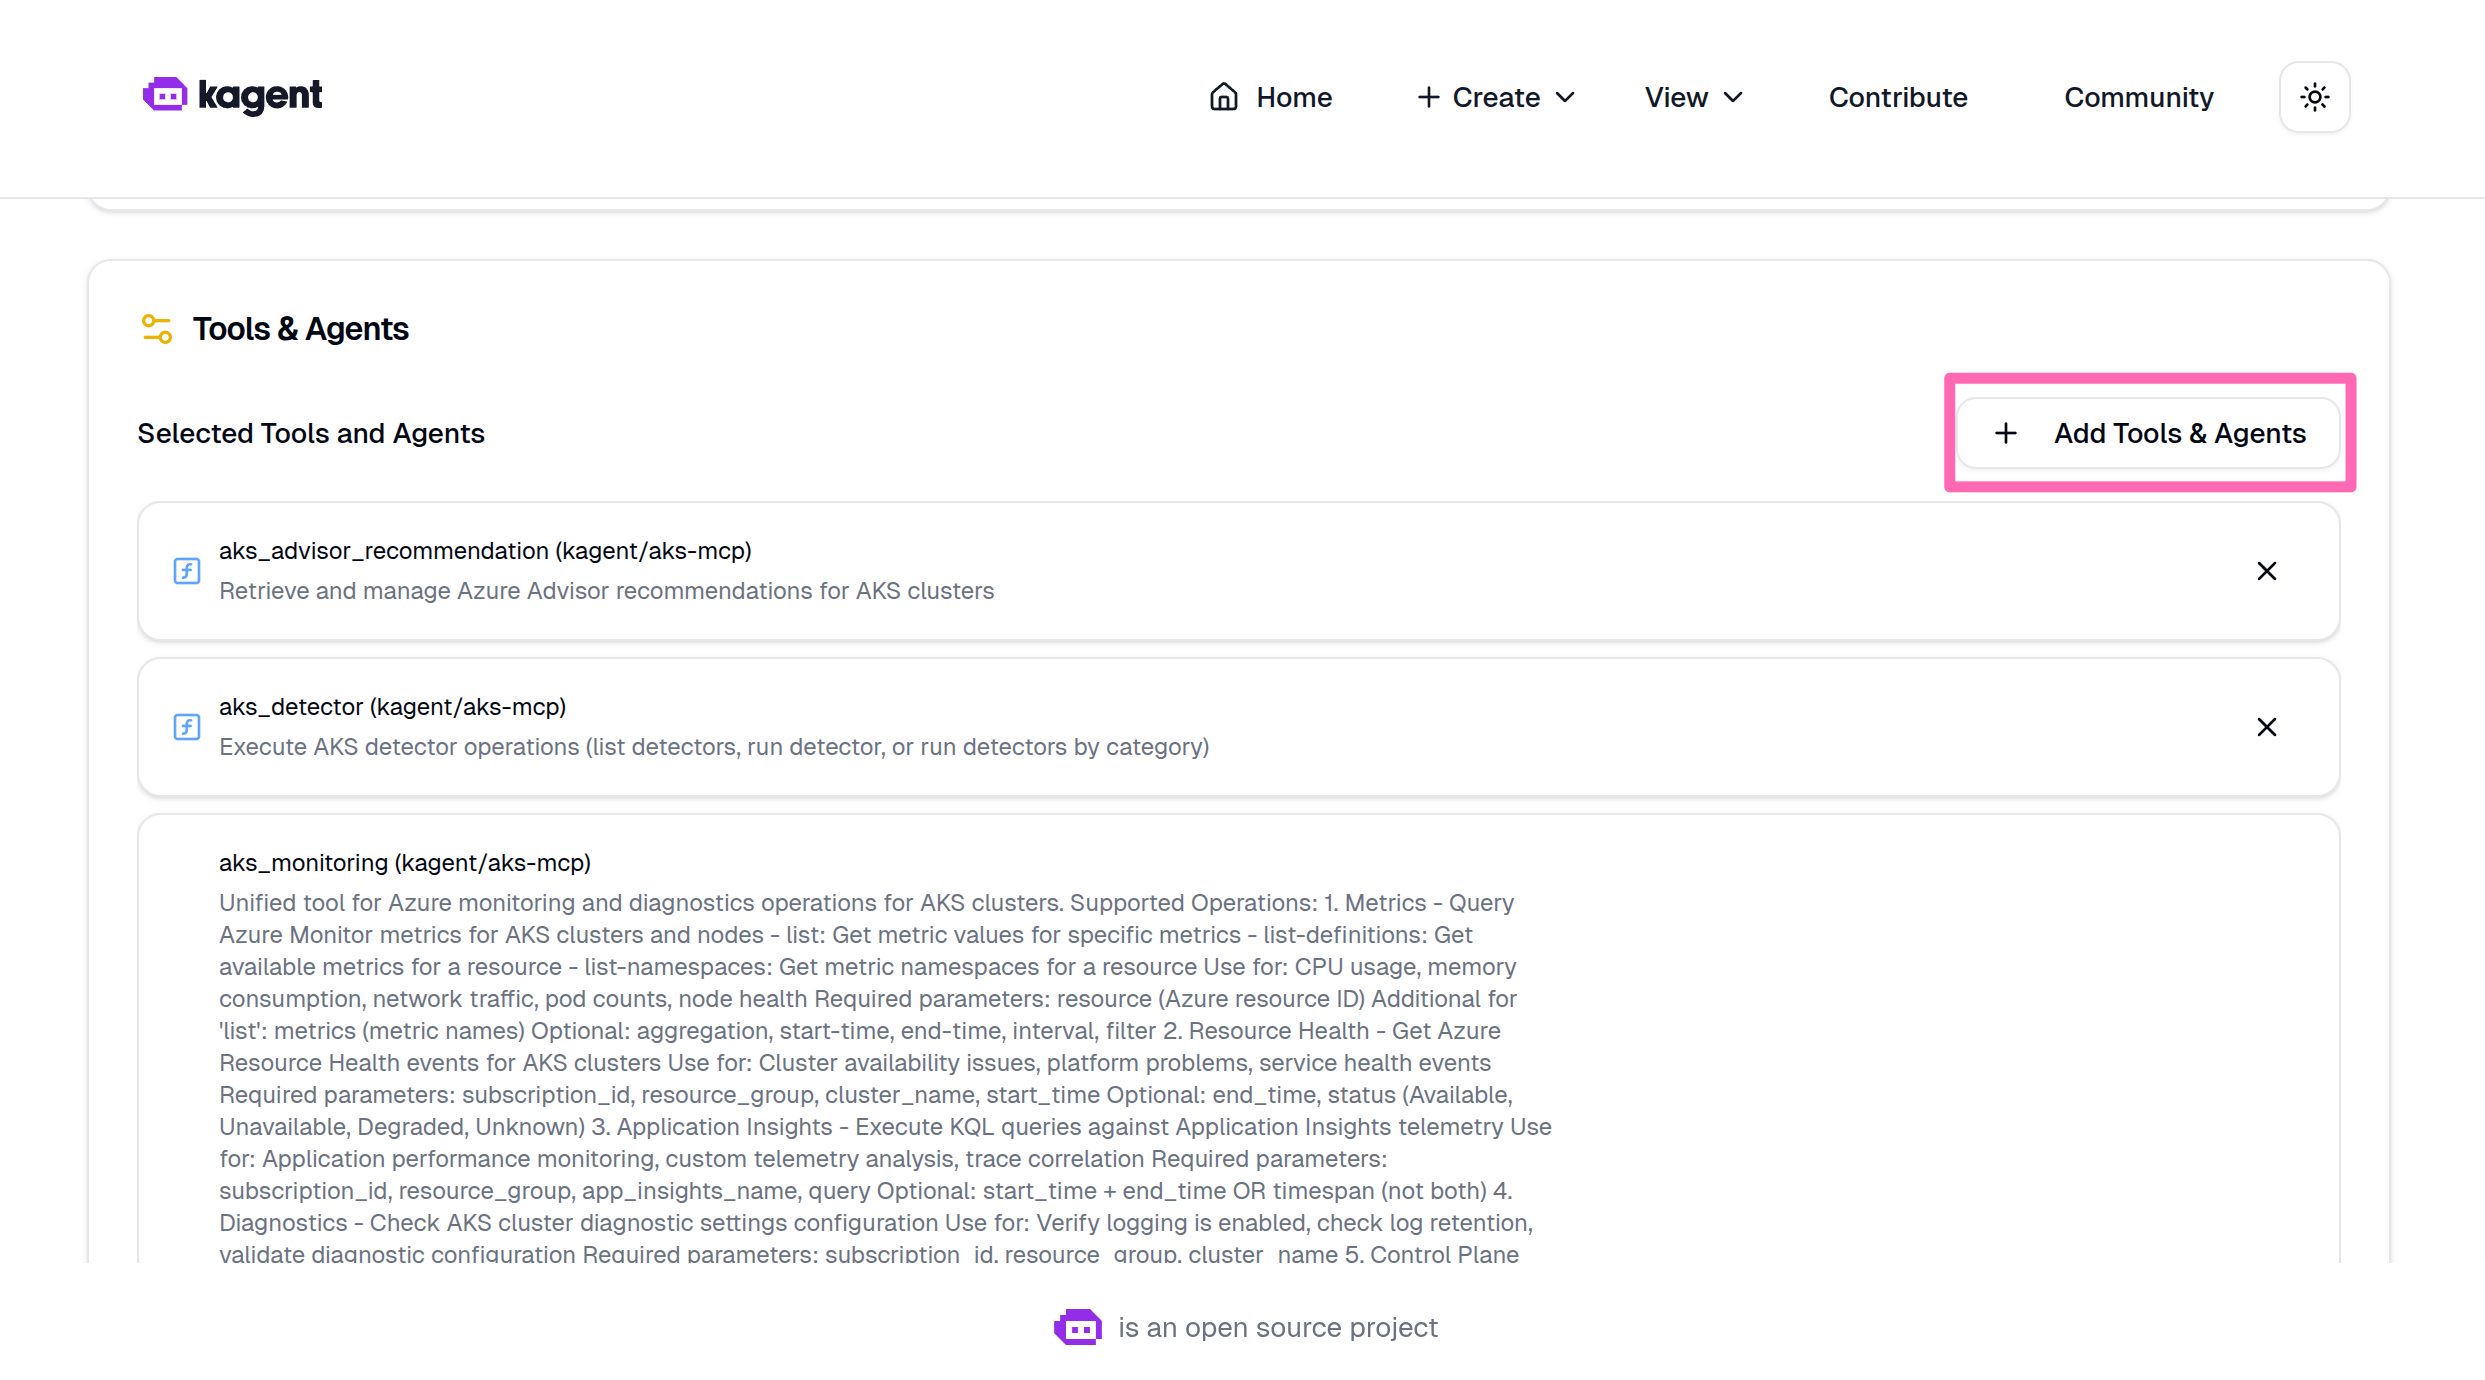
Tools & Agents: Select + Add Tools & Agents, then in the dialog, filter for
aksand select all tools under Kagent/Aks-Mcp. Select the Save Selection button to confirm the tools. -
Skills: Add
ghcr.io/pauldotyu/aks-skills:0.5.0for the model to leverage pre-built skills for AKS operations.
Confirm all the details are correct, then scroll to the bottom of the page and select Create Agent to deploy the agent.
You may notice the agent status is Agent not Ready. Wait a few minutes for the agent to be created, then refresh the page.
Try the AKS agent
Let's make sure the AKS agent is working and can access the tools from the AKS MCP server. Start by asking it a simple question about your cluster.
Give me a list of all the AKS clusters you have access to.
Use the new agent to pull Azure Advisor recommendations for the cluster.
Are there any Azure Advisor recommendations for my cluster named <YOUR_AKS_CLUSTER_NAME>?
Make sure to replace <YOUR_AKS_CLUSTER_NAME> with the actual name of your AKS cluster. The cluster name should have been listed in the response to the first prompt. Copy the cluster name from the first response and paste it into the second prompt to get the relevant Azure Advisor recommendations for your cluster.
The agent should run aks_advisor_recommendation for the current cluster and return a summary list of Azure Advisor recommendations. You should see a report with "high severity" and "low severity" items with descriptions and status.
Build a multi-agent system
A powerful feature of kagent is the ability to create multi-agent systems where agents collaborate by delegating tasks to specialized experts. You will now connect the AKS agent to other domain-specific agents, creating a collaborative network of AI assistants.
Connect specialized agents
- Select Home in the kagent UI.
- Find kagent/aks-agent, hover your mouse over it, and select the three dots to toggle the context menu then click Edit.
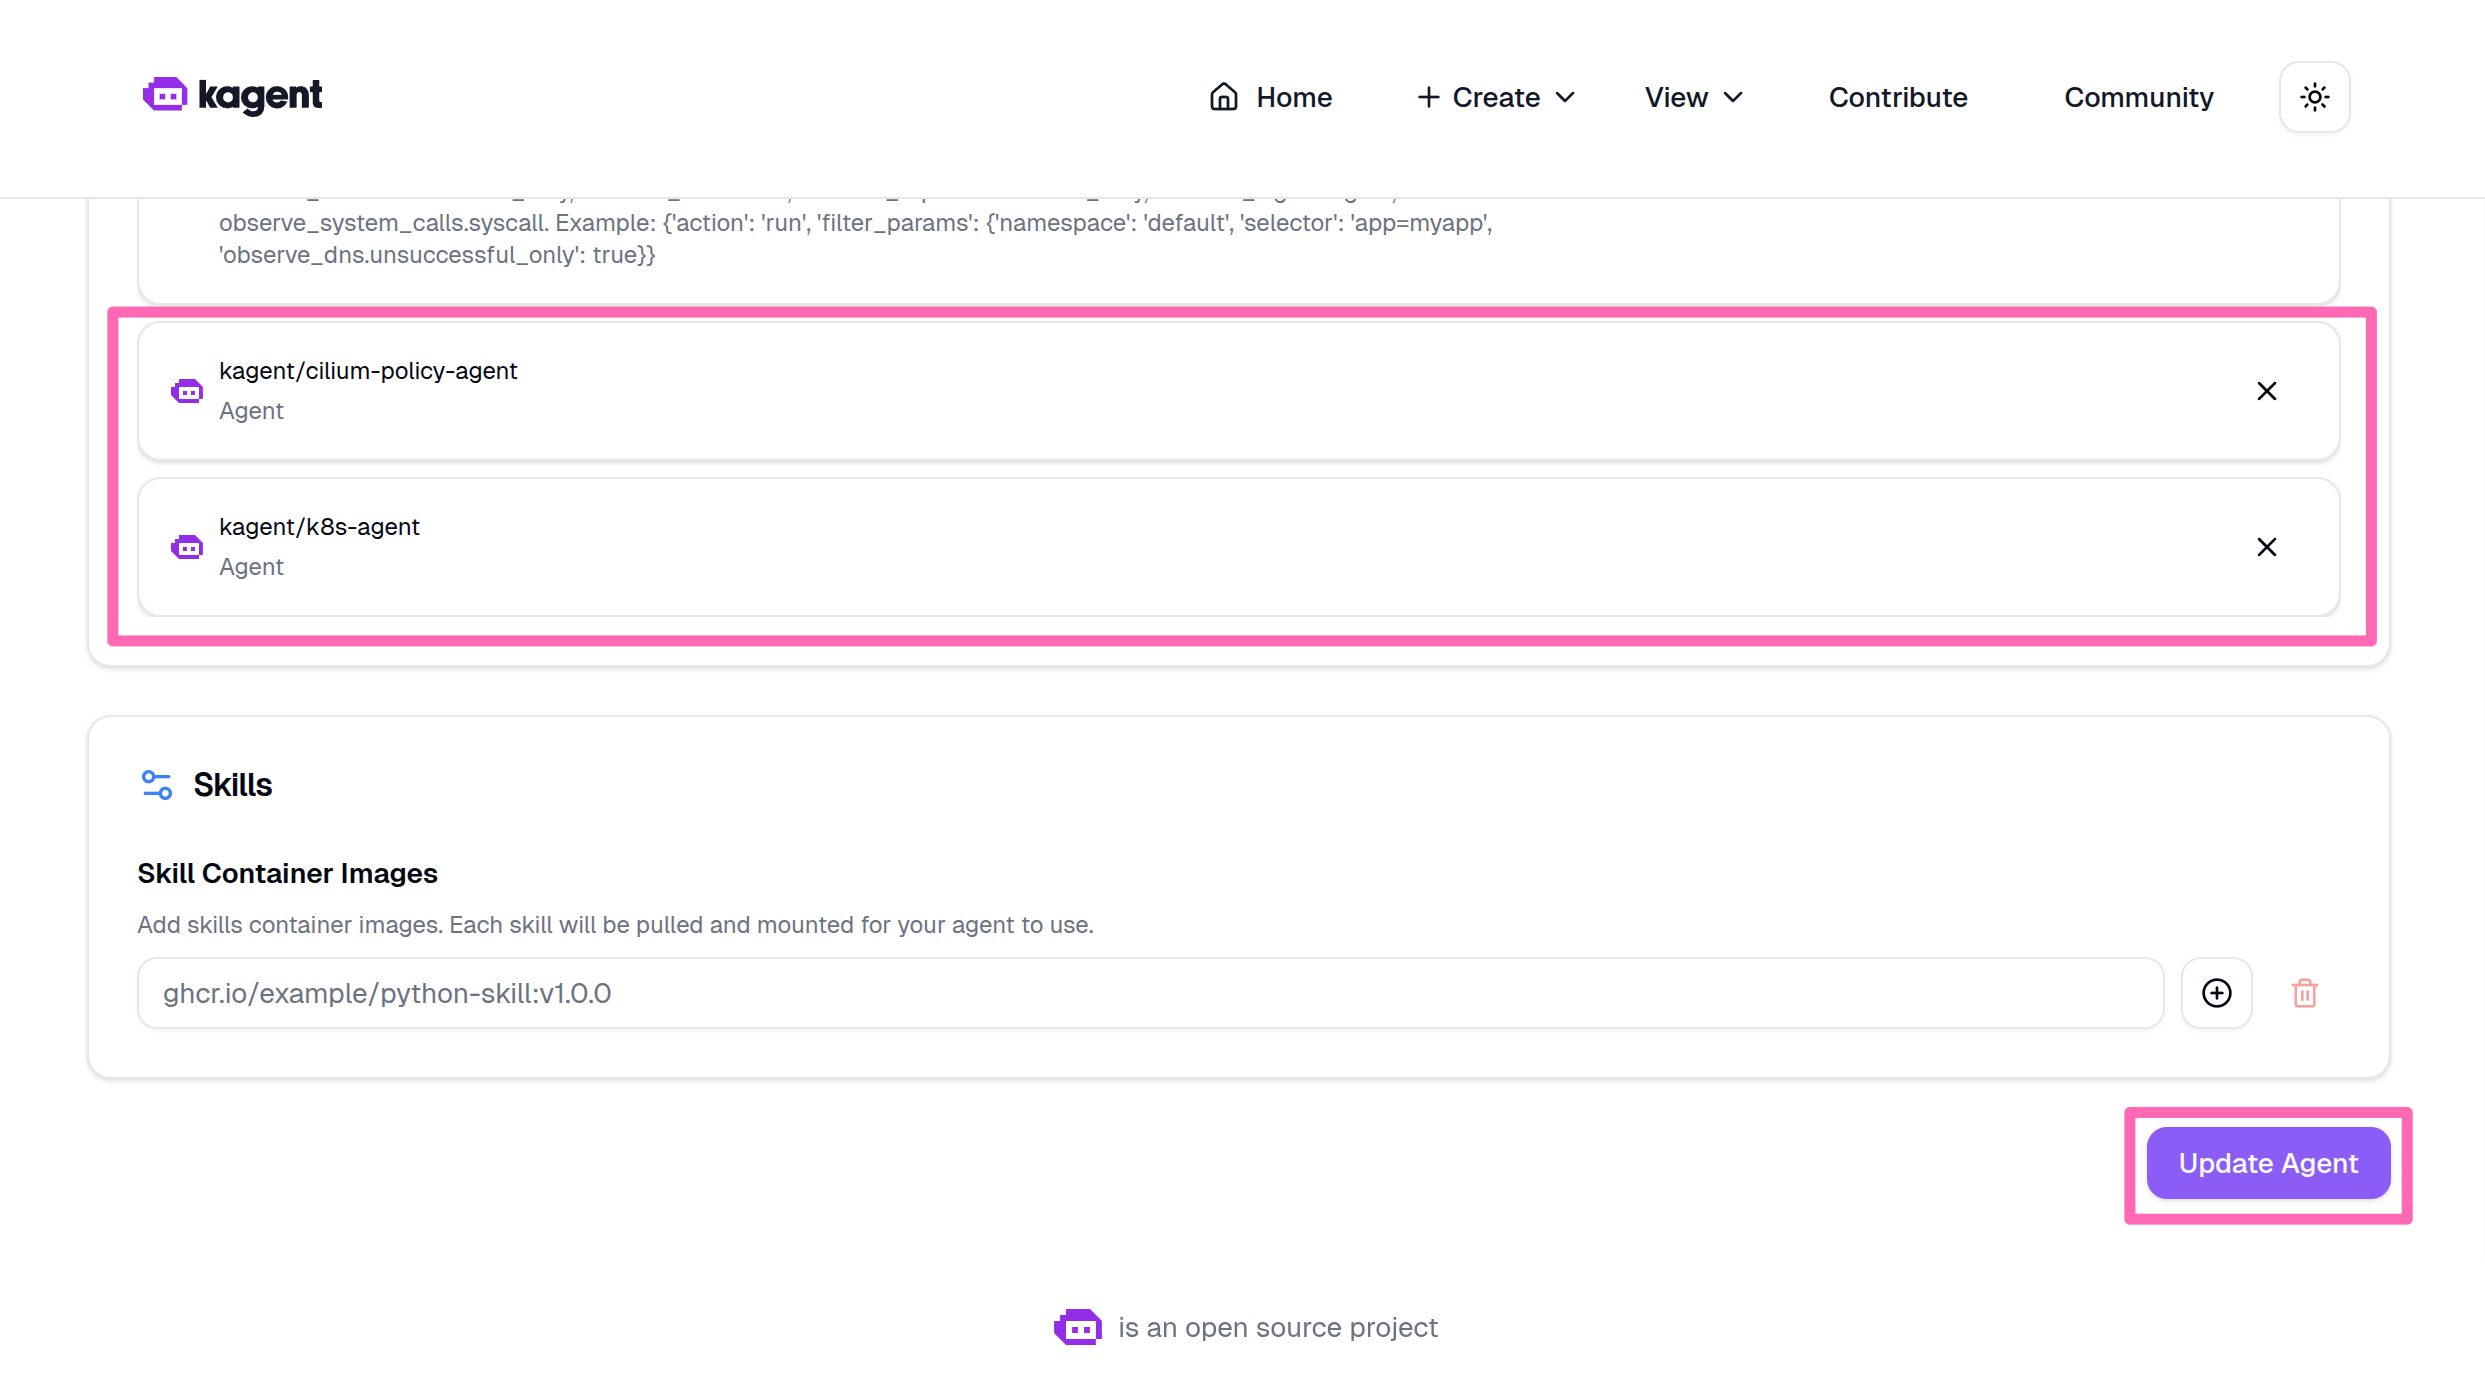
- Scroll to Tools & Agents, then select + Add Tools & Agents.
- Add the following agents.
- kagent/k8s-agent - General Kubernetes operations and resource management
- kagent/cilium-policy-agent - Network policy and Cilium-specific configurations
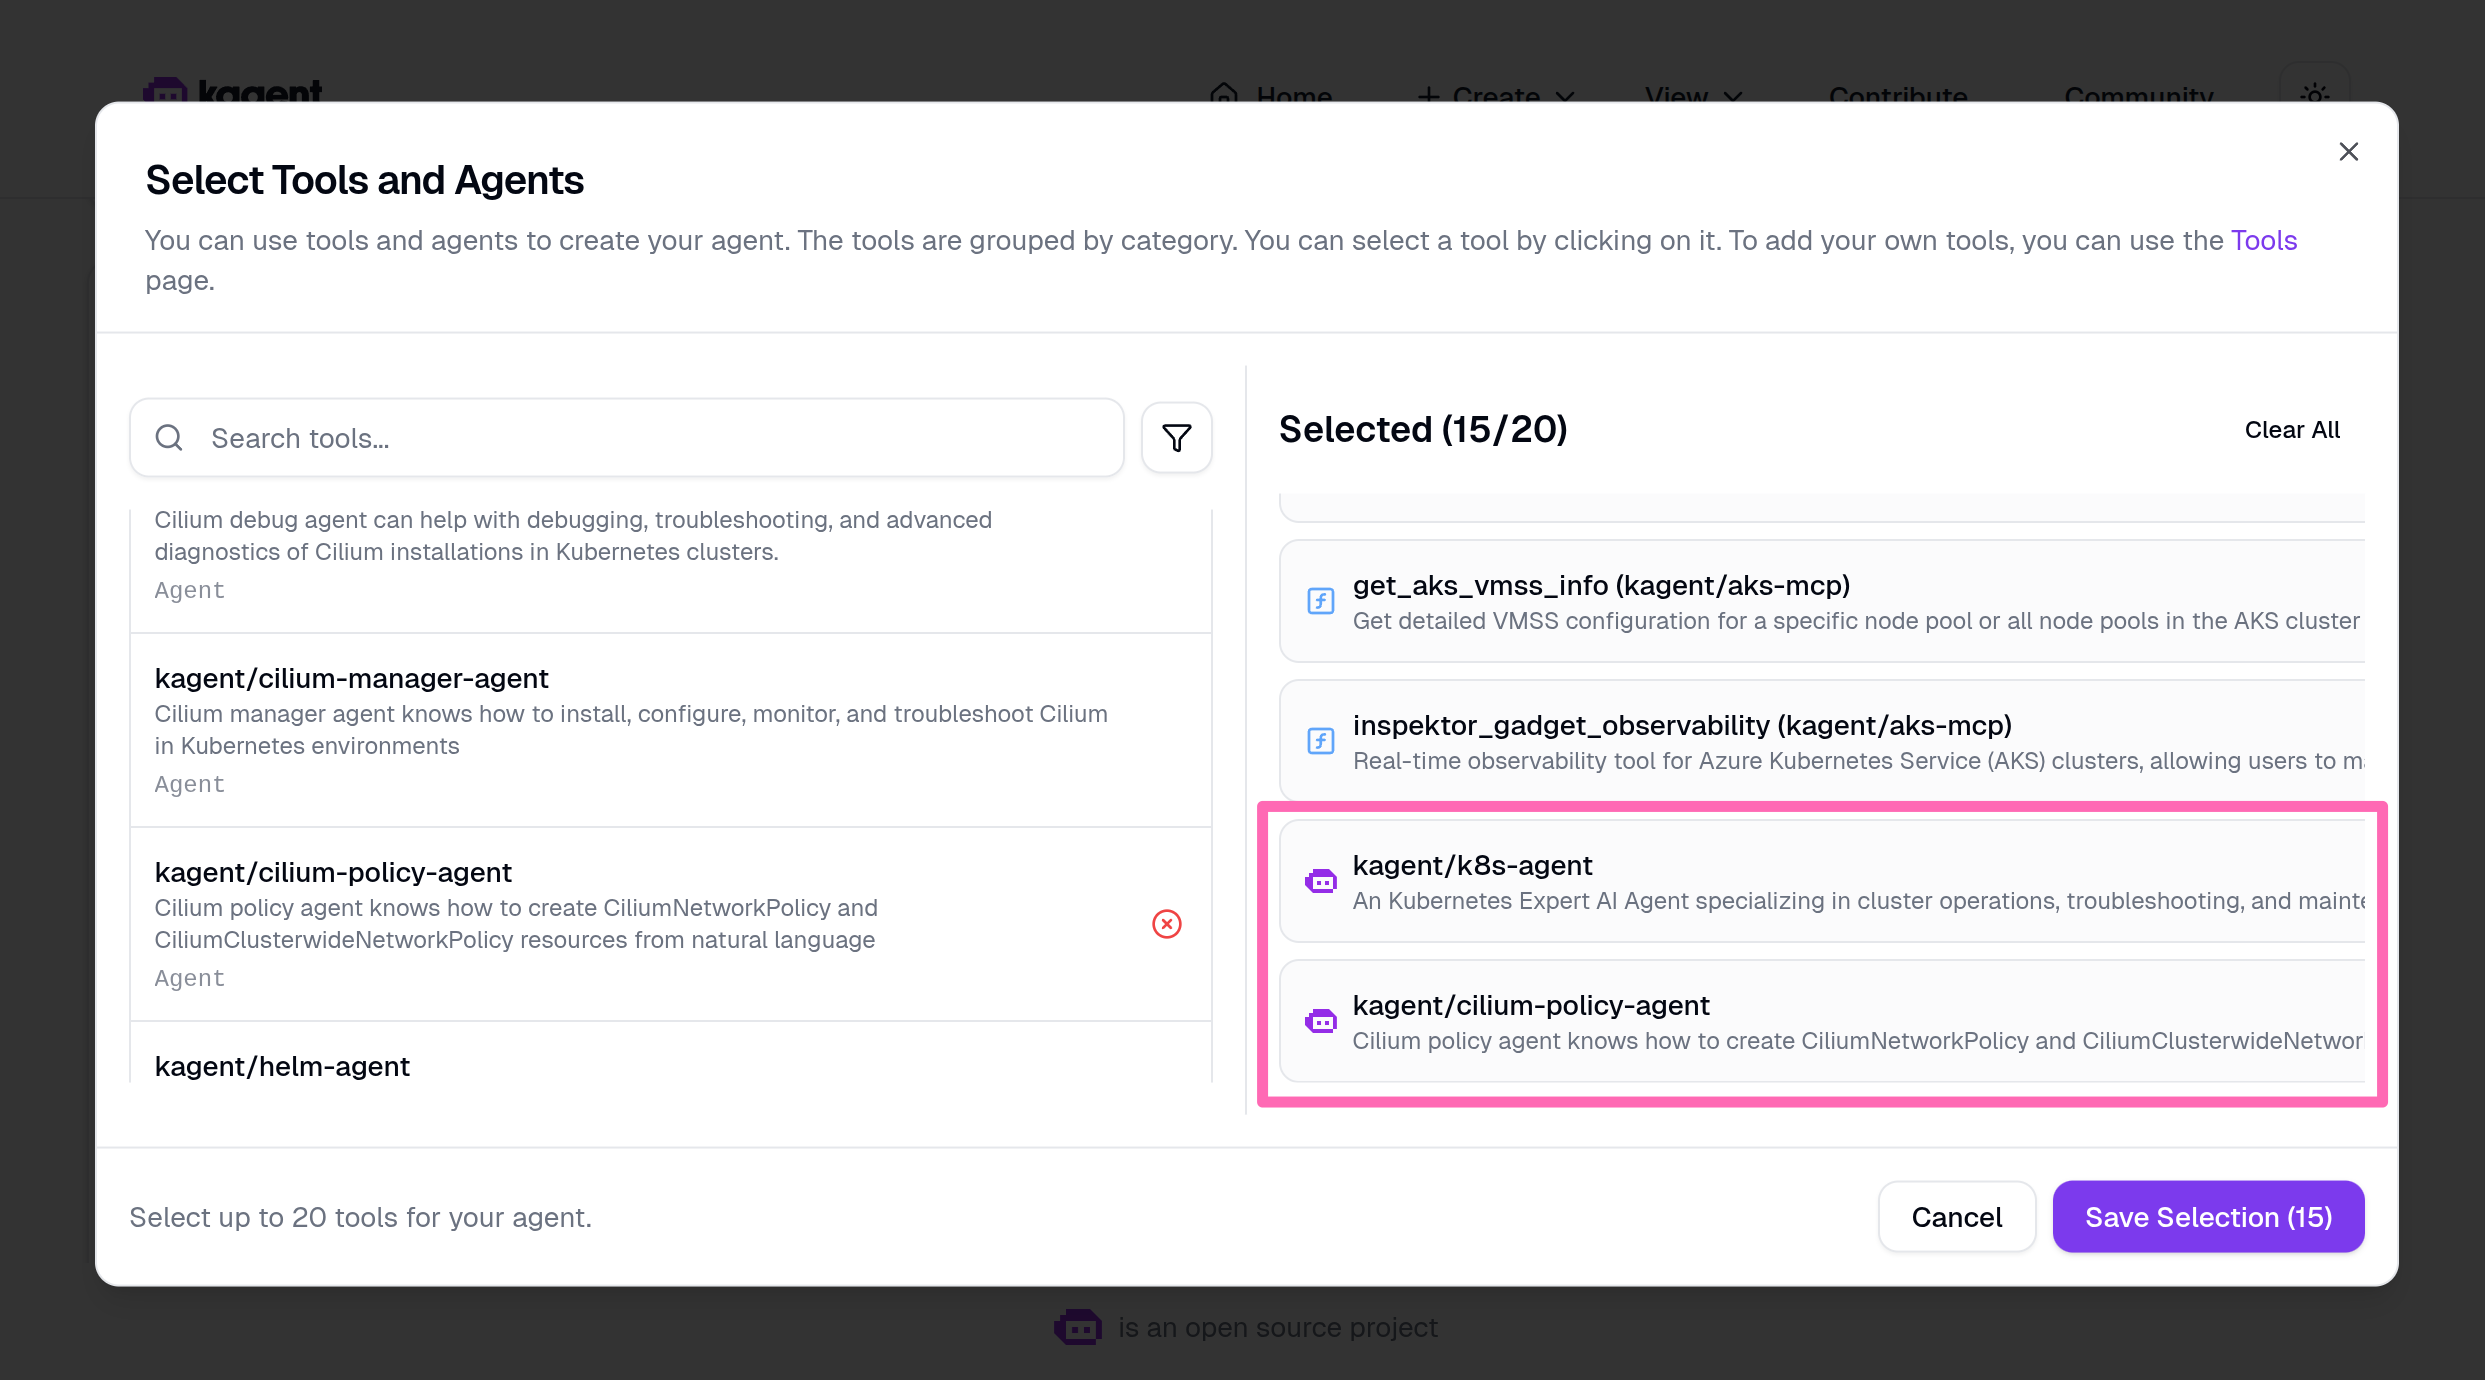
- Select Save Selection then scroll to the bottom of the page and select Update Agent to save the changes.
Try the multi-agent system
Ask the aks-agent to perform a task that requires collaboration between agents.
Can you please help me implement a CiliumNetworkPolicy to block all ingress traffic in the "pets" namespace?
The AKS agent should delegate the task to more specialized agents (in this case the cilium-policy-agent). This hierarchical architecture creates a more capable system where each agent contributes domain expertise.
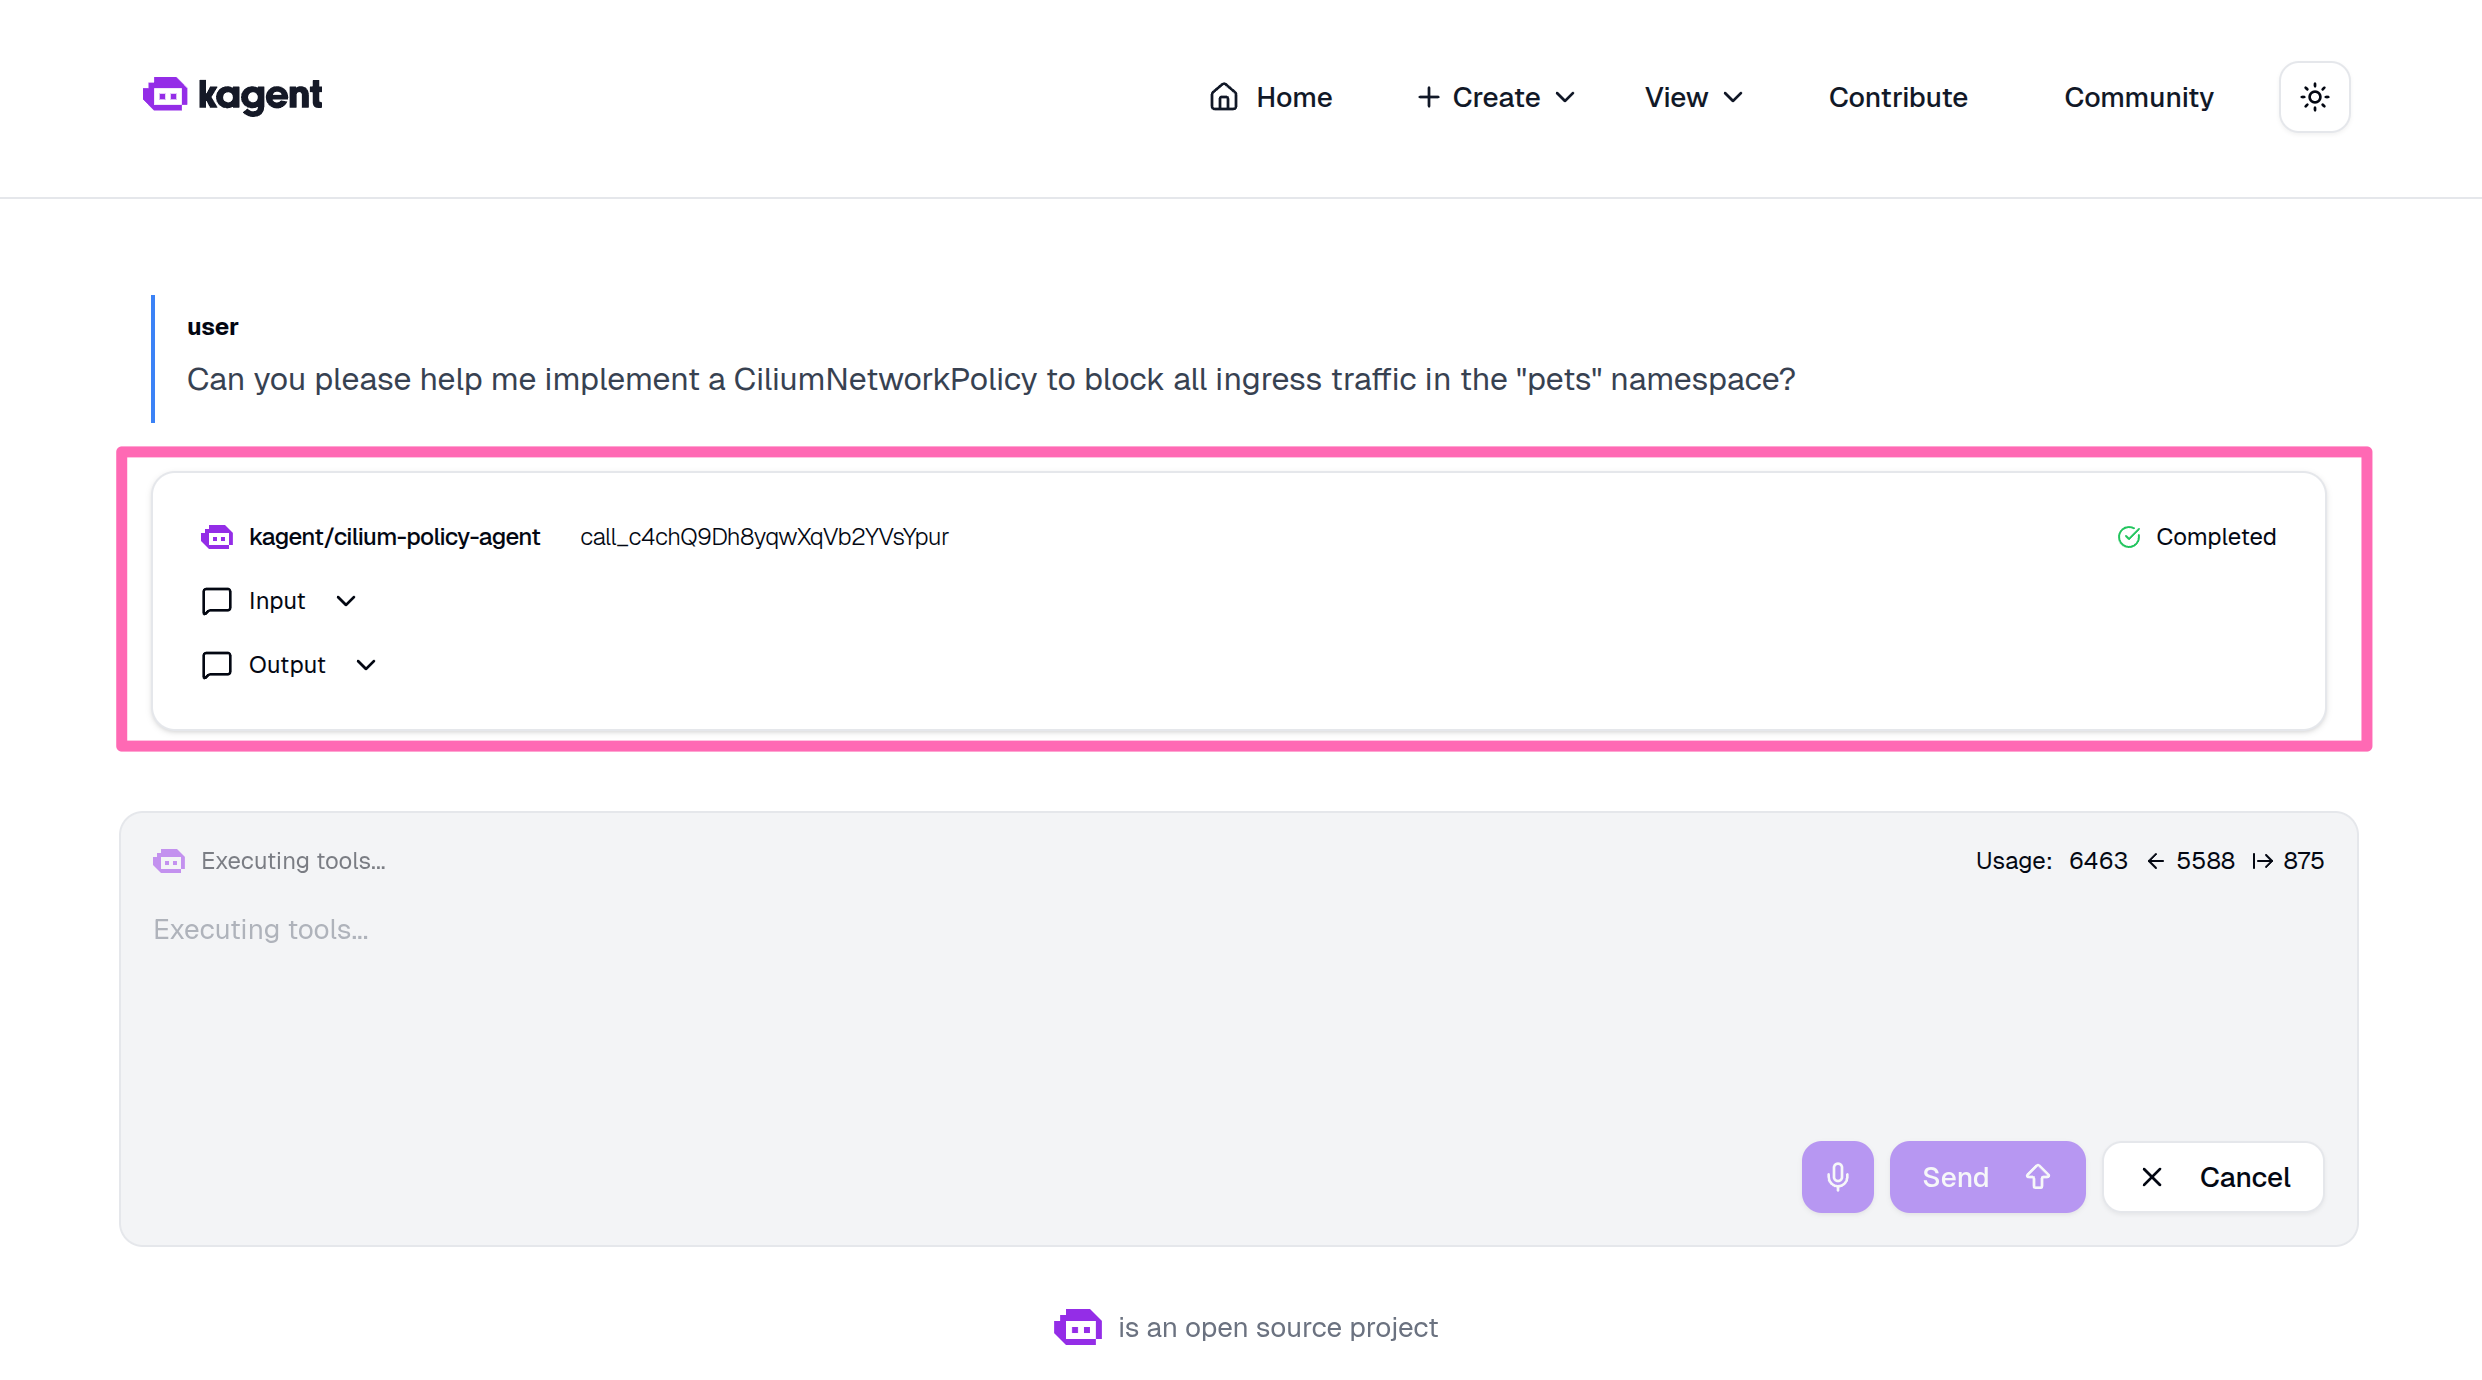
If you are prompted to confirm the action to apply the network policy, you can ignore it and move on.
Troubleshooting Challenges
Now that you've learned to use all three agent approaches, it's time to put them into practice. The cluster has been intentionally broken in multiple ways - at the infrastructure, application, and authentication levels. Your task is to diagnose what went wrong and fix it using the agents you deployed.
Your mission: Use GitHub Copilot with the AKS MCP server, the Agentic CLI for AKS, or kagent to figure out what's broken and fix it.
Don't worry if you get stuck - there are hints in each challenge, and you can always inspect the setup script to see exactly what was broken.
Prepare the cluster for troubleshooting challenges
Before attempting the challenges, you need to intentionally break the cluster. A script does this for you, but it won't tell you what it's breaking - that's for you to figure out!
Running this script will create multiple issues in your cluster across infrastructure, application, and authentication layers. You'll use agents to diagnose and fix all issues in the challenges section.
If you want to know exactly what will break, you can inspect the script at setup-cluster-issues.sh.
Ensure your environment variables are still exported (including AI_API_BASE from earlier), then run:
curl -fsSL https://raw.githubusercontent.com/Azure-Samples/aks-labs/refs/heads/main/docs/ai-assisted-operations/managing-aks-with-ai-agents-and-mcp/setup-cluster-issues.sh | bash
The script will use the AI_API_BASE environment variable if available to configure a service that relies on Azure AI Foundry.
Expected output:
🔧 Breaking cluster...

✓ Issue 1 setup completed
✓ Issue 2 setup completed

✅ Cluster is now broken. Use agents to figure out what's wrong!
   (Hint: Check the source of this script if you get stuck)
One more thing... for the AKS MCP server to have the necessary permissions to diagnose and fix the issues in the challenges, you need to grant the MCP server's service account (aks-mcp in the kagent namespace) the cluster-admin ClusterRole. This gives it full access to perform diagnostics and management operations on the cluster.
In the terminal, run the following command to apply the ClusterRoleBinding.
kubectl apply -f - <<EOF
apiVersion: rbac.authorization.k8s.io/v1
kind: ClusterRoleBinding
metadata:
  name: aks-mcp-cluster-admin
subjects:
- kind: ServiceAccount
  name: aks-mcp
  namespace: kagent
roleRef:
  kind: ClusterRole
  name: cluster-admin
  apiGroup: rbac.authorization.k8s.io
EOF
With the cluster broken, and AKS MCP granted additional permissions for troubleshooting, let's continue to the troubleshooting challenges.
Remember when using Agentic CLI for AKS or kagent, the quality of the insights and recommendations you get will depend on the model you are using; which in this lab is gpt-5-mini. If you have access to a more powerful model, feel free to update the agent configurations to use that model for better results. You might have access to more powerful models through VS Code GitHub Copilot or through your Azure OpenAI service, so don't hesitate to experiment with different models to see how it impacts the agent's performance in diagnosing and fixing the cluster issues.
Challenge 1: Is the store closed for business?
Scenario: Users report that they can't access the store-admin application in the pets namespace. No services in the namespace are reachable, even though the pods appear to be running.
To reproduce the issue, try to access the store-admin service:
IP_ADDRESS=$(kubectl get svc store-admin -n pets -o jsonpath='{.status.loadBalancer.ingress[0].ip}')
curl --connect-timeout 5 http://$IP_ADDRESS
Use an agent to figure out what's wrong and fix it. Try one of these prompts to get started:
- kagent: "Why can't users reach the store-admin service over http? The store-admin service is the pets namespace"
- Agentic CLI for AKS: "Users can't access the store-admin service running in the pets namespace. Help me figure out why."
- GitHub Copilot Agent in VS Code: "@aks-mcp Help me investigate why no services are reachable in the pets namespace."
Hint (expand if you're stuck)
A NetworkPolicy named deny-all-ingress is blocking all ingress traffic to every pod in the pets namespace. You can fix this by either removing the policy entirely or by adding a new ingress rule that allows traffic to the store-admin and store-front pods.
To test if your fix worked, run the following command to get the IP address of the store-admin service, then try to curl it.
IP_ADDRESS=$(kubectl get svc store-admin -n pets -o jsonpath='{.status.loadBalancer.ingress[0].ip}')
curl -IL http://$IP_ADDRESS
You should see a successful response with HTTP status code 200.
Challenge 2: Hello, AI... or not?
Scenario: With the store-admin site up and running again, users report that the AI-generated product descriptions feature isn't working.
To reproduce the issue:
- Run
echo http://$IP_ADDRESSto print the URL of the store-admin service in the terminal - Navigate to the store-admin site using the URL you just printed in your web browser
- Click on the Products tab in the navigation bar
- Click the Add Product button
- Enter a product name and related keywords (comma-separated)
- Click the Ask AI Assistant button
If you don't see the Ask AI Assistant button, that's a problem too
You should see a "thinking..." message, but then nothing happens and no product description is generated.
The feature relies on the ai-service pod making inference calls to Azure AI Foundry. Investigate the issue and get the AI-generated product descriptions working again.
The challenge is complete when the AI-generated product description feature is working again in the store-admin application.
Use an agent to diagnose why the AI feature isn't working and fix it. Try one of these prompts to get started:
- kagent: "The ai-service doesn't seem to be working correctly. Users are reporting nothing happens when they click the 'Ask AI Assistant' button in the store-admin site. Investigate and see if there are potential network or authentication issues."
- Agentic CLI for AKS: "The AI-generated product descriptions feature in store-admin isn't working. Help me investigate the ai-service pod in the pets namespace."
- GitHub Copilot with AKS MCP: "@aks-mcp Why isn't the ai-service working in the pets namespace? Check its logs and configuration."
Hints (expand if you're stuck)
Workload identity misconfiguration:
The ai-service is deployed with workload identity using the same managed identity used for the aks-mcp server, but the ServiceAccount annotation is misconfigured, so the workload identity token exchange fails and the pod can't authenticate to Azure AI Foundry.
To fix this:
- First, confirm the issue by checking the ai-service ServiceAccount:
kubectl get sa ai-service -n pets -oyaml
You should see an annotation like azure.workload.identity/client-id: 00000000-0000-0000-0000-000000000000.
- Get the correct client ID of the managed identity you created earlier:
echo $CLIENT_ID
- Update the ServiceAccount annotation with the correct client ID:
kubectl patch serviceaccount ai-service -n pets --type='json' -p='[{"op": "replace", "path": "/metadata/annotations/azure.workload.identity~1client-id", "value":"'$CLIENT_ID'"}]'
- Restart the ai-service pod to pick up the updated credential:
kubectl rollout restart deployment ai-service -n pets
- Verify the pod is running:
kubectl get pods -n pets -l app=ai-service
Once the pod is in Running state, try the AI-generated product description feature again.
If you're still stuck, skim the source code of setup-cluster-issues.sh to see what was applied.
Challenge 3: Works on my cluster... but is it production-ready?
Scenario: The earlier issues are resolved and the application is working again. But the cluster was just "fixed," not hardened. Use the multi-agent system to audit the pets namespace and see what improvements are recommended.
Use the multi-agent system to audit the cluster across networking, security, and resiliency - then implement the recommendations.
Use the multi-agent system to audit the pets namespace and implement the top recommendations. Try this prompt to get started:
- In kagent, ask the aks-agent: "Review the pets namespace for best practices across networking, security, and resiliency. Then implement the top recommendations."
Hint (expand if you're stuck)
The aks-agent should delegate to multiple specialized agents:
- cilium-policy-agent - Analyze pod-to-pod communication and recommend network policies that allow only required traffic (store-front/store-admin to backend services, ai-service outbound to Azure AI Foundry)
- k8s-agent - Check resource requests/limits, replica counts, and probe configurations across Deployments
- aks-agent (via AKS MCP tools) - Pull Azure Advisor recommendations for security and operational excellence
After implementing changes, verify the store-admin application loads and the AI-generated product descriptions feature still works.
To verify your improvements, check that the agent's recommendations were applied:
# Verify network policies exist in the pets namespace
kubectl get networkpolicy -n pets

# Verify resource requests and limits are set on all containers
kubectl get pods -n pets -o jsonpath='{range .items[*]}{.metadata.name}{"\t"}{range .spec.containers[*]}{.name}: requests={.resources.requests}, limits={.resources.limits}{"\n"}{end}{end}'
Confirm that the store-admin application still works end-to-end, including the AI-generated product descriptions feature.
Summary
In this lab, you explored three complementary approaches to AI-powered AKS operations:
- AKS MCP Server with GitHub Copilot - You installed the MCP server locally and used GitHub Copilot to discover available tools and run read-only diagnostics against your cluster.
- Agentic CLI for AKS - You configured and launched a terminal-based AI agent that analyzes telemetry signals and provides actionable insights through natural language queries.
- kagent - You deployed in-cluster AI agents, connected them to the AKS MCP Server, and built a multi-agent system where specialized agents collaborate on complex tasks.
Along the way, you practiced troubleshooting real cluster issues - from network policies blocking traffic to misconfigured workload identity credentials - using AI agents to diagnose root causes and guide remediation.
Learn more
To continue your learning journey with AI-powered operations and MCP agents, check out these resources:
- AKS MCP Server - github.com/Azure/aks-mcp
- Agentic CLI for AKS - github.com/Azure/cli-agent-for-aks
- Azure AI Foundry - learn.microsoft.com/azure/ai-foundry
- Model Context Protocol documentation - modelcontextprotocol.io
- Agent Skills documentation - agentskills.io
- kagent project - kagent.dev
Cleanup
To clean up the resources created in this lab, run the following command to delete the resource group. If you want to use the resources again, you can skip this step.
az group delete \
--name ${RG_NAME} \
--yes \
--no-wait
This will delete the resource group and all its contents.
Be sure to purge the Azure AI Foundry resource you created to free up any associated quota.
If you just want to reset the cluster state by removing the issues introduced in the challenges, run the following cleanup script:
curl -fsSL https://raw.githubusercontent.com/Azure-Samples/aks-labs/refs/heads/main/docs/ai-assisted-operations/managing-aks-with-ai-agents-and-mcp/cleanup-cluster-issues.sh | bash