Snippy Tutorial: Building an AI-Enhanced Code Snippet Manager
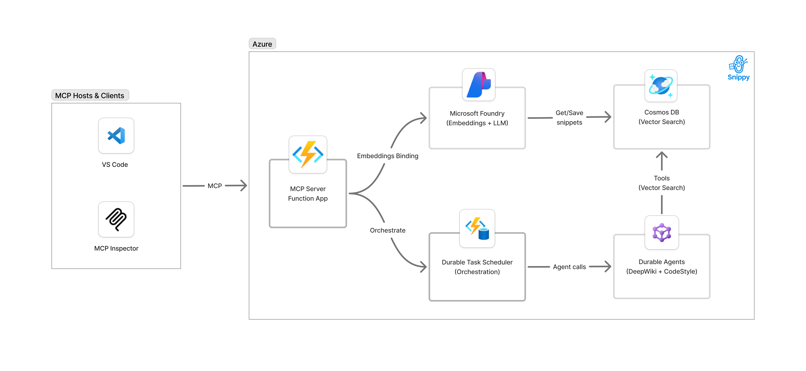
This tutorial guides you through building Snippy, an intelligent code snippet manager using Azure Functions. You'll save and retrieve code snippets in Azure Cosmos DB with vector search enabled, using Azure OpenAI embeddings to capture semantic meaning. You'll also create AI agents that generate documentation and coding standards from your snippets.
The key innovation is exposing your Azure Functions as MCP (Model Context Protocol) Tools that AI assistants like GitHub Copilot can discover and invoke directly.
You'll implement both patterns:
- Azure Functions as consumable tools for AI agents
- Azure Functions that create and orchestrate AI agents
This dual approach demonstrates how serverless functions can seamlessly integrate with modern AI workflows through standard protocols.
Prerequisites
Before starting this tutorial, ensure you have the following installed and configured on your local machine:
Required Software
- Visual Studio Code - Your primary development environment
- Python 3.11 or 3.12
- uv package manager (faster alternative to pip) - Install with:
- macOS/Linux:
curl -LsSf https://astral.sh/uv/install.sh | sh - Windows:
powershell -c "irm https://astral.sh/uv/install.ps1 | iex" - Git for source control
- Azure CLI for managing Azure resources - Installation guide
- Azure Functions Core Tools v4 - Installation guide
- Azure Developer CLI (azd) - Installation guide
- Docker Desktop for the Durable Task emulator and Azurite support
Azure Account
- An active Azure subscription with permissions to create resources
- GitHub account with access to GitHub Copilot
Knowledge Requirements
- Basic understanding of Python
- Familiarity with Azure Functions concepts
- Understanding of REST APIs
- Basic knowledge of Git and command-line tools
Tutorial Steps
Follow these steps in order to complete the tutorial:
- Set Up Azure Resources - Provision Azure infrastructure with Azure Developer CLI
- Code Review - Understanding MCP Tools and AI Agents - Explore the implementation patterns
- Local Setup and Installing Python Dependencies - Set up your development environment
- Verify Local Settings After Provisioning - Confirm configuration is correct
- Start Docker Compose for Durable Task Support - Run local services for agent state management
- Run Functions Locally and Test with Cloud Resources - Test the application end-to-end
- Explore MCP Tools in GitHub Copilot (Local Endpoint) - Connect Copilot to your local functions
- Test Multi-Agent Orchestration with Durable Task Scheduler - Run complex AI workflows
- Deploy the Application Code to Azure - Push your code to the cloud
- Connect VS Code / Copilot to the Cloud MCP Endpoint - Use deployed functions from Copilot
- Monitor Cloud Orchestration with DTS Dashboard - Observe production workflows
- Clean Up Azure Resources - Remove resources to avoid charges
What You'll Build
By the end of this tutorial, you will have:
- Serverless API with Azure Functions for saving/retrieving code snippets
- Vector Search using Azure OpenAI embeddings and Cosmos DB
- MCP Tools that GitHub Copilot can discover and use
- AI Agents that generate documentation and style guides from your code
- Multi-Agent Orchestration using Durable Functions
Technologies Used
- Azure Functions (Python v2, Blueprint model)
- Azure OpenAI (GPT-4o-mini, text-embedding-3-small)
- Azure Cosmos DB (with vector search)
- Model Context Protocol (MCP)
- Microsoft Agent Framework
- Durable Functions & Durable Task Scheduler
Ready to get started? Head to Step 1: Set Up Azure Resources!