2.1 Development Environment Setup Options
There are two main options for setting up your development environment, using a Dev Container or a Local Development Environment. It is recommended to use a Dev Container.
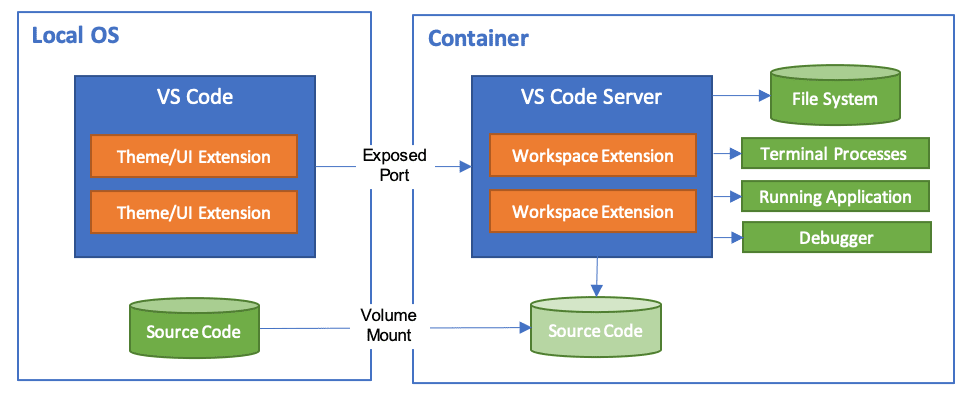
Dev Containers are useful tools as they help minimize setup and configuration issues that may occur (sometimes known as the "it works on my machine" problem).
There are a lot of prerequisite installation requirements for this solution accelerator, if you use the Dev Container option, many of these prerequisites are installed automatically
inside the container without variability or risk of configuration drift.
Alternatively, if you prefer to work locally without a dev container, you can install and configure each prerequisites yourself on your operating system. The following sections walk you through how to do either option.
For more background on dev containers, read the documentation.
Option 1 (Recommended) - Setup Using Dev Container
Using a Dev Container will minimize the amount of software you need to install on your local operating system. The following is the minimum needed to build and run the dev container:
Install Software
The required development environment uses a Visual Studio (VS) Code editor with a Python runtime. To complete this lab on your own computer, you must install the following required software. On completing this step, you should have installed:
- Windows Terminal (Only if using Windows)
- WSL 2 and Ubuntu (Only if using Windows)
- Git
- Docker desktop
- Visual Studio Code
- pgAdmin
Install Windows Terminal (Only if using Windows)
Much nicer than the old cmd.exe or bare PowerShell.
- From Microsoft Store: Windows Terminal
Install WSL 2 and Ubuntu (Only if using Windows)
Windows Subsystem for Linux (WSL) is a powerful tool that allows the ability to run Linux based Docker images on the Windows operating system. Plus, WSL 2 provides advantages to using Docker Desktop on Windows, such as better memory management for large containers. WSL 2 is needed because the dev container for this solution accelerator is built on an Ubuntu Linux base image.
-
First we need to install Ubuntu from the Microsoft App Store:
- Open "Microsoft Store" from your Start Menu
- Search for "Ubuntu"
- For the search result titled simply "Ubuntu", select and click "Get" to install
- Reboot if it asks.
-
Open PowerShell as Admin and run:
1wsl --install -
It will install WSL 2.
- Reboot if it asks.
-
Test the installation:
- Opening Terminal in PowerShell shell, and type `wsl'
- This should load an Ubuntu Linux Shell command line and if you type
psyou will be a list of processes, this means everything works correctly
Install Git
Git enables you to manage your code by tracking changes, maintaining a version history, and facilitating collaboration with others. This helps in organizing and maintaining the integrity of your project's development.
-
Download Git from https://git-scm.com/downloads.
-
Run the installer using the default options.
Install Docker Desktop
Docker Desktop is an application that allows you to build, share, and run containerized applications on your local machine. It provides a user-friendly interface to manage Docker containers, images, and networks. By streamlining the containerization process, Docker Desktop helps you develop, test, and deploy applications consistently across different environments.
-
Download and install Docker Desktop for your OS:
-
Configure Docker Desktop to use WSL 2 based engine
- Open Docker Desktop
- Click Settings
- Click General
- Select
Use the WSL 2 based engine - Click
Apply & restart
-
Configure Docker Desktop to use WSL 2 integration
- Open Docker Desktop
- Click Resources
- Click WSL integration
- Select
Enable integration with me default WSL distro - Select
Ubuntu - Click
Apply & restart
Install Visual Studio Code
Visual Studio Code is a versatile, open-source code editor that combines powerful features with an intuitive interface to help you efficiently write, debug, and customize projects. Note that
the needed extensions will automatically be installed within the dev container, so no need to install any additional extensions now.
-
Download and install from https://code.visualstudio.com/download.
- Use the default options in the installer.
-
After installation completed, launch Visual Studio Code.
-
In the Extensions menu, search for and install the following extensions from Microsoft:
-
Close VS Code.
Install pgAdmin
Throughout this workshop, you will use pgAdmin to run queries against your PostgreSQL database. pgAdmin is the leading Open Source management tool for Postgres.
-
Download pgAdmin from https://www.pgadmin.org/download/.
-
Run the installer using the default options.
Option 2 - Setup Local Development Environment
Install Software
The required development environment uses a Visual Studio (VS) Code editor with a Python runtime. To complete this lab on your own computer, you must install the following required software. On completing this step, you should have installed:
- Windows Terminal (Only if using Windows)
- Azure command-line tools
- PowerShell 7
- Git
- Python 3.11+
- Node.js
- Docker desktop
- Visual Studio Code and required extensions
- pgAdmin
Install Windows Terminal (Only if using Windows)
Much nicer than the old cmd.exe or bare PowerShell.
- From Microsoft Store: Windows Terminal
Install Azure command-line tools
In this task, you will install both the Azure CLI and the Azure Developer CLI (azd).
- The Azure CLI enables you to execute Azure CLI commands from a command prompt or VS Code terminal on your local machine.
- The Azure Developer CLI (
azd) is an open-source tool that accelerates provisioning and deploying app resources on Azure.
-
Install or upgrade to the latest version of the Azure CLI by following the instructions for your OS at https://learn.microsoft.com/cli/azure/install-azure-cli
Upgrade to latest version of Azure CLI
If you already have the Azure CLI installed, you'll need to be sure to upgrade to the latest version. This guide required v2.69.0 or greater. You can use this command to upgrade to the latest version:
1az upgrade -
Once installed, open a command prompt on your machine and verify the installation by running the following:
1az version -
Next, install the
mlextension to the Azure CLI.About the ml extension
The
mlextension to the Azure CLI is the enhanced interface for Azure Machine Learning. It enables you to train and deploy models from the command line, with features that accelerate scaling data science up and out while tracking the model lifecycle.To install the
mlextension you should first remove any existing installation of the extension and also the CLI v1azure-cli-mlextension:1 2
az extension remove -n azure-cli-ml
az extension remove -n ml
Then, run the following to install the latest version of the
mlextension:1az extension add -n ml -
Install or upgrade Azure Developer CLI to the latest version by following the instructions for your OS at https://learn.microsoft.com/azure/developer/azure-developer-cli/install-azd.
Upgrade to latest version of Azure Developer CLI
If you already have the Azure Developer CLI installed, you'll need to be sure to upgrade to the latest version. This guide required v1.12 or greater.
-
Execute the following command from a terminal prompt to verify the tools were installed:
1azd version
Install PowerShell 7
To run the provision and deployment of the solution accelerator, you will need to have PowerShell 7 installed. By default, Windows 11 does not come with PowerShell 7.
-
Install or upgrade to PowerShell 7 by following the installation instructions for your OS:
-
Once installed, open a command prompt on your machine and verify the installation by running the following:
1pwsh -
The command prompt should show the version of PowerShell as
7.5.0or greater.
Error running pwsh command
If there's an error running the pwsh command, then PowerShell 7 is not installed.

Install Git
Git enables you to manage your code by tracking changes, maintaining a version history, and facilitating collaboration with others. This helps in organizing and maintaining the integrity of your project's development.
-
Download Git from https://git-scm.com/downloads.
-
Run the installer using the default options.
Install Python
Python is the programming used to build the backend API for the solution. By utilizing Python's versatile programming capabilities and Azure Database for PostgreSQL's generative AI and vector search capabilities, you can create powerful and efficient AI copilots and streamlining complex workflows.
-
Download Python 3.11+ from https://python.org/downloads.
-
Run the installer using the default options.
-
Use the following command from a terminal prompt to verify Python was installed:
1python --version
Install Node.js
Node.js is an open-source runtime environment that lets you run JavaScript code outside of a browser. It's ideal for building scalable network applications and works seamlessly with REACT single-page applications by providing a backend environment to handle server-side logic and API requests. This allows for efficient development and smooth interactions between the frontend and backend.
-
Download Node.js from https://nodejs.org/en/download/, ensuring you select the most recent LTS version and your correct OS.
-
Run the installer using the default options.
Install Docker Desktop
Docker Desktop is an application that allows you to build, share, and run containerized applications on your local machine. It provides a user-friendly interface to manage Docker containers, images, and networks. By streamlining the containerization process, Docker Desktop helps you develop, test, and deploy applications consistently across different environments.
Install Visual Studio Code (and extensions)
Visual Studio Code is a versatile, open-source code editor that combines powerful features with an intuitive interface to help you efficiently write, debug, and customize projects.
-
Download and install from https://code.visualstudio.com/download.
- Use the default options in the installer.
- Make sure to check "Add to PATH" during install.
-
After installation completed, launch Visual Studio Code.
-
In the Extensions menu, search for and install the following extensions from Microsoft:
-
Close VS Code.
Install pgAdmin
Throughout this workshop, you will use pgAdmin to run queries against your PostgreSQL database. pgAdmin is the leading Open Source management tool for Postgres.
-
Download pgAdmin from https://www.pgadmin.org/download/.
-
Run the installer using the default options.