call-center-voice-agent-accelerator
Call Center Voice Agent Accelerator with Azure Voice Live API
| ![]() |
| 
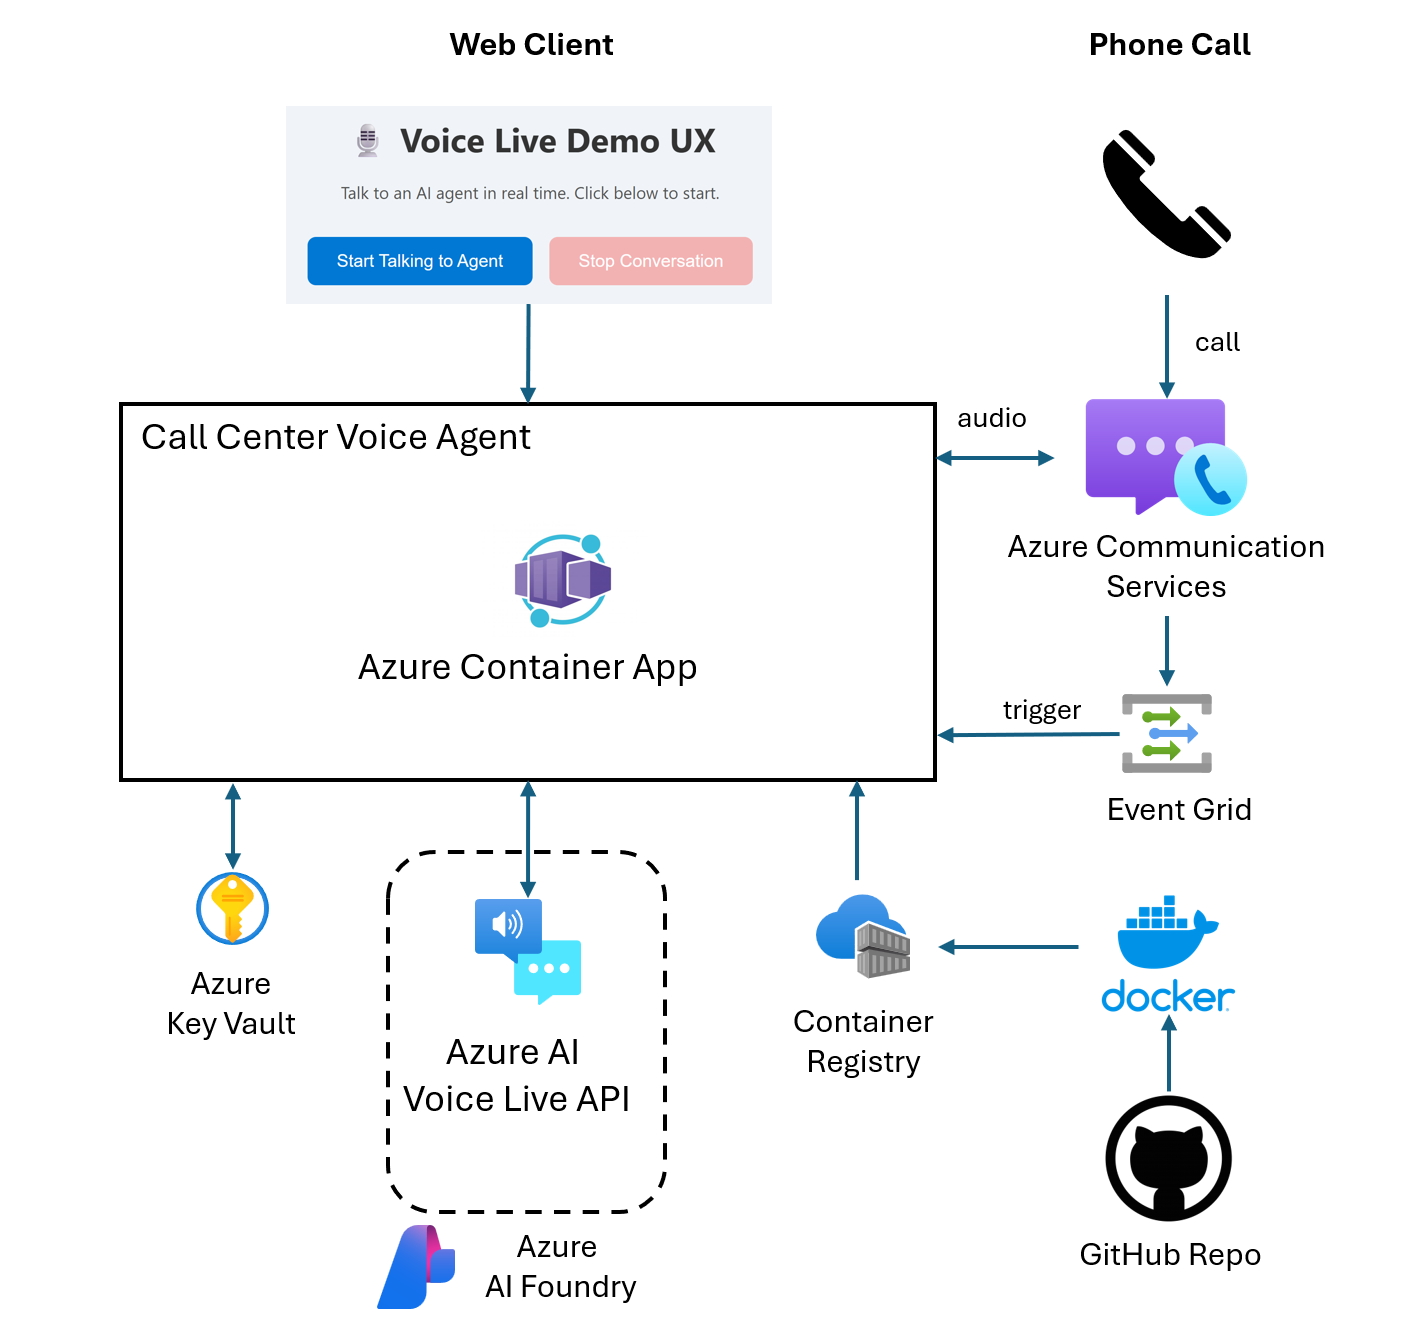
Welcome to the Call Center Real-time Voice Agent solution accelerator. It’s a lightweight template to create speech-to-speech voice agents that deliver personalized self-service experiences and natural-sounding voices, seamlessly integrated with telephony systems. This solution accelerator uses Azure Voice Live API and Azure Communication Services — Start locally, deploy later to Azure Web App. No PSTN number needed.
The Azure voice live API is a solution enabling low-latency, high-quality speech to speech interactions for voice agents. The API is designed for developers seeking scalable and efficient voice-driven experiences as it eliminates the need to manually orchestrate multiple components. By integrating speech recognition, generative AI, and text to speech functionalities into a single, unified interface, it provides an end-to-end solution for creating seamless experiences. Learn more about Azure Voice Live API.
The Azure Communication Services Calls Automation APIs provide telephony integration and real-time event triggers to perform actions based on custom business logic specific to their domain. Within the call automation APIs developers can use simple AI powered APIs, which can be used to play personalized greeting messages, recognize conversational voice inputs to gather information on contextual questions to drive a more self-service model with customers, use sentiment analysis to improve customer service overall. Learn more about Azure Communication Services (Call Automation).
Note: With any AI solutions you create using these templates, you are responsible for assessing all associated risks, and for complying with all applicable laws and safety standards. Learn more in the transparency documents for Voice Live API and Azure Communication Services.
Features
This sample demonstrates how to build a real-time voice agent using the Azure Speech Voice Live API.
The solution includes:
- A backend service that connects to the Voice Live API for real-time ASR, LLM and TTS
- Two client options: Web browser (microphone/speaker) and Azure Communication Services (ACS) phone calls
- Ambient Scenes (optional): Add realistic background audio (office, call center) or use custom audio files to simulate real-world environments
- Flexible configuration to customize prompts, ASR, TTS, and behavior
- Easy extension to other client types such as Audiohook
You can also try the Voice Live API via Azure AI Foundry for quick experimentation before deploying this template to your own Azure subscription.
Architecture diagram
| |
|—|
|
|—|
Getting Started
| ![]() |
|
Prerequisites and Costs
To deploy this solution accelerator, ensure you have access to an Azure subscription with the necessary permissions to create resource groups and resources. Follow the steps in Azure Account Set Up.
Check the Azure Products by Region page and select a region where the following services are available: Azure AI Foundry Speech, Azure Communication Services, Azure Container Apps, and Container Registry.
Here are some example regions where the services are available: East US2, West US2, Southeast Asia, Central India, Sweden Central. Pricing varies per region and usage, so it isn’t possible to predict exact costs for your usage. The majority of the Azure resources used in this infrastructure are on usage-based pricing tiers. However, Azure Container Registry has a fixed cost per registry per day.
Use the Azure pricing calculator to calculate the cost of this solution in your subscription.
| Product | Description | Cost |
|---|---|---|
| Azure Speech Voice Live | Low-latency and high-quality speech to speech interactions | Pricing |
| Azure Communication Services | Server-based intelligent call workflows | Pricing |
| Azure Container Apps | Hosts the web application frontend | Pricing |
| Azure Container Registry | Stores container images for deployment | Pricing |
Here are some developers tools to set up as prerequisites:
- Azure CLI:
az - Azure Developer CLI:
azd - Python:
python - UV:
uv - Optionally Docker:
docker
Deployment Options
Pick from the options below to see step-by-step instructions for: GitHub Codespaces, VS Code Dev Containers, Local Environments, and Bicep deployments.
Deploy in GitHub Codespaces
### GitHub Codespaces You can run this solution using GitHub Codespaces. The button will open a web-based VS Code instance in your browser: 1. Open the solution accelerator (this may take several minutes): [](https://codespaces.new/Azure-Samples/call-center-voice-agent-accelerator) 2. Accept the default values on the create Codespaces page. 3. Open a terminal window if it is not already open. 4. Follow the instructions in the helper script to populate deployment variables. 5. Continue with the [deploying steps](#deploying).Deploy in VS Code Dev Containers
### VS Code Dev Containers You can run this solution in VS Code Dev Containers, which will open the project in your local VS Code using the [Dev Containers extension](https://marketplace.visualstudio.com/items?itemName=ms-vscode-remote.remote-containers): 1. Start Docker Desktop (install it, if not already installed) 2. Open the project: [](https://vscode.dev/redirect?url=vscode://ms-vscode-remote.remote-containers/cloneInVolume?url=https://vscode.dev/redirect?url=vscode://ms-vscode-remote.remote-containers/cloneInVolume?url=https://github.com/Azure-Samples/call-center-voice-agent-accelerator) 3. In the VS Code window that opens, once the project files show up (this may take several minutes), open a terminal window. 4. Follow the instructions in the helper script to populate deployment variables. 5. Continue with the [deploying steps](#deploying).Deploy in your local environment
### Local environment If you're not using one of the above options for opening the project, then you'll need to: 1. Make sure the following tools are installed: * `bash` * [Azure Developer CLI (azd)](https://aka.ms/install-azd) 2. Download the project code: ```shell azd init -t Azure-Samples/call-center-voice-agent-accelerator/ ``` **Note:** the above command should be run in a new folder of your choosing. You do not need to run `git clone` to download the project source code. `azd init` handles this for you. 3. Open the project folder in your terminal or editor. 4. Continue with the [deploying steps](#deploying).Deploying
Once you’ve opened the project in Codespaces or in Dev Containers or locally, you can deploy it to Azure following the following steps.
To change the azd parameters from the default values, follow the steps here.
-
Login to Azure:
azd auth login -
Provision and deploy all the resources:
azd upIt will prompt you to provide an
azdenvironment name (like “flask-app”), select a subscription from your Azure account, and select a location (like “eastus”). Then it will provision the resources in your account and deploy the latest code. If you get an error with deployment, changing the location can help, as there may be availability constraints for some of the resources. -
When
azdhas finished deploying, you’ll see an endpoint URI in the command output. Visit that URI, and you should see the API output! 🎉 -
When you’ve made any changes to the app code, you can just run:
azd deploy
[!NOTE] AZD will also setup the local Python environment for you, using
venvand installing the required packages.
[!NOTE]
- Region: swedencentral is strongly recommended due to AI Foundry availability.
- Post-Deployment: You can also setup ACS Event Grid subscription and PSTN to use the ACS client.
Testing the Agent
After deployment, you can verify that your Voice Agent is running correctly using either the Web Client (for quick testing) or the ACS Phone Client (for simulating a real-world call center scenario).
🌐 Web Client (Test Mode)
Use this browser-based client to confirm your Container App is up and responding.
- Go to the Azure Portal and navigate to the Resource Group created by your deployment.
- Find and open the Container App resource.
- On the Overview page, copy the Application URL.
- Open the URL in your browser — a demo webpage should load.
- Click Start Talking to Agent to begin a voice session using your browser’s microphone and speaker.
- Click Stop Conversation to end the session.
⚠️ This web client is intended for testing purposes only. Use the ACS client below for production-like call flow testing.
📞 ACS Client (Call Center Scenario)
This simulates a real inbound phone call to your voice agent using Azure Communication Services (ACS).
1. Set Up Incoming Call Webhook
- In the same resource group, find and open the Communication Services resource.
- In the left-hand menu, click Events.
-
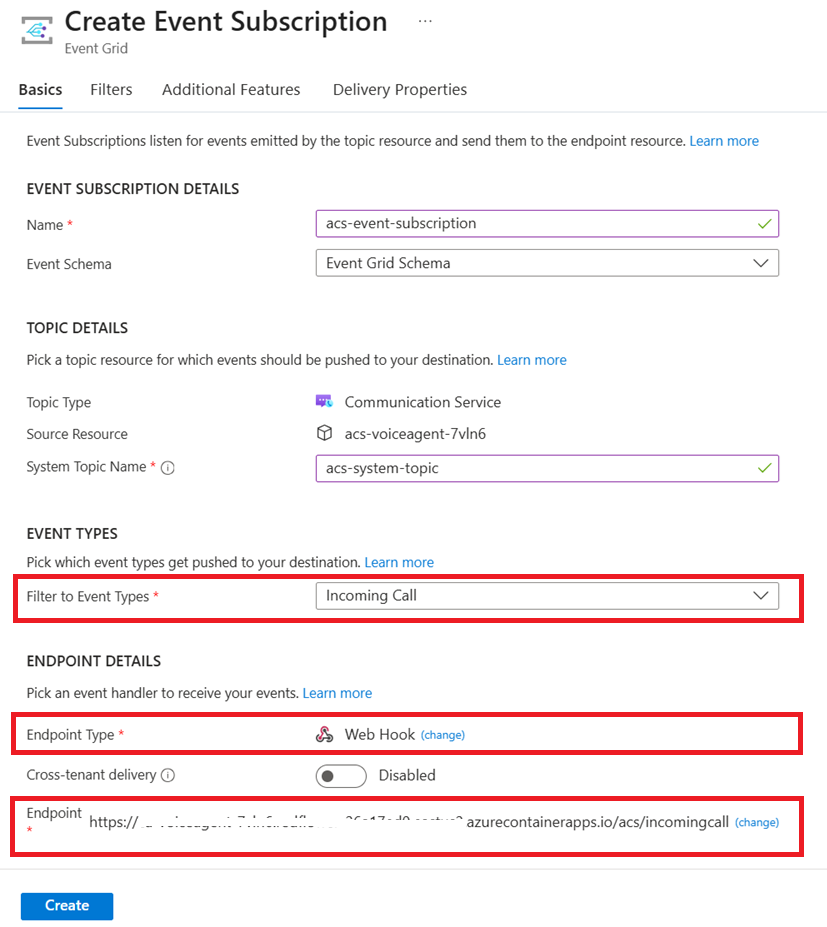
Click + Event Subscription and fill in the following:
- Event Type:
IncomingCall - Endpoint Type:
Web Hook - Endpoint Address:
https://<your-container-app-url>/acs/incomingcallReplace
<your-container-app-url>with the Application URL from your Container App.
- Event Type:
📸 Refer to the screenshot below for guidance:
2. Get a Phone Number
If you haven’t already, obtain a phone number for your ACS resource:
👉 How to get a phone number (Microsoft Docs)
3. Call the Agent
Once your event subscription is configured and the phone number is active:
- Dial the ACS number.
- Your call will connect to the real-time voice agent powered by Azure Voice Live.
Local execution
Once the environment has been deployed with azd up you can also run the application locally.
Please follow the instructions in the instructions in service
Optional Features
🎧 Ambient Scenes
Add realistic background audio to your voice agent to simulate real-world call center environments. This feature works for both web browser and phone (ACS) clients.
Available Presets:
| Preset | Description |
|---|---|
none |
Disabled (default) - clean audio with no background |
office |
Quiet office ambient (keyboard typing, soft murmurs) |
call_center |
Busy call center background (phones, conversations) |
| custom | Add your own audio files (see below) |
How to Enable:
- Set the
AMBIENT_PRESETenvironment variable in your.envfile:AMBIENT_PRESET=call_center - For Azure deployment, set it before running
azd up:azd env set AMBIENT_PRESET call_center azd up
Adjusting Volume:
The ambient volume is controlled by _ambient_gain in server/app/handler/ambient_mixer.py:
self._ambient_gain = 0.08 # Default: subtle background
| Value | Effect |
|---|---|
0.05 |
Very quiet (barely audible) |
0.08 |
Subtle (default) |
0.12 |
Moderate |
0.20 |
Noticeable |
Using Custom Audio Files:
You can add your own ambient audio files:
- Prepare your audio file with these requirements:
- Format: WAV (uncompressed PCM)
- Sample Rate: 24000 Hz
- Bit Depth: 16-bit signed
- Channels: Mono
- Duration: 30-60 seconds (will loop seamlessly)
-
Place the file in
server/app/audio/ - Register the preset in
server/app/handler/ambient_mixer.py:PRESETS = { "none": {"file": None}, "office": {"file": "office.wav"}, "call_center": {"file": "callcenter.wav"}, "my_custom": {"file": "my_audio.wav"}, # Add your preset } - Set
AMBIENT_PRESET=my_customin your.envfile
Guidance
Resource Clean-up
When you no longer need the resources created in this article, run the following command to power down the app:
azd down
If you want to redeploy to a different region, delete the .azure directory before running azd up again. In a more advanced scenario, you could selectively edit files within the .azure directory to change the region.
Resources
- 📖 Docs: Voice live overview
- 📖 Blog: Upgrade your voice agent with Azure AI Voice Live API
- 📖 Docs: Azure Speech
- 📖 Docs: Azure Communication Services (Call Automation)
Security Considerations
ACS currently does not support Managed Identity. The ACS connection string is stored securely in Key Vault and injected into the container app via its secret URL.
Additional Disclaimers
To the extent that the Software includes components or code used in or derived from Microsoft products or services, including without limitation Microsoft Azure Services (collectively, “Microsoft Products and Services”), you must also comply with the Product Terms applicable to such Microsoft Products and Services. You acknowledge and agree that the license governing the Software does not grant you a license or other right to use Microsoft Products and Services. Nothing in the license or this ReadMe file will serve to supersede, amend, terminate or modify any terms in the Product Terms for any Microsoft Products and Services.
You must also comply with all domestic and international export laws and regulations that apply to the Software, which include restrictions on destinations, end users, and end use. For further information on export restrictions, visit https://aka.ms/exporting.
You acknowledge that the Software and Microsoft Products and Services (1) are not designed, intended or made available as a medical device(s), and (2) are not designed or intended to be a substitute for professional medical advice, diagnosis, treatment, or judgment and should not be used to replace or as a substitute for professional medical advice, diagnosis, treatment, or judgment. Customer is solely responsible for displaying and/or obtaining appropriate consents, warnings, disclaimers, and acknowledgements to end users of Customer’s implementation of the Online Services.
You acknowledge the Software is not subject to SOC 1 and SOC 2 compliance audits. No Microsoft technology, nor any of its component technologies, including the Software, is intended or made available as a substitute for the professional advice, opinion, or judgement of a certified financial services professional. Do not use the Software to replace, substitute, or provide professional financial advice or judgment.
BY ACCESSING OR USING THE SOFTWARE, YOU ACKNOWLEDGE THAT THE SOFTWARE IS NOT DESIGNED OR INTENDED TO SUPPORT ANY USE IN WHICH A SERVICE INTERRUPTION, DEFECT, ERROR, OR OTHER FAILURE OF THE SOFTWARE COULD RESULT IN THE DEATH OR SERIOUS BODILY INJURY OF ANY PERSON OR IN PHYSICAL OR ENVIRONMENTAL DAMAGE (COLLECTIVELY, “HIGH-RISK USE”), AND THAT YOU WILL ENSURE THAT, IN THE EVENT OF ANY INTERRUPTION, DEFECT, ERROR, OR OTHER FAILURE OF THE SOFTWARE, THE SAFETY OF PEOPLE, PROPERTY, AND THE ENVIRONMENT ARE NOT REDUCED BELOW A LEVEL THAT IS REASONABLY, APPROPRIATE, AND LEGAL, WHETHER IN GENERAL OR IN A SPECIFIC INDUSTRY. BY ACCESSING THE SOFTWARE, YOU FURTHER ACKNOWLEDGE THAT YOUR HIGH-RISK USE OF THE SOFTWARE IS AT YOUR OWN RISK.
Trademarks:
This project may contain trademarks or logos for projects, products, or services. Authorized use of Microsoft trademarks or logos is subject to and must follow Microsoft’s Trademark & Brand Guidelines. Use of Microsoft trademarks or logos in modified versions of this project must not cause confusion or imply Microsoft sponsorship. Any use of third-party trademarks or logos are subject to those third-party’s policies.
Data Collection:
The software may collect information about you and your use of the software and send it to Microsoft. Microsoft may use this information to provide services and improve our products and services. You may turn off the telemetry as described in the repository. There are also some features in the software that may enable you and Microsoft to collect data from users of your applications. If you use these features, you must comply with applicable law, including providing appropriate notices to users of your applications together with a copy of Microsoft’s privacy statement. Our privacy statement is located at here. You can learn more about data collection and use in the help documentation and our privacy statement. Your use of the software operates as your consent to these practices.
Note:
- No telemetry or data collection is directly added in this accelerator project. Please review individual telemetry information from the included Azure services regarding their APIs.